
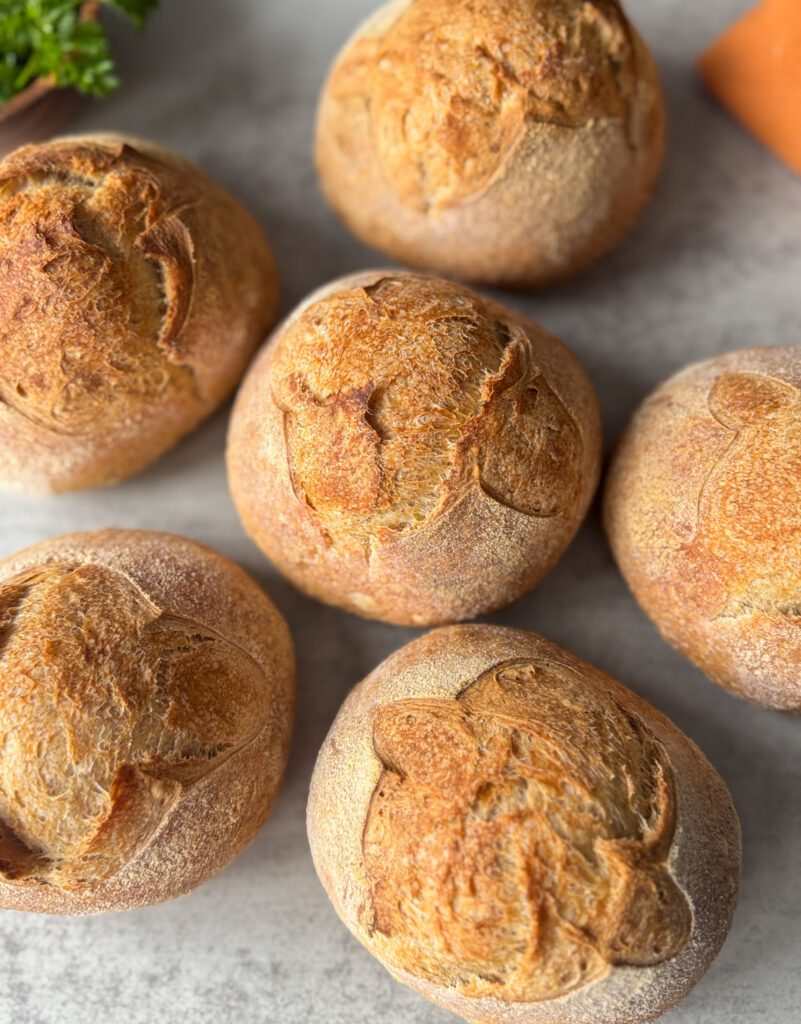
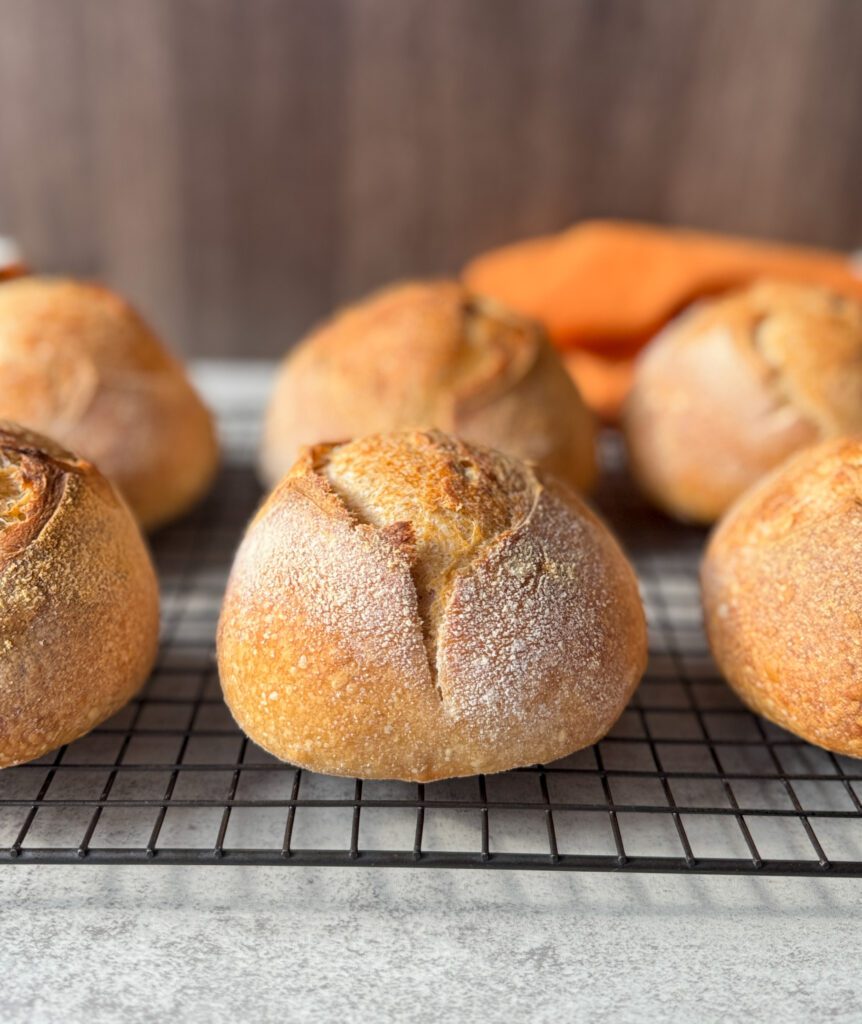
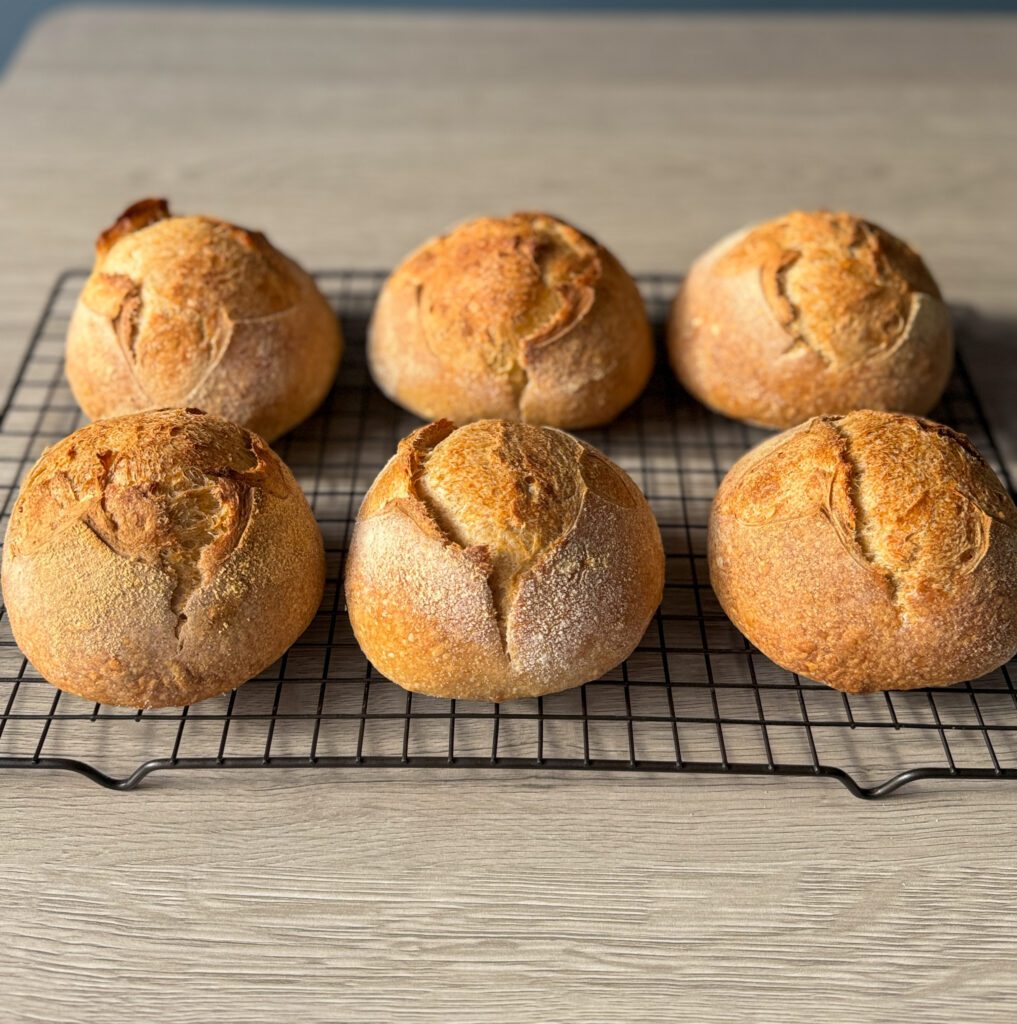
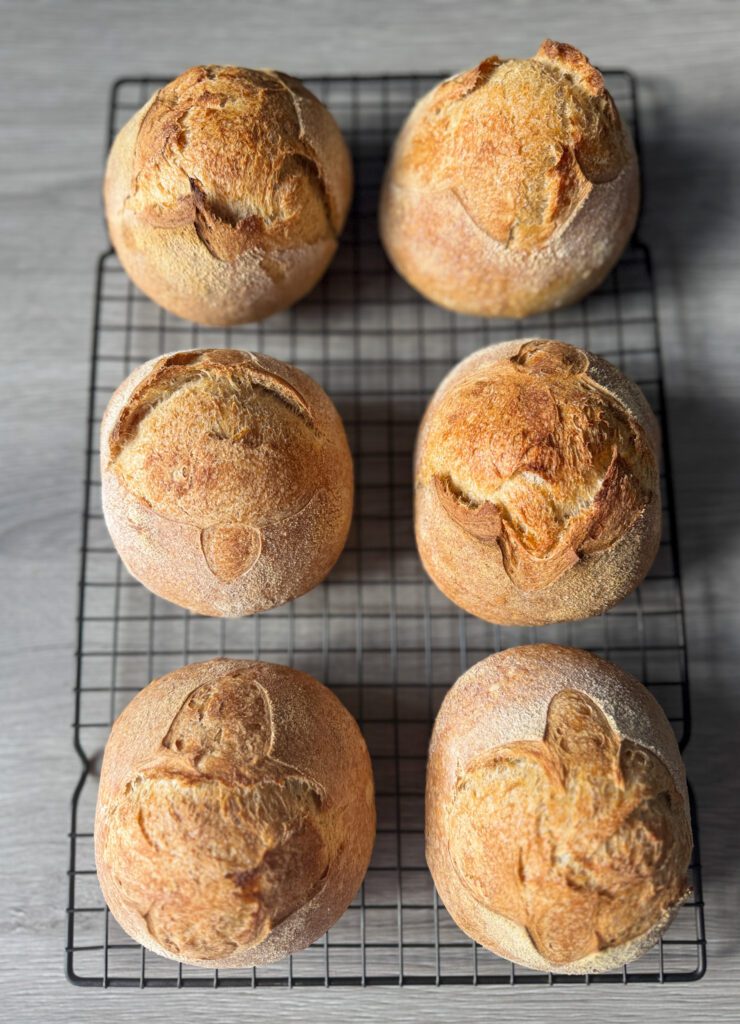
Who doesn’t love a fresh, crusty bread bowl filled with warm, comforting soup? These sourdough bread bowls have all the flavor and texture of a classic artisan loaf, golden crust, chewy interior, and that signature tang, just in a smaller, personal size. Perfect for pairing with a cozy bowl of soup or serving as mini loaves alongside a crisp green salad.
How to use sourdough bread bowls
These sourdough bread bowls are about 4-5 inches wide, the perfect personal size. While they’re ideal for serving warm, cozy soups, their versatility goes far beyond that. You can give each family member their own mini loaf, use them as individual bread servings, or enjoy them alongside any meal. These little sourdough boules are as charming as they are adaptable!

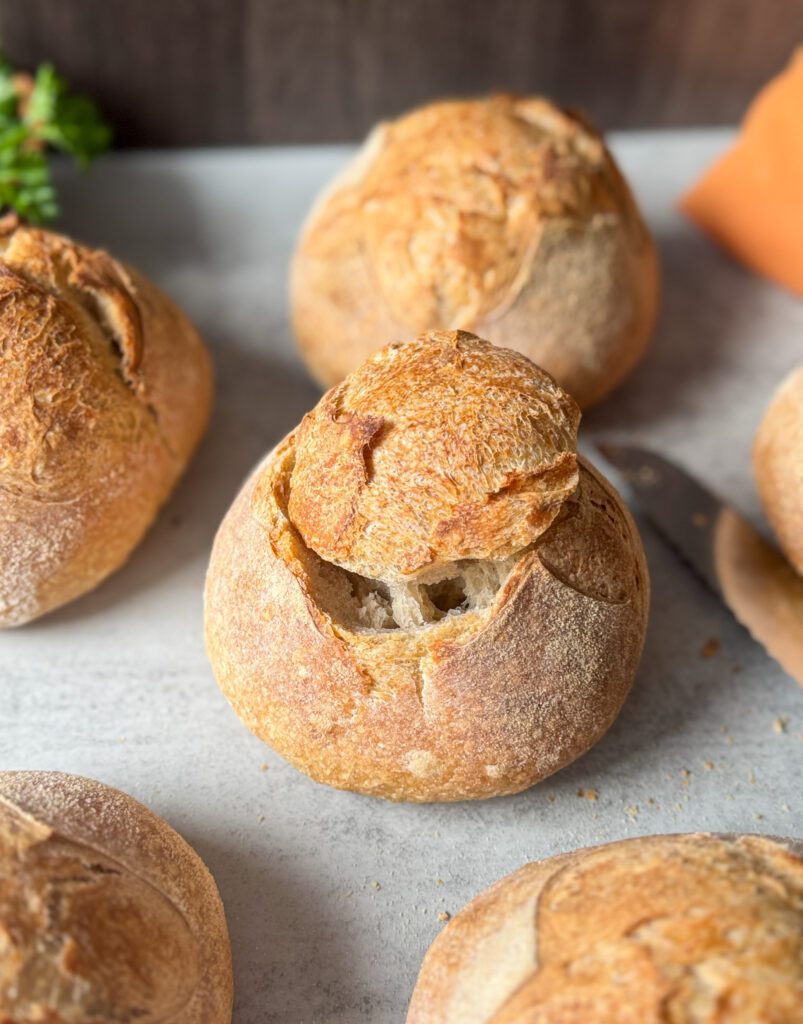
To use as a bread bowl for soup:
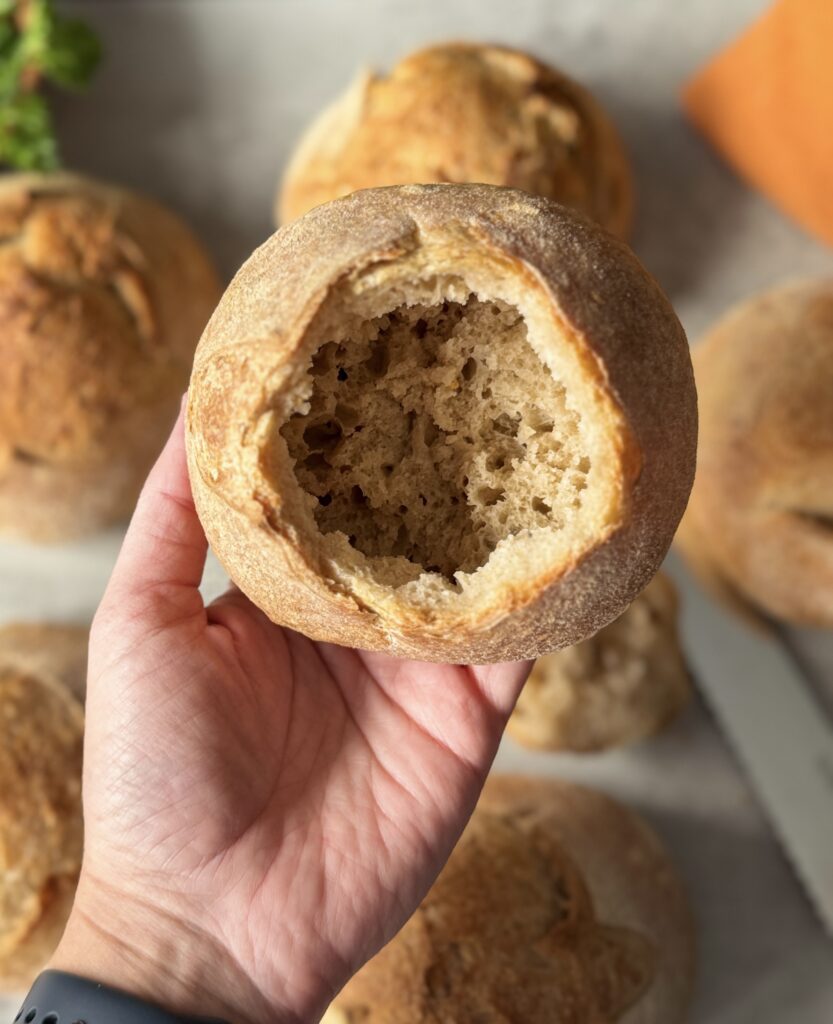
- Cut a 4–5 inch circle from the top of each loaf, this will be your “lid.” Gently lift it off, then use a spoon or your hands to scoop out some of the soft bread inside, creating space for your soup. Be sure to save those delicious bread pieces for dipping later!
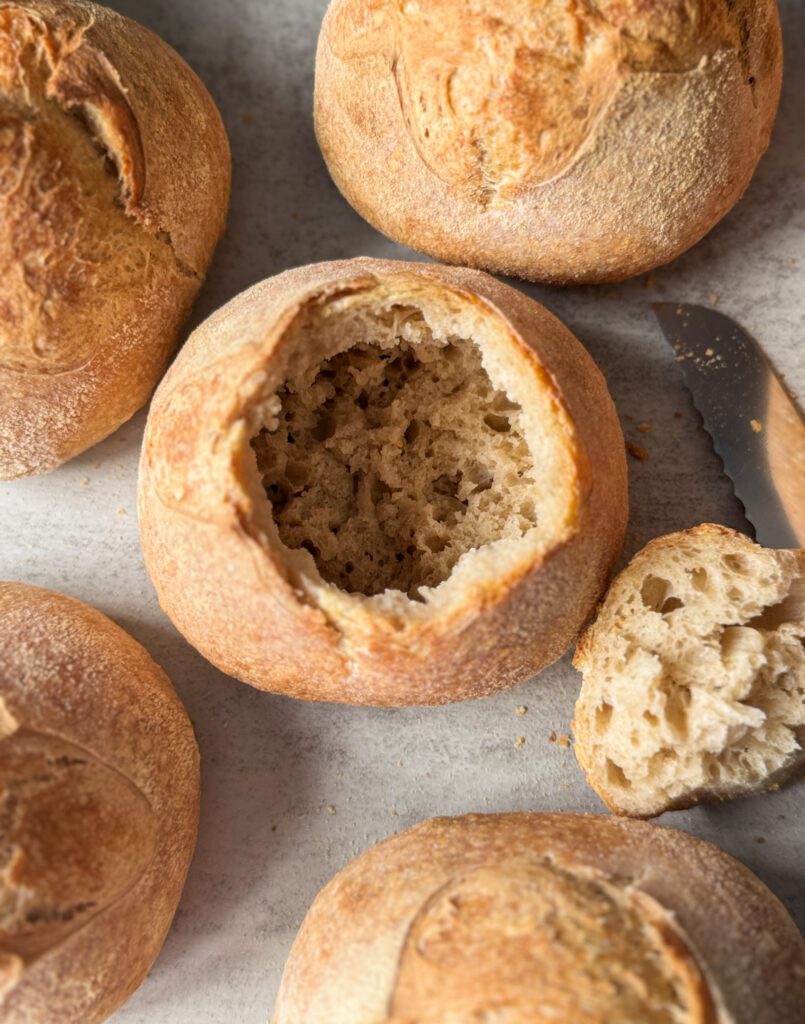
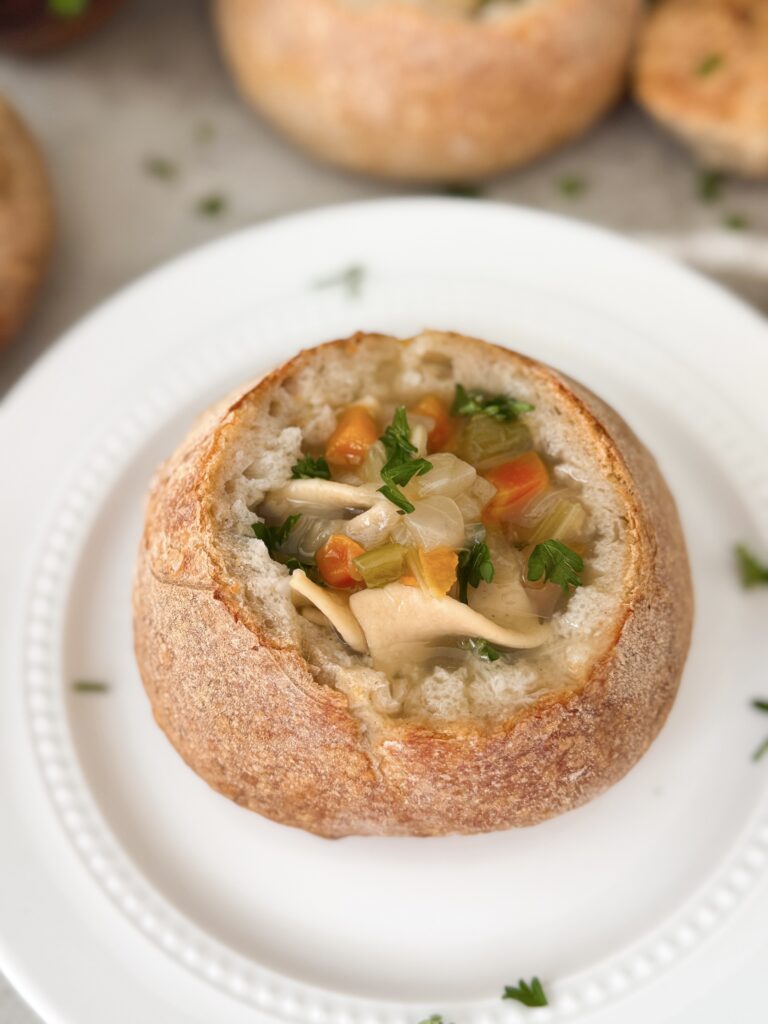
- Ladle the soup in the bread bowl and enjoy! The soup will soften the bread and the loaf will soak up all the flavor. Because these bowls are the perfect size you can comfortably eat an entire one to yourself 🙂
Tips before baking sourdough bread bowls
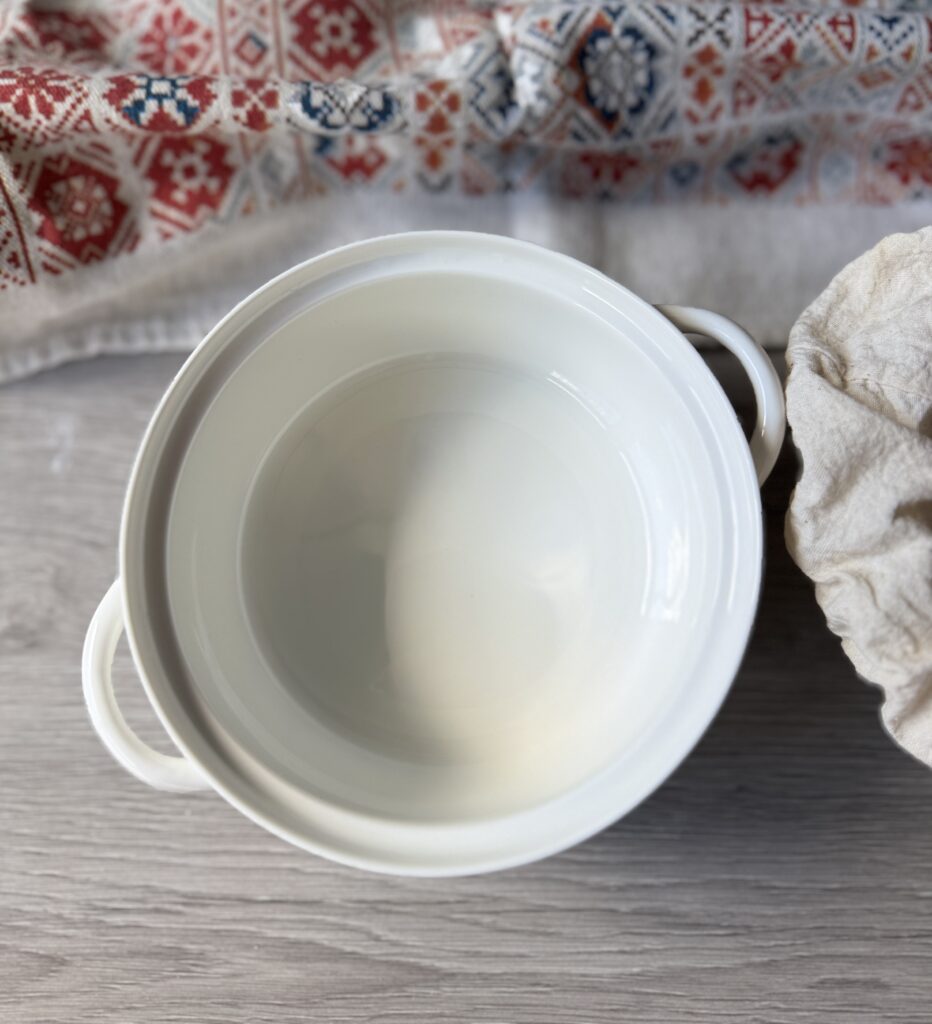
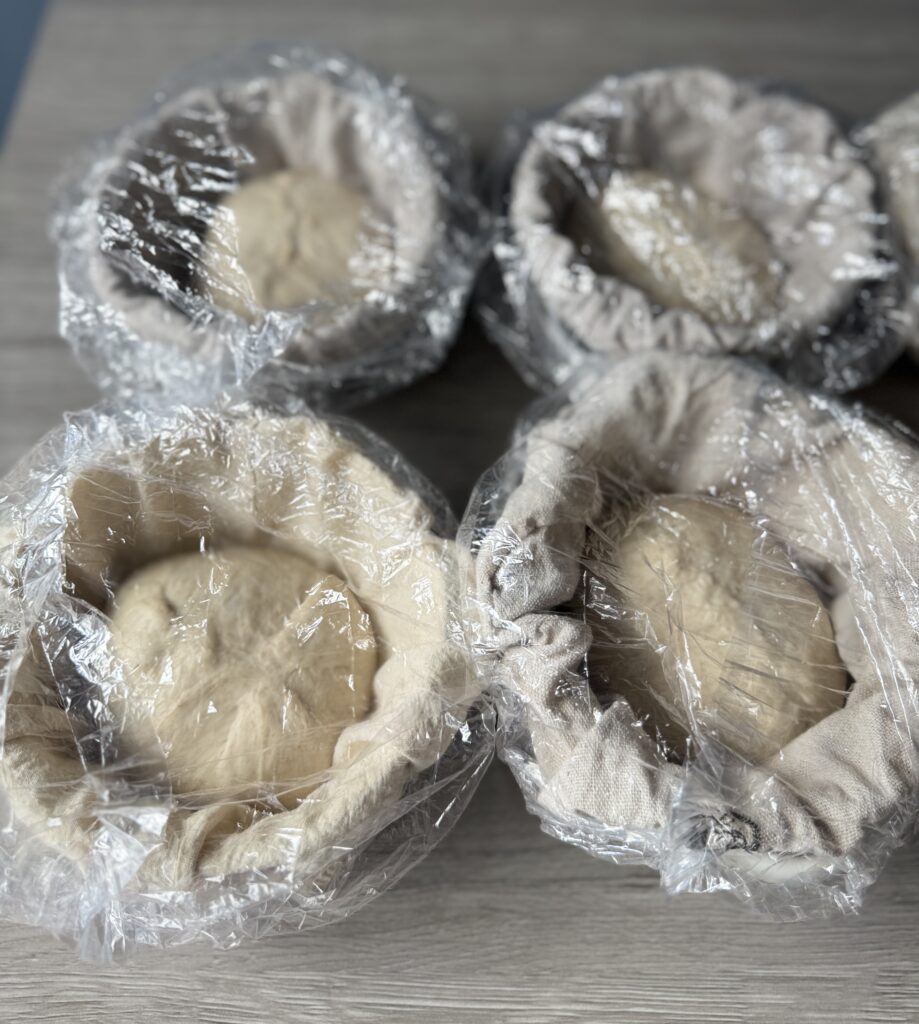
- Use 6-inch soup bowls for proofing: they’re the perfect size for shaping and supporting the dough as it rises. The bowls help the bread hold its round shape, giving you that classic bread bowl look once baked.
- Choose your loaf size: this recipe makes 5 to 6 bread bowls, depending on how you divide the dough:
- For 5 bread bowls, each will weigh about 300 grams- a more traditional, hearty size that’s perfect for a full serving of soup.
- For 6 bread bowls, each will be around 250 grams, still generous and ideal for smaller portions or serving alongside a meal.
- Plan for steam: A tray of ice in the oven or a few spritzes of water before baking helps create a crisp, golden crust, perfect for holding that cozy soup filling.
How to make sourdough bread bowls: step-by-step
Baker’s schedule: Feed your starter the night before, then mix your dough the next morning. Let it rise in a warm spot (around 73°F) until nearly doubled — about 6–7 hours for most kitchens. Once risen, shape the dough and place it in the refrigerator overnight. Bake fresh the following morning for the best flavor and texture.
Ingredients
- 100 grams active sourdough starter (bubbly and at peak)
- 550 grams of water
- 700 grams of bread flour
- 100 grams of whole wheat flour
- 18 grams salt
Do I have to use whole wheat flour? No, it simply adds extra flavor. You can use all bread flour instead and the recipe will turn out just as wonderful.
Equipment:
- Food scale
- Mixing bowl
- 5-6-inch soup bowls or mini banneton baskets
- Bench scraper
- Silicone scraping tool (optional but handy)
- Scoring tool or a razor
- Pizza steel or stone
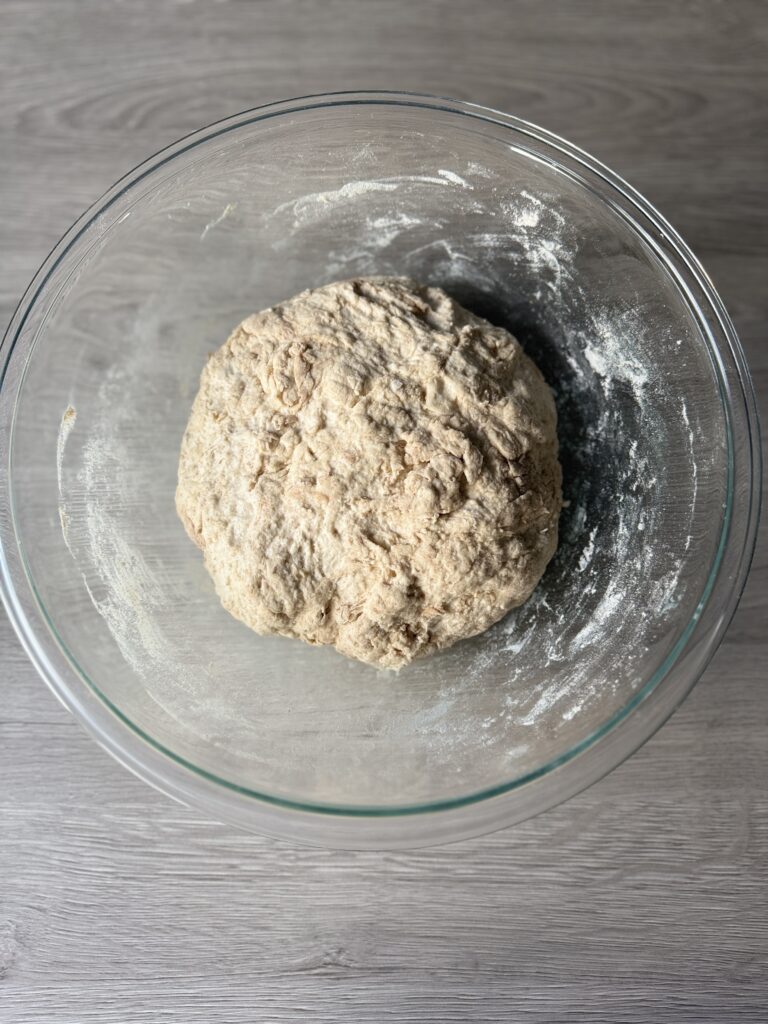
Mix the dough
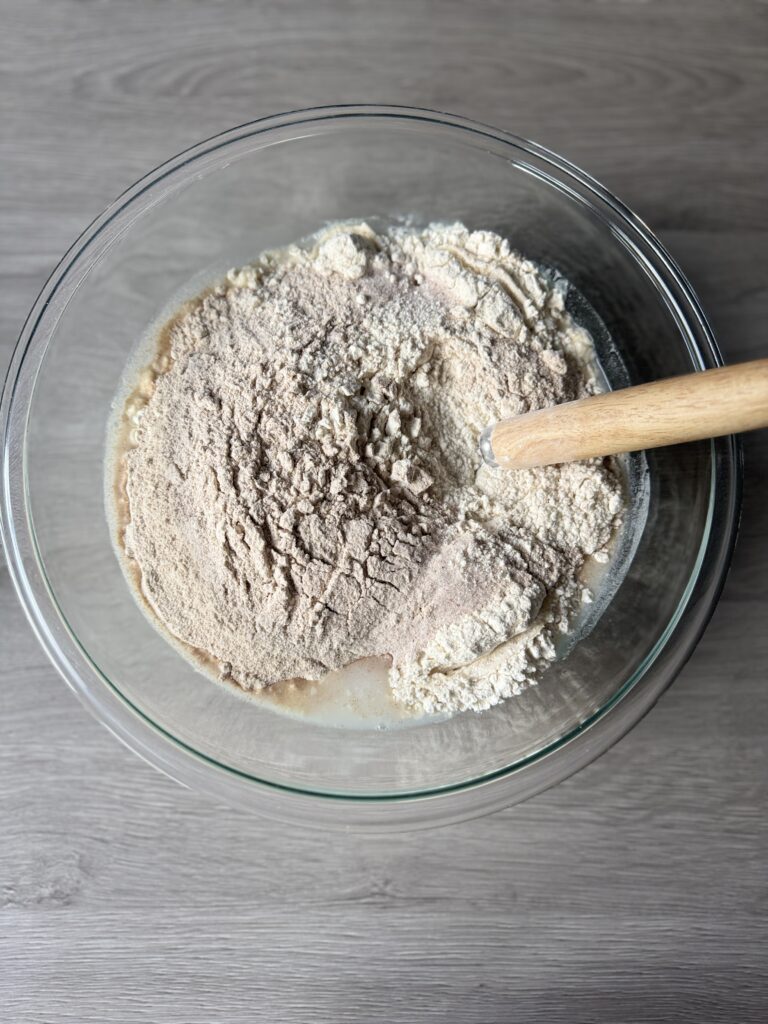
- In a large bowl, whisk together the sourdough starter and water until the starter is mostly dissolved and the mixture looks milky.
- Stir in the bread flour, whole wheat flour (if using), and salt until a rough dough forms.
- Cover the bowl and let it rest for 30 minutes to allow the flour to fully hydrate.
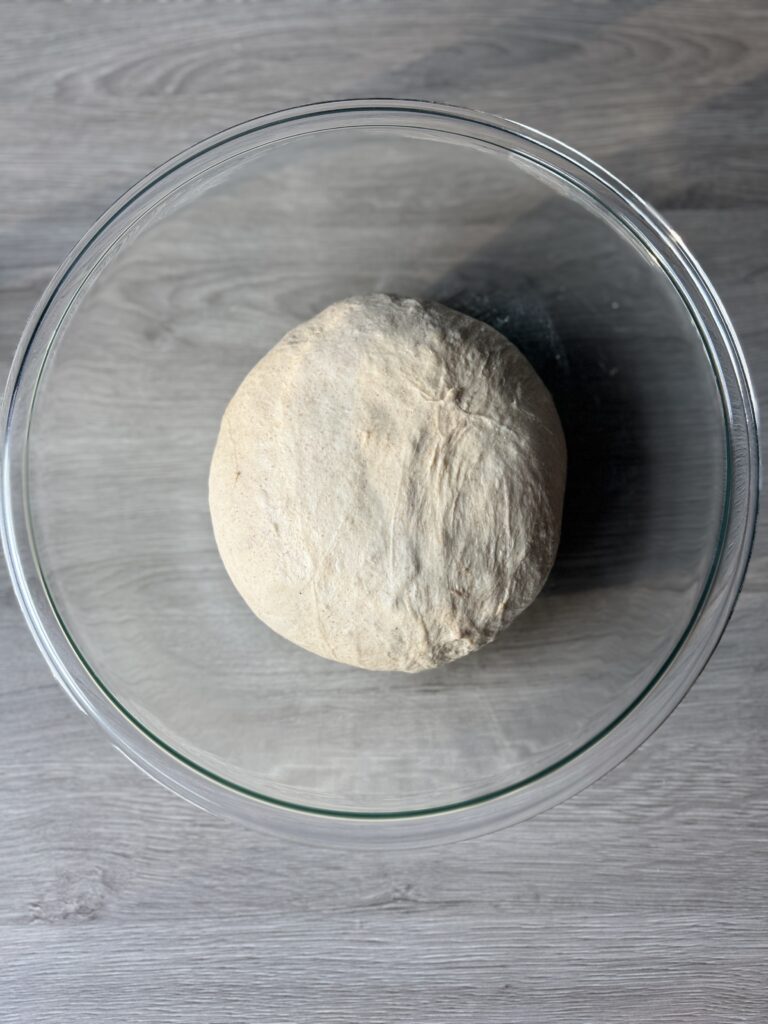
Strengthen the dough
- After the dough has rested, knead it gently for 3–5 minutes to build strength. You’ll notice it start to feel smoother and more elastic. Once it’s slightly stronger, cover the bowl and let the dough rest for another 30 minutes before moving on to the next step.
Stretch and folds
- After the dough has rested, perform the first stretch and fold.
- Scoop your hand under a portion of the dough, stretch it up a few inches, and fold it to the opposing side. Do this to each section of the dough (totaling about 4-5 sections).
- Cover the dough and let it rest and perform 2 more stretch and folds in 30-minute increments totaling 3.
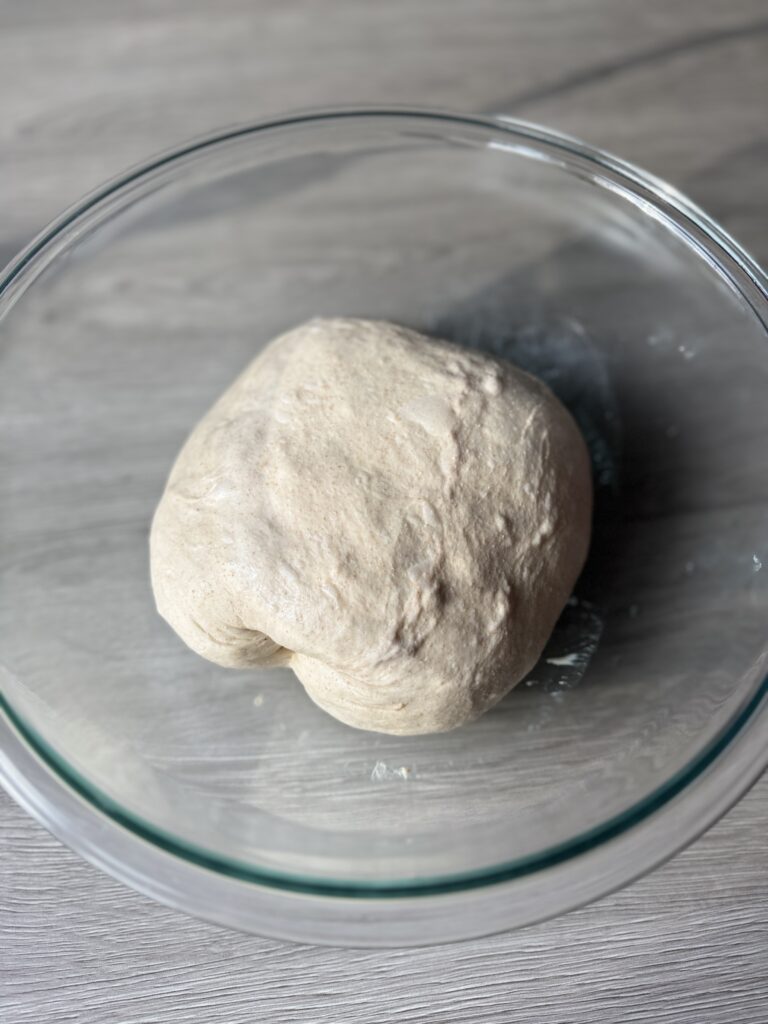
- Once all 4 stretch and folds have been completed, cover the dough and allow it to rest for the remaining of the bulk rise (until doubled in size).
Pre-shape the dough
- After the dough has completed its first bulk rise it should be doubled in size, have bubbles on the surface, and be jiggly.
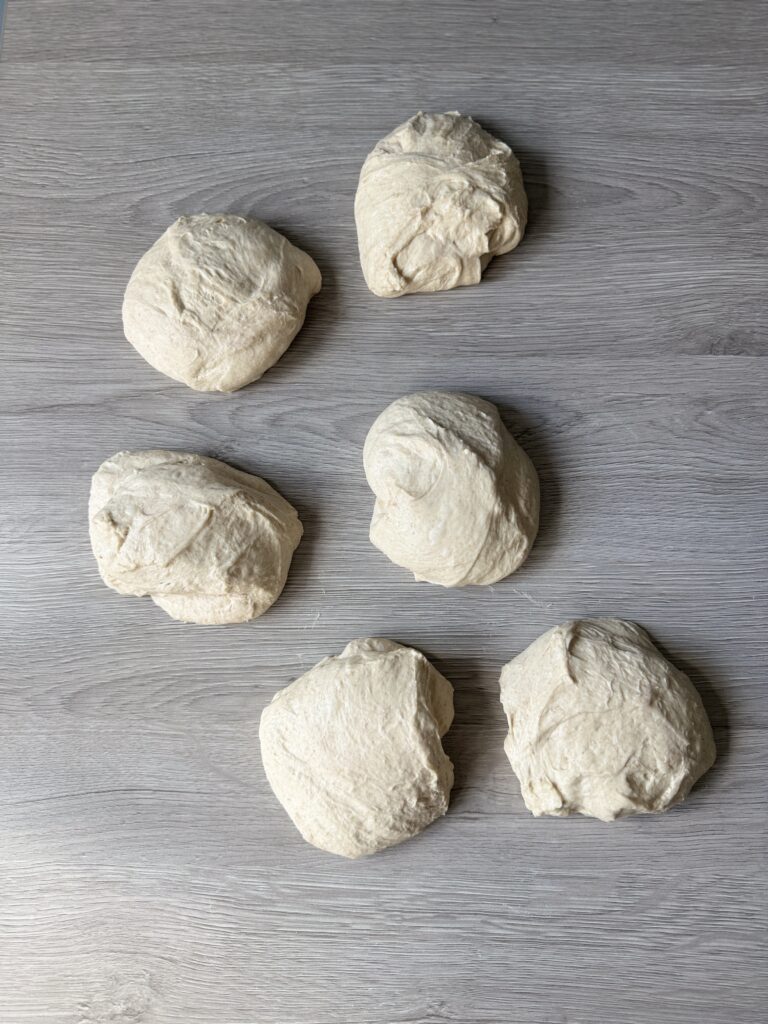
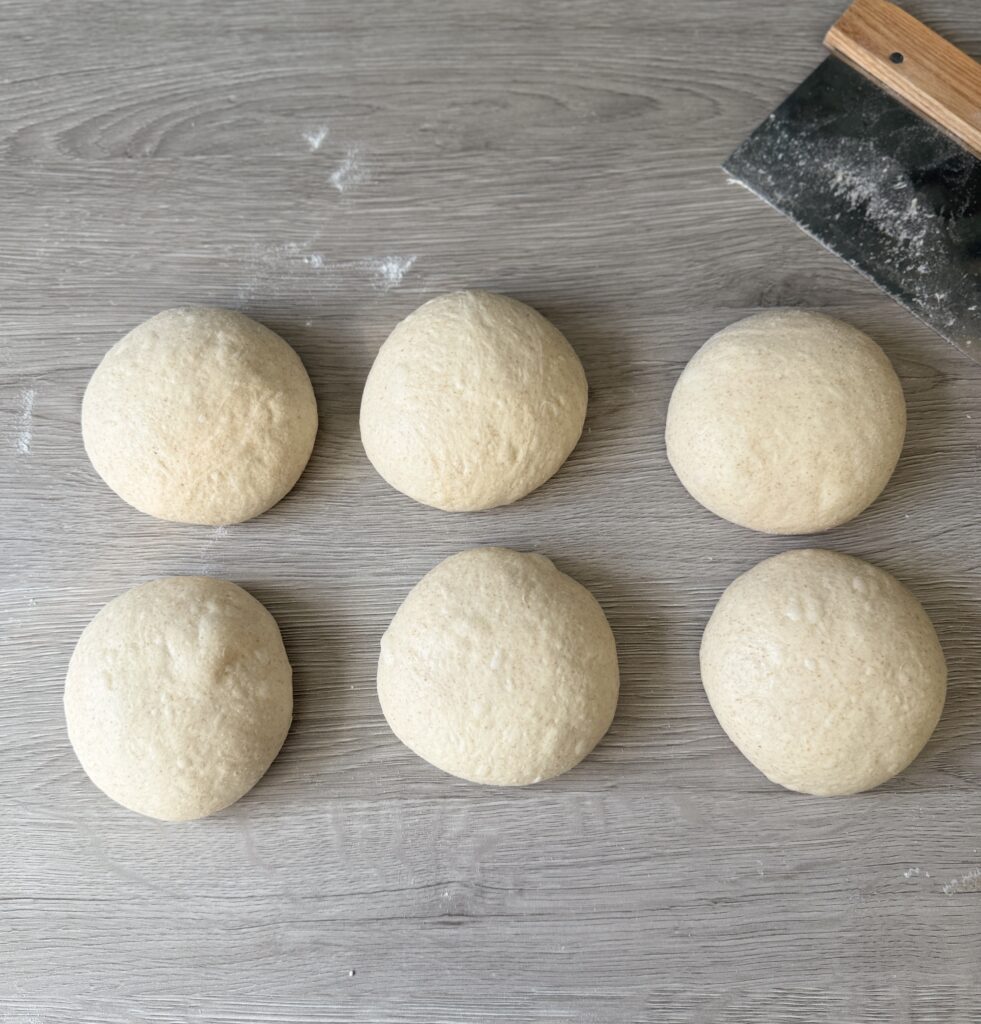
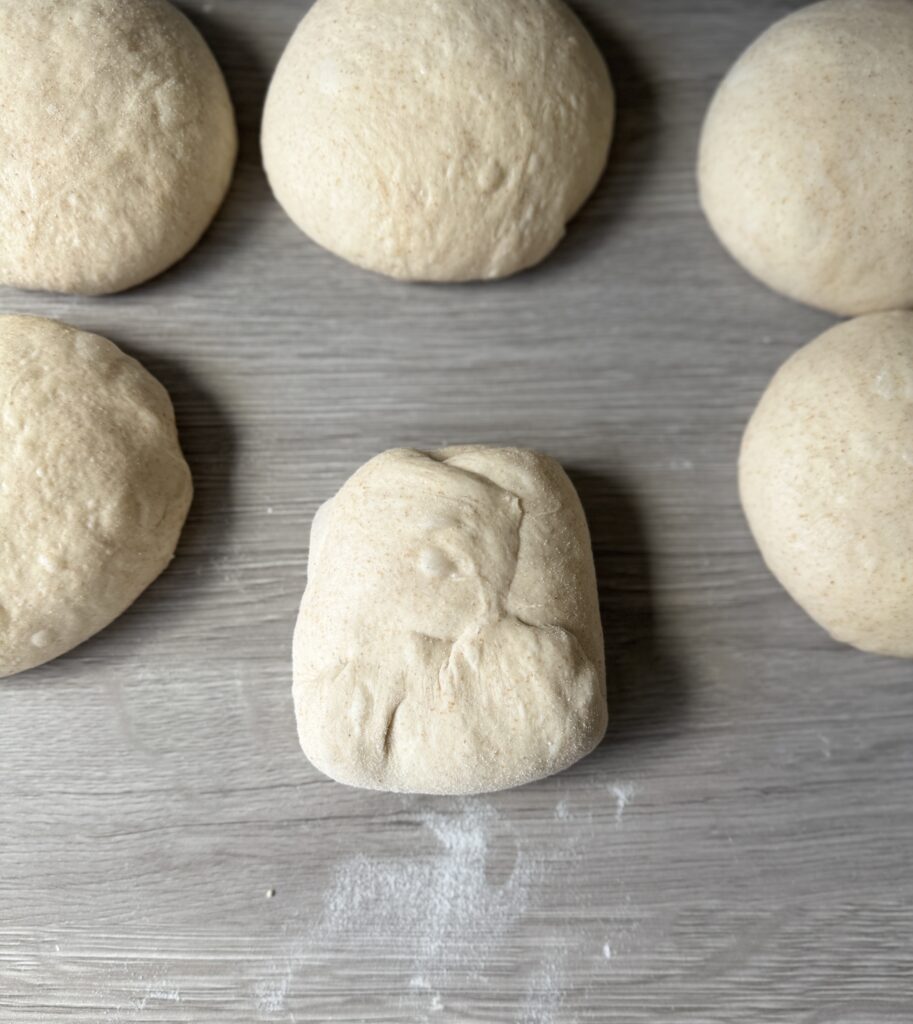
- Turn the dough out onto a lightly floured surface and divide it into 5 equal portions, about 300 grams each. For smaller servings, you can divide the dough into 6 portions, roughly 250 grams each, both sizes bake up beautifully.
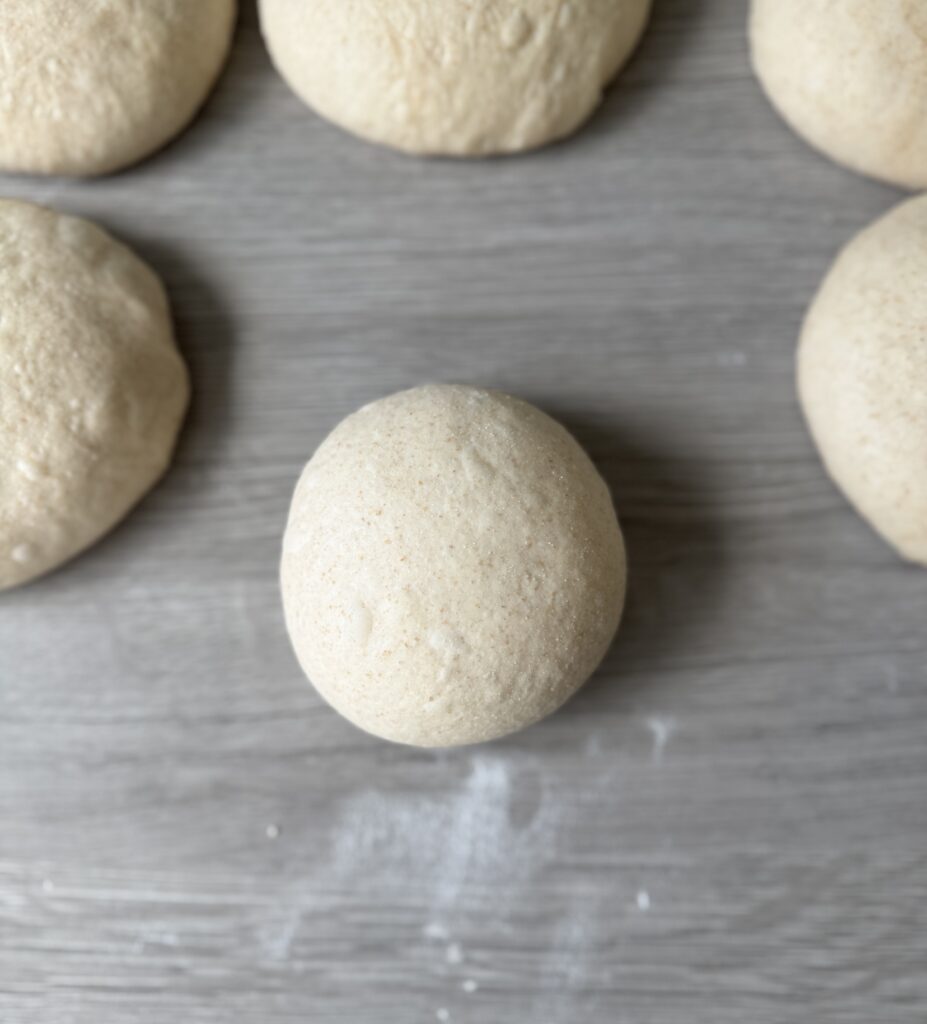
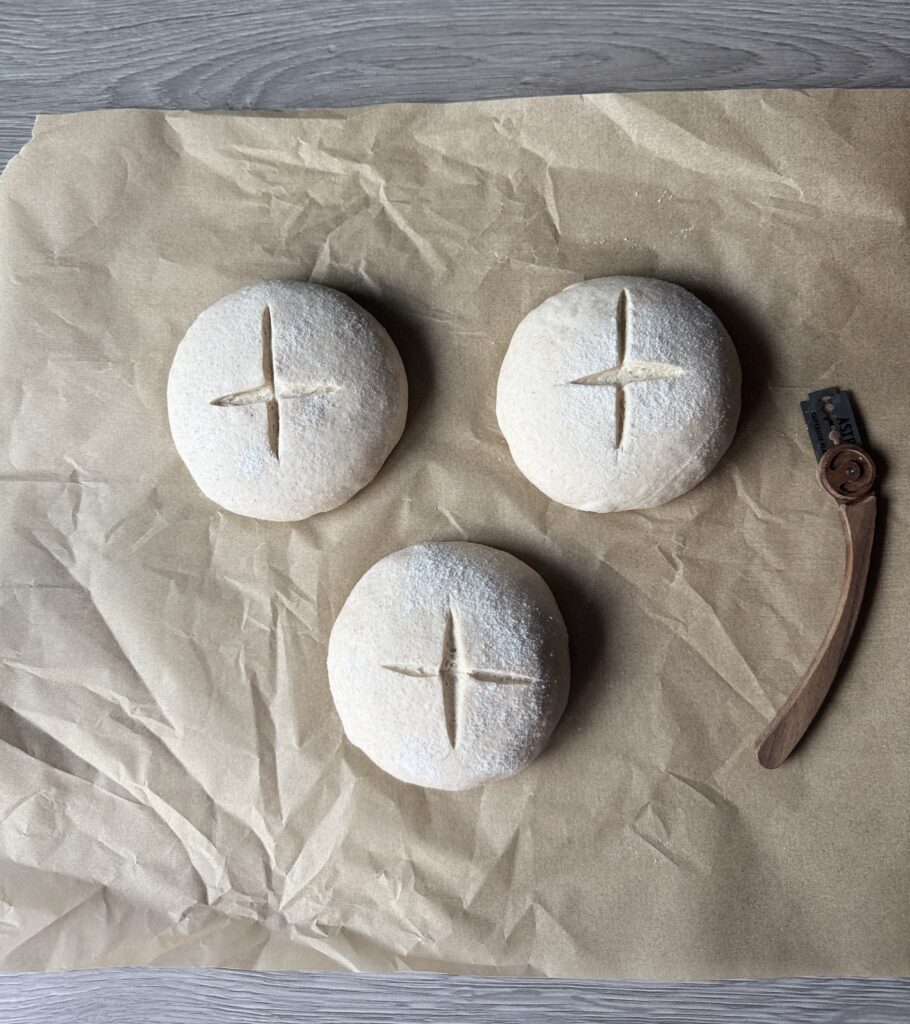
- Gently shape each piece of dough into a smooth circle, cover with a towel, and let it rest for 15–30 minutes, this short rest makes the final shaping easier.
Final shaping
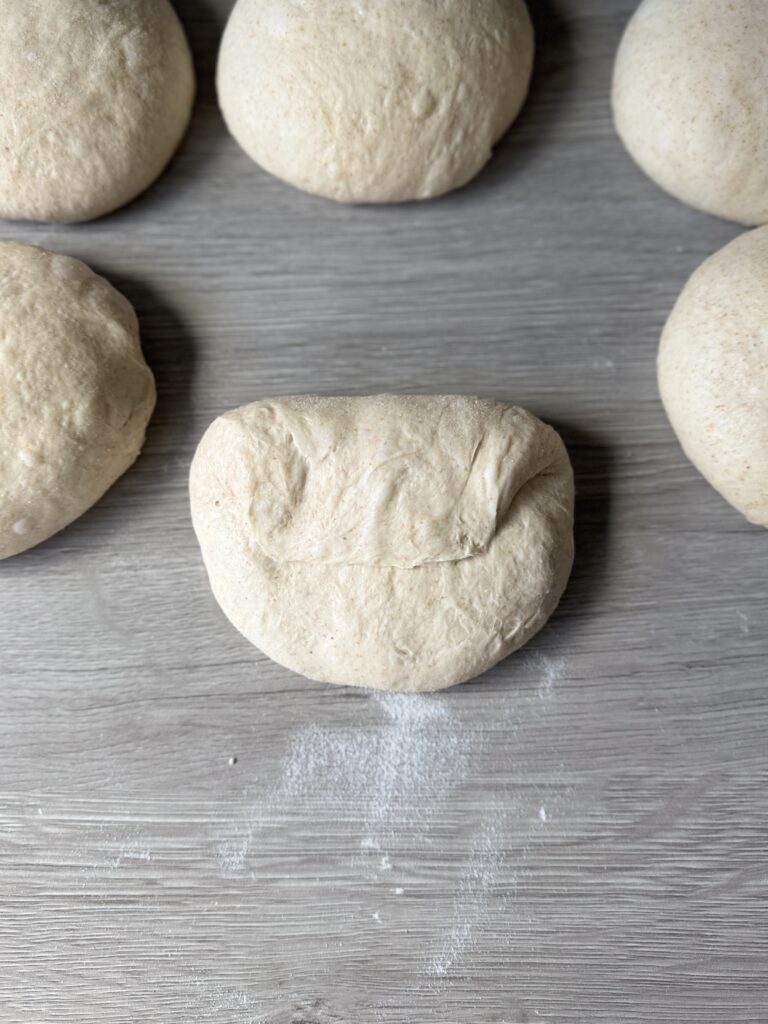
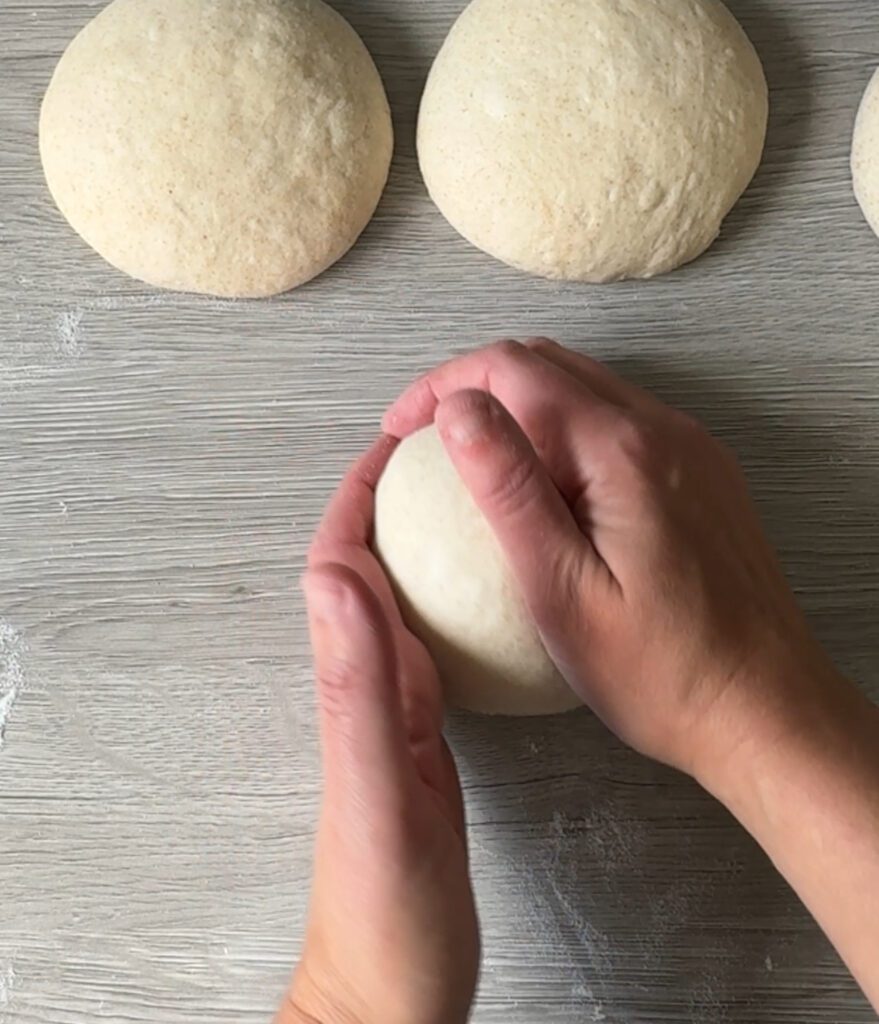
- Turn one piece of dough onto a lightly floured countertop, smooth side down.
- Gently flatten the dough just a bit, then fold the top edge down toward the center, followed by the right and left sides, and finally the bottom edge up over the center, like folding an envelope.
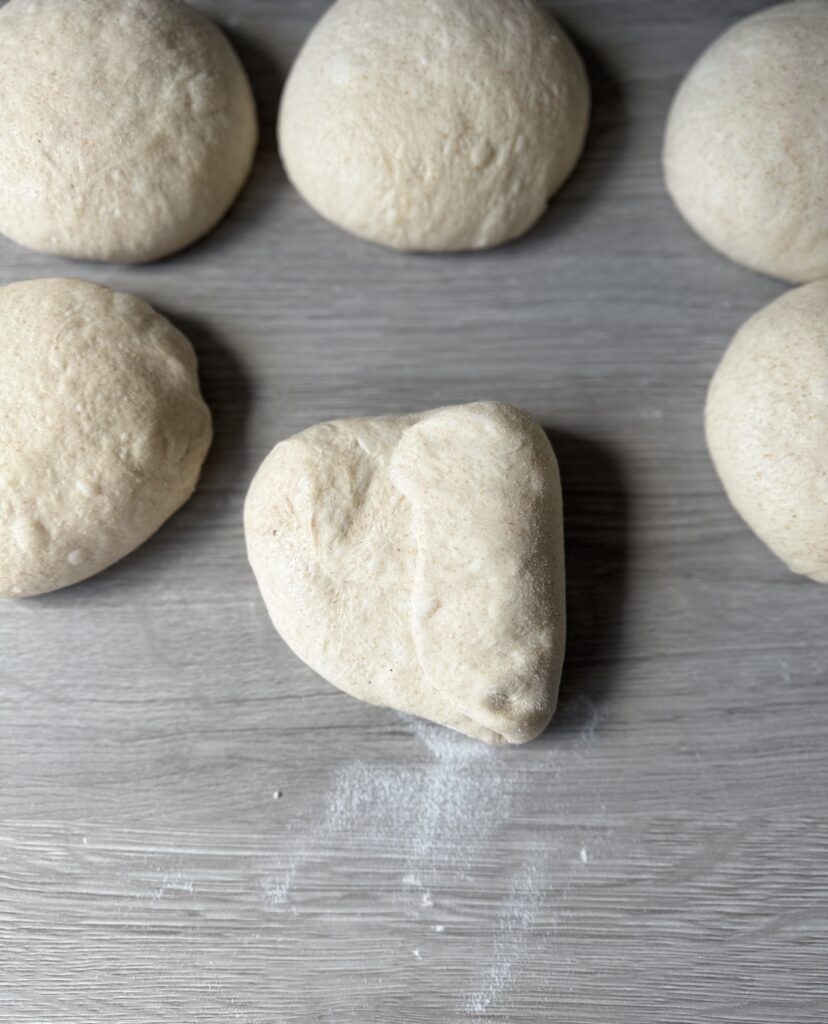
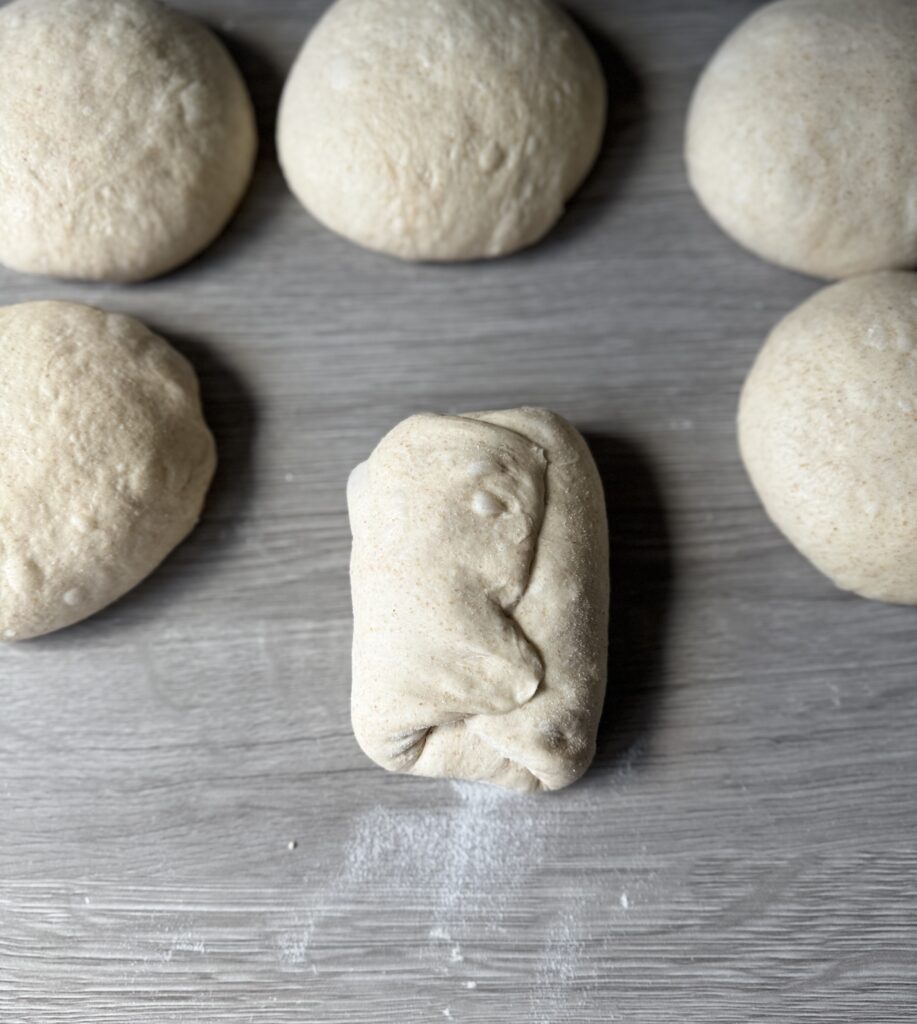
- Carefully flip the dough over so the smooth side is facing up. Use your hands to cup and gently rotate the dough, pulling it toward you to create surface tension and form a tight, round ball.
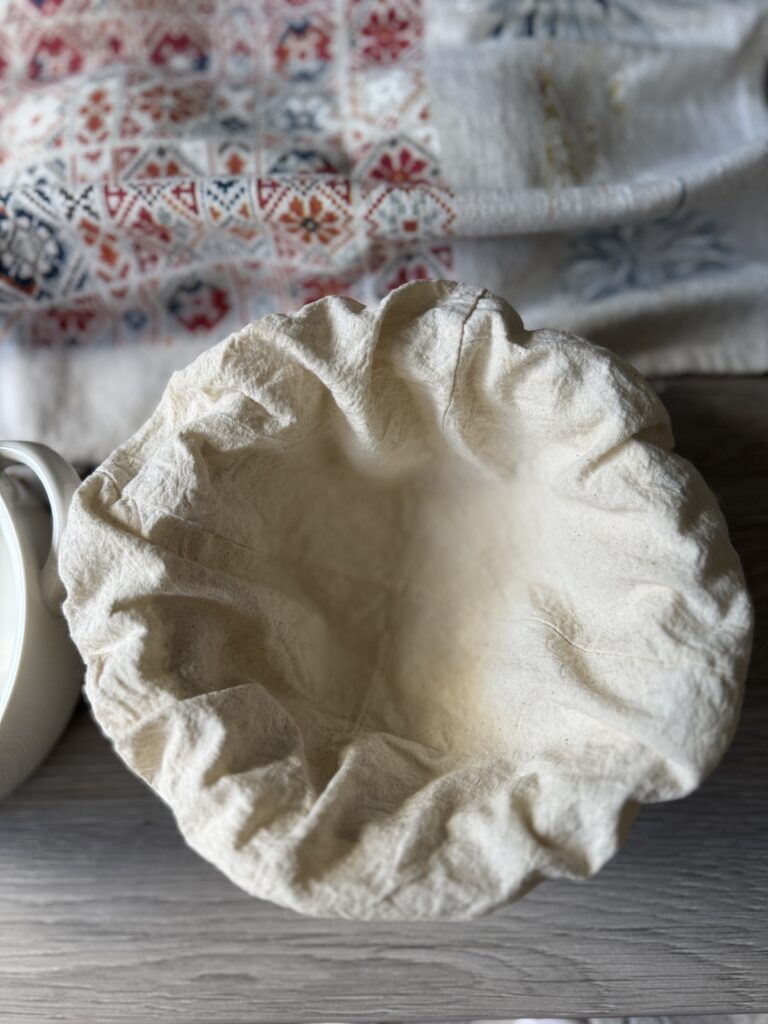
- Once shaped, place the dough seam side up into your lightly floured 6-inch soup bowl for proofing. Repeat with the remaining dough pieces. Tip: Line soup bowls with floured cloth liners or tea towels to keep the dough from sticking.

- Cover the shaped dough with plastic wrap or a towel and refrigerate overnight (12–18 hours) for a slow, flavorful rise. Tip: I love using reusable shower caps as covers for my dough!
Score and Bake
- The following morning, preheat the oven to 450 degrees with the pizza stone or steel in the oven for 30 minutes.
- When ready to place the dough in the oven, remove three dough balls from the refrigerator and place them on parchment paper (about an inch apart) smooth side up. They will need to be baked in 2 batches.
- Use a sharp razor or bread lame to score an “X” on the top of each bread bowl. This allows the dough to expand beautifully as it bakes and prevents it from splitting unevenly.
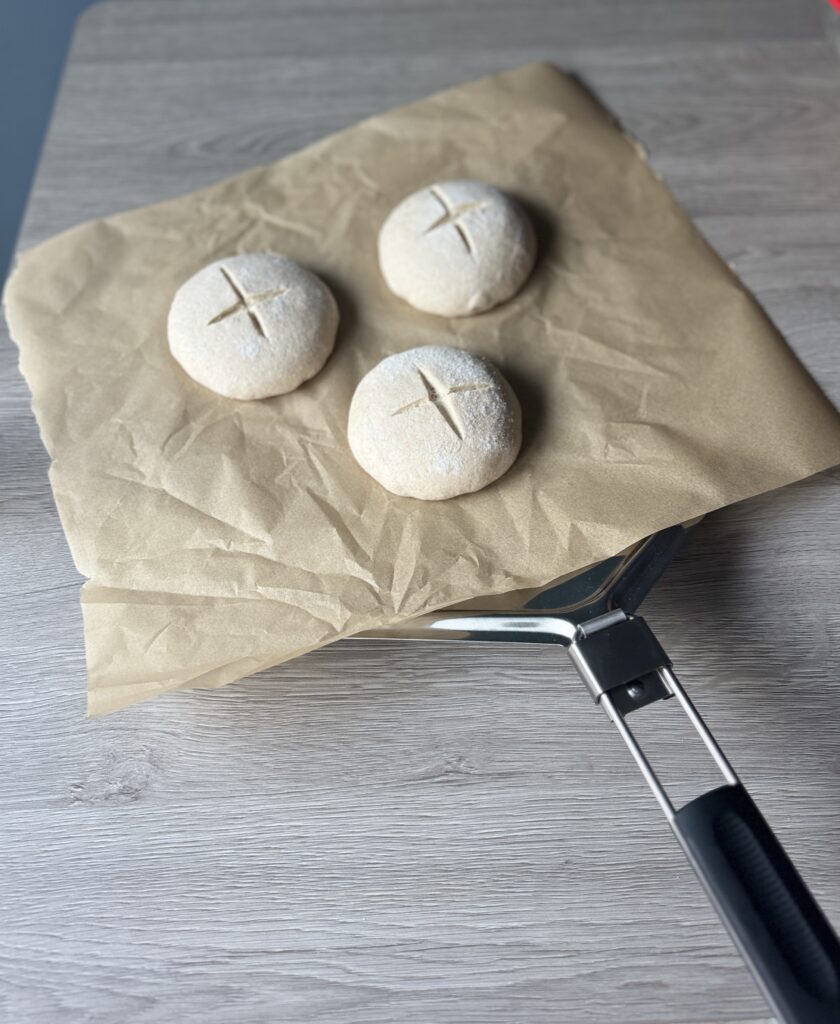
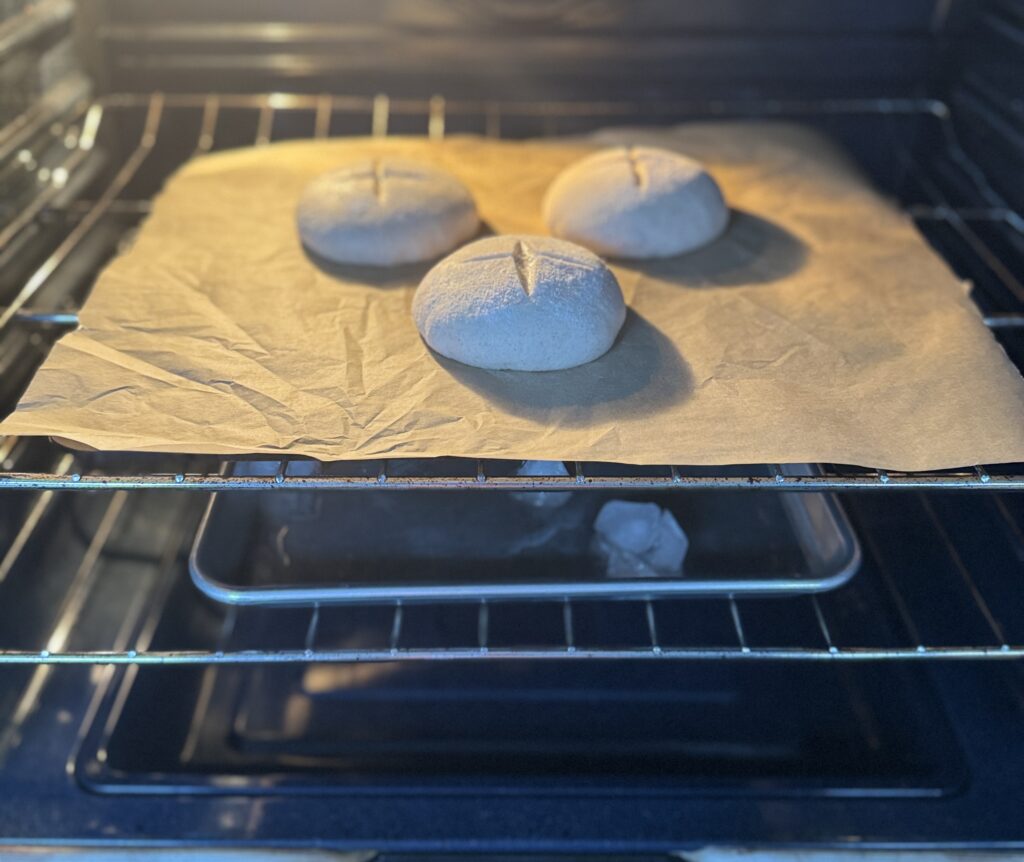
- Transfer the parchment paper with the dough balls to the pizza stone and bake for 30-35 minutes. Tip: I love using this pizza peel for easy transferring!
- Simultaneously place a metal tray at the bottom of your oven with 1 cup of ice on it to create steam to give the bread that beautiful, brown crust.
- Baking in a Dutch oven? You can fit two bread bowls at a time. Bake covered at 450°F for 20 minutes, then uncovered for 15–20 minutes more. No need for ice in this case!
- Allow the bread bowls to cool fully before slicing and serving. Cooling helps preserve their soft interior and crisp crust.
- Sourdough bread bowls stay fresh for up to 3 days at room temperature when stored in a paper bag or loosely covered to keep the crust crisp.
- Freezing instructions: For longer storage, freeze them for up to 2 months, just let them cool completely, then wrap tightly in plastic wrap or a freezer bag. Reheat in the oven at 350°F (175°C) for 10–15 minutes to refresh.

More sourdough bread recipes
- Sourdough Ghost Fougasse (easy Halloween recipe)
- Soft & Fluffy Sourdough Challah (same day bake!)
- Greek Yogurt Sourdough Discard Flatbread
- Simple Sourdough Recipe

Sourdough Bread Bowls (Soft, Sturdy & Perfect for Soup!)
These homemade sourdough bread bowls capture the classic flavor of traditional sourdough, perfectly sized to hold your favorite soups or stews.
Equipment
- Food scale
- Mixing bowl
- 5-6-inch soup bowls or mini banneton baskets
- Bench scraper
- Scoring tool or a razor
- Pizza steel or stone
Ingredients
- 100 grams active sourdough starter (bubbly and at peak)
- 550 grams water
- 700 grams bread flour
- 100 grams whole wheat flour
- 18 grams salt
Instructions
Mix the dough
-
In a large bowl, whisk together the sourdough starter and water until the starter is mostly dissolved and the mixture looks milky.
-
Stir in the bread flour, whole wheat flour (if using), and salt until a rough dough forms.
-
Cover the bowl and let it rest for 30 minutes to allow the flour to fully hydrate.
Strengthen the dough
-
After the dough has rested, knead it gently for 3–5 minutes to build strength. You’ll notice it start to feel smoother and more elastic. Once it’s slightly stronger, cover the bowl and let the dough rest for another 30 minutes before moving on to the next step.
Stretch and folds
-
After the dough has rested, perform the first stretch and fold.
-
Scoop your hand under a portion of the dough, stretch it up a few inches, and fold it to the opposing side. Do this to each section of the dough (totaling about 4-5 sections).
-
Cover the dough and let it rest and perform 2 more stretch and folds in 30-minute increments totaling 3.
-
Once all stretch and folds have been completed, cover the dough and allow it to rest for the remaining of the bulk rise (until doubled in size).
Pre-shape the dough
-
After the dough has completed its first bulk rise it should be doubled in size, have bubbles on the surface, and be jiggly.
-
Turn the dough out onto a lightly floured surface and divide it into 5 equal portions, about 300 grams each. For smaller servings, you can divide the dough into 6 portions, roughly 250 grams each, both sizes bake up beautifully.
-
Gently shape each piece of dough into a smooth circle, cover with a towel, and let it rest for 15–30 minutes, this short rest makes the final shaping easier.
Final shaping
-
Turn one piece of dough onto a lightly floured countertop, smooth side down.
-
Gently flatten the dough just a bit, then fold the top edge down toward the center, followed by the right and left sides, and finally the bottom edge up over the center, like folding an envelope.
-
Carefully flip the dough over so the smooth side is facing up. Use your hands to cup and gently rotate the dough, pulling it toward you to create surface tension and form a tight, round ball.
-
Once shaped, place the dough seam side up into your lightly floured 6-inch soup bowl for proofing. Repeat with the remaining dough pieces. Tip: Line soup bowls with floured cloth liners or tea towels to keep the dough from sticking.
-
Cover the shaped dough with plastic wrap or a towel and refrigerate overnight (12–18 hours) for a slow, flavorful rise. Tip: I love using reusable shower caps as covers for my dough!
Score and Bake
-
The following morning, preheat the oven to 450 degrees with the pizza stone or steel in the oven for 30 minutes.
-
When ready to place the dough in the oven, remove three dough balls from the refrigerator and place them on parchment paper (about an inch apart) smooth side up. They will need to be baked in 2 batches.
-
Use a sharp razor or bread lame to score an “X” on the top of each bread bowl. This allows the dough to expand beautifully as it bakes and prevents it from splitting unevenly.
-
Transfer the parchment paper with the dough balls to the pizza stone and bake for 30-35 minutes. Tip: I love using this pizza peel for easy transferring!
-
Simultaneously place a metal tray at the bottom of your oven with 1 cup of ice on it to create steam to give the bread that beautiful, brown crust.
-
Baking in a Dutch oven? You can fit two bread bowls at a time. Bake covered at 450°F for 20 minutes, then uncovered for 15–20 minutes more. No need for ice in this case!
-
Allow the bread bowls to cool fully before slicing and serving. Cooling helps preserve their soft interior and crisp crust.
-
Sourdough bread bowls stay fresh for up to 3 days at room temperature when stored in a paper bag or loosely covered to keep the crust crisp.
-
Freezing instructions: For longer storage, freeze them for up to 2 months, just let them cool completely, then wrap tightly in plastic wrap or a freezer bag. Reheat in the oven at 350°F (175°C) for 10–15 minutes to refresh.
Notes
Baker's schedule: Feed your starter the night before, then mix your dough the next morning. Let it rise in a warm spot (around 73°F) until nearly doubled — about 6–7 hours for most kitchens. Once risen, shape the dough and place it in the refrigerator overnight. Bake fresh the following morning for the best flavor and texture.
Do I have to use whole wheat flour? No, it simply adds extra flavor. You can use all bread flour instead and the recipe will turn out just as wonderful.

Comments