
Tis the season for crafting a delightful pumpkin-shaped sourdough bread to bring in the holiday spirit! I’ve written out step-by-step instructions to equip you with the essential knowledge to create this seasonal masterpiece. While this is not a pumpkin-flavored bread, I will provide my go-to sourdough recipe for this design. Make sure to check out “tips for success” before you begin and get ready to elevate your baking game with this festive creation!
If you want to skip the baking instructions and use your own recipe that is okay too! To simply jump to the shaping steps click here.
What is pumpkin-shaped sourdough bread?
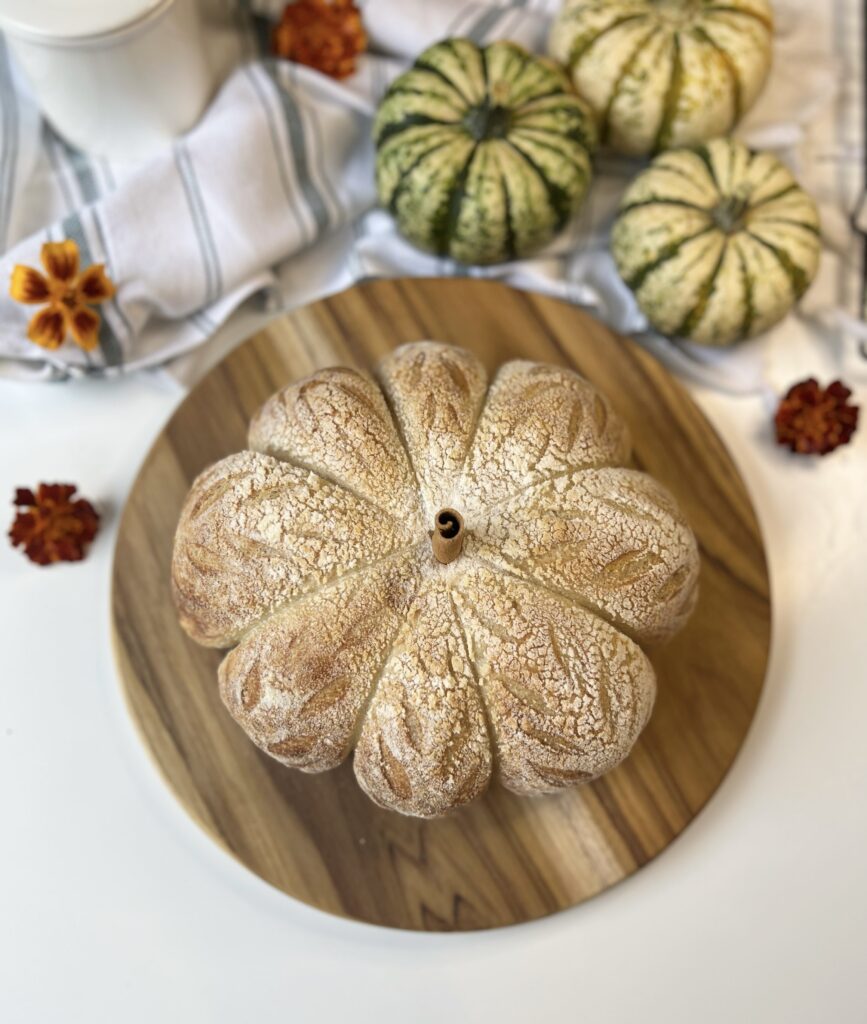
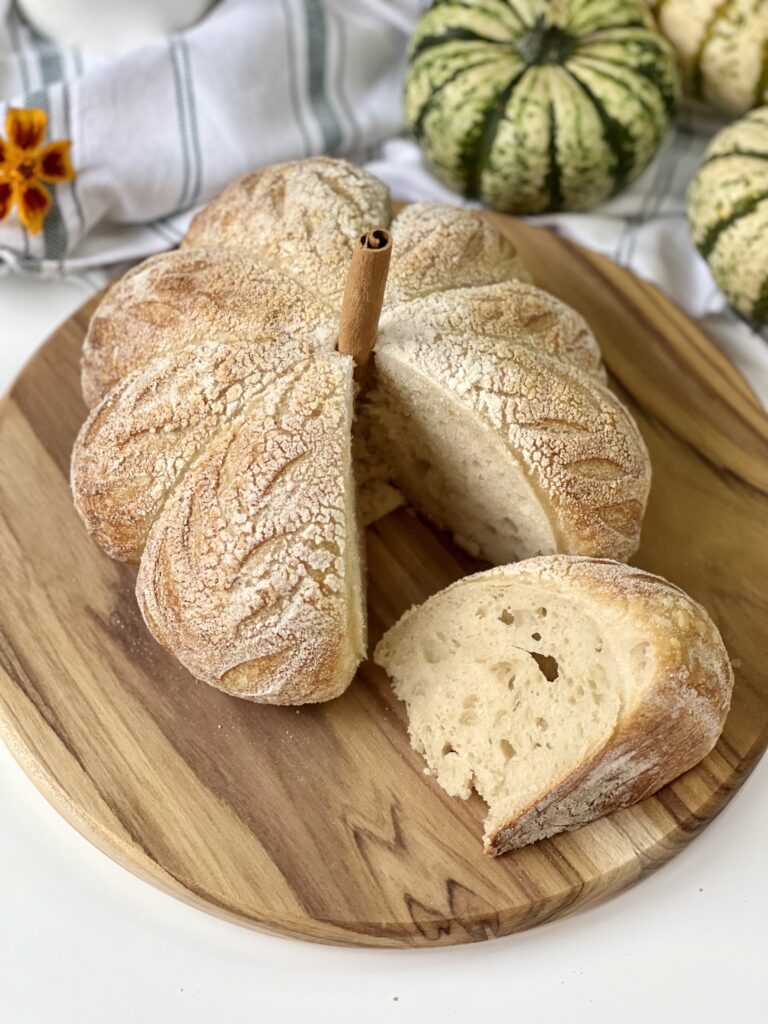
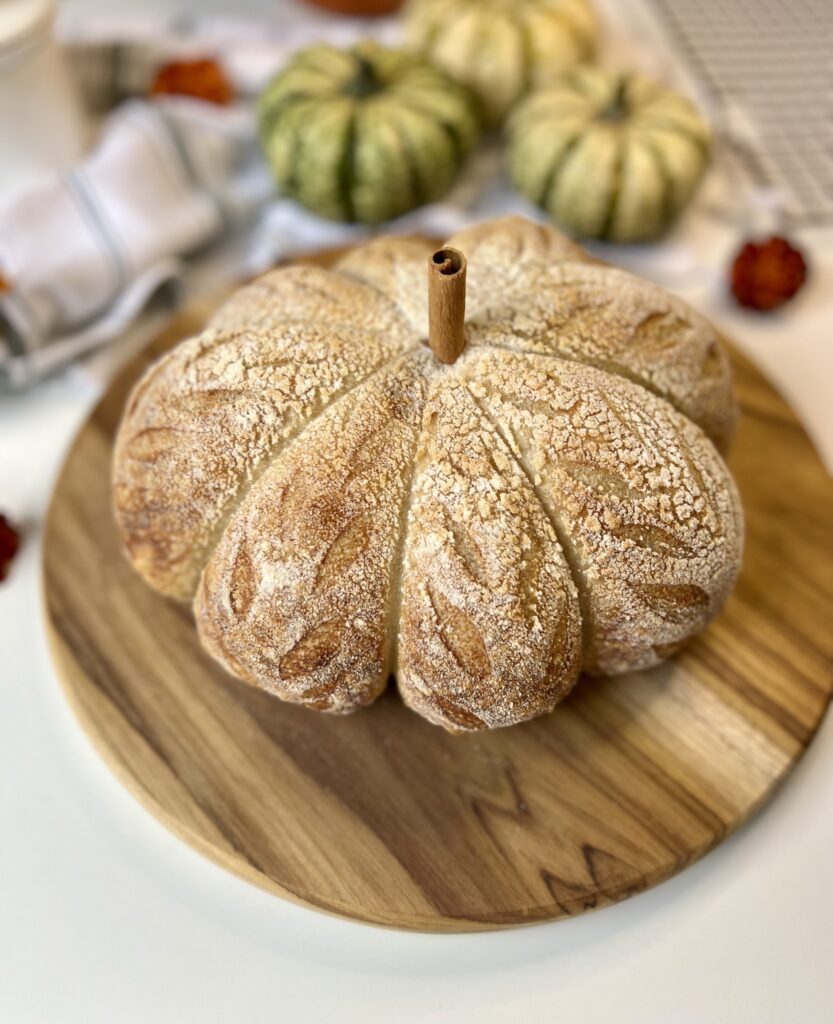
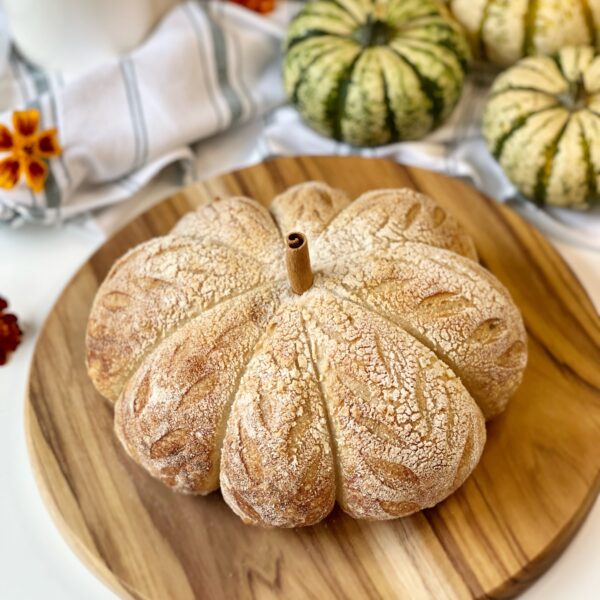
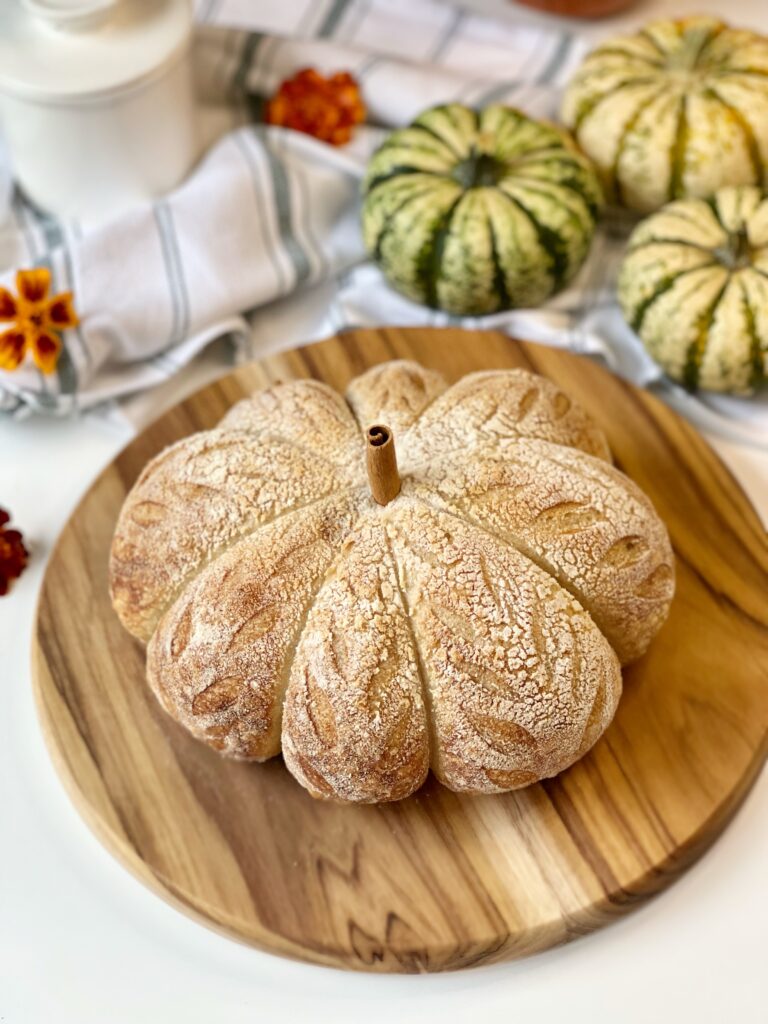
Pumpkin-shaped sourdough bread is a delightful and visually appealing twist on traditional sourdough bread. This artisanal bread is shaped like a pumpkin, making it a perfect addition to your autumn table or holiday gatherings. It is still crafted with the same sourdough fermentation process that gives sourdough its distinctive tangy flavor and chewy texture. It is usually finished with a cinnamon stick stem that really gives it that final touch.
The design allows for a fun and innovative way of slicing the bread, where you can enjoy a fluffy chunk with your topping of choice!
Tips for Success
Before you begin baking your pumpkin-shaped sourdough bread, make sure to read the helpful hints below! This will ensure you are set up for success.
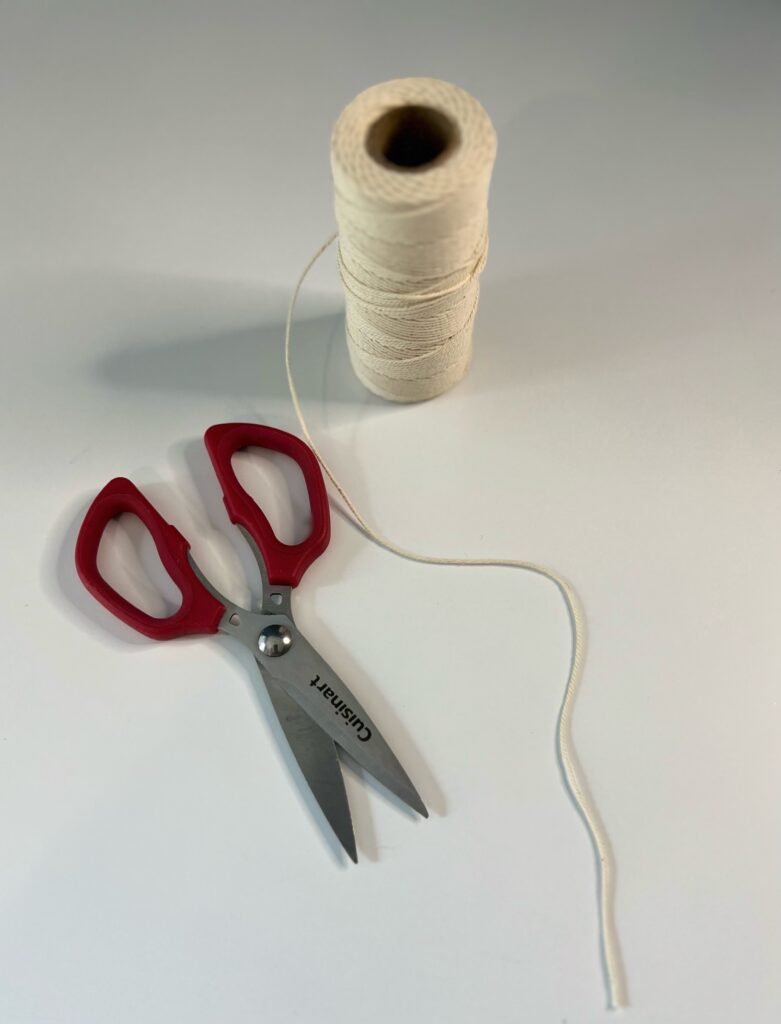
- Cooking twine: Make sure it is food-grade safe and can withstand high temperatures, This is the cooking twine I use and it works great!
- Place the dough in the freezer: I don’t normally do this, but with an intricate scoring or design, it helps to place the dough in the freezer for 15-20 minutes before you get ready to tie the twine. This ensures that the dough won’t spread out too much while you are working on it.
- Don’t tie the twine too tight: When tying the twine around the dough, leave enough space for the dough to expand. This will also prevent the twine from getting stuck in your dough. To avoid the twine from getting stuck you can coat the twine in extra flour.
- Properly proof the dough: While this is ideal for any sourdough recipe, it is especially important when achieving a design like a pumpkin. A proper rise is needed to give it that desired look! My rule of thumb is to watch the dough, not the clock. It should be about doubled in size with some nice bubbles and jiggle to it before placing it in the refrigerator.
How to make pumpkin-shaped sourdough bread
Baker’s schedule: feed your starter in the AM to mix the dough by the afternoon to bake for the following morning.
Tip: make sure to use an active, bubbly starter that is at its peak.
Ingredients & Equipment
For the dough:
- 500 grams of bread flour
- 80 grams of sourdough starter (at its peak)
- 10 grams of salt
- 350 grams of water
You will need:
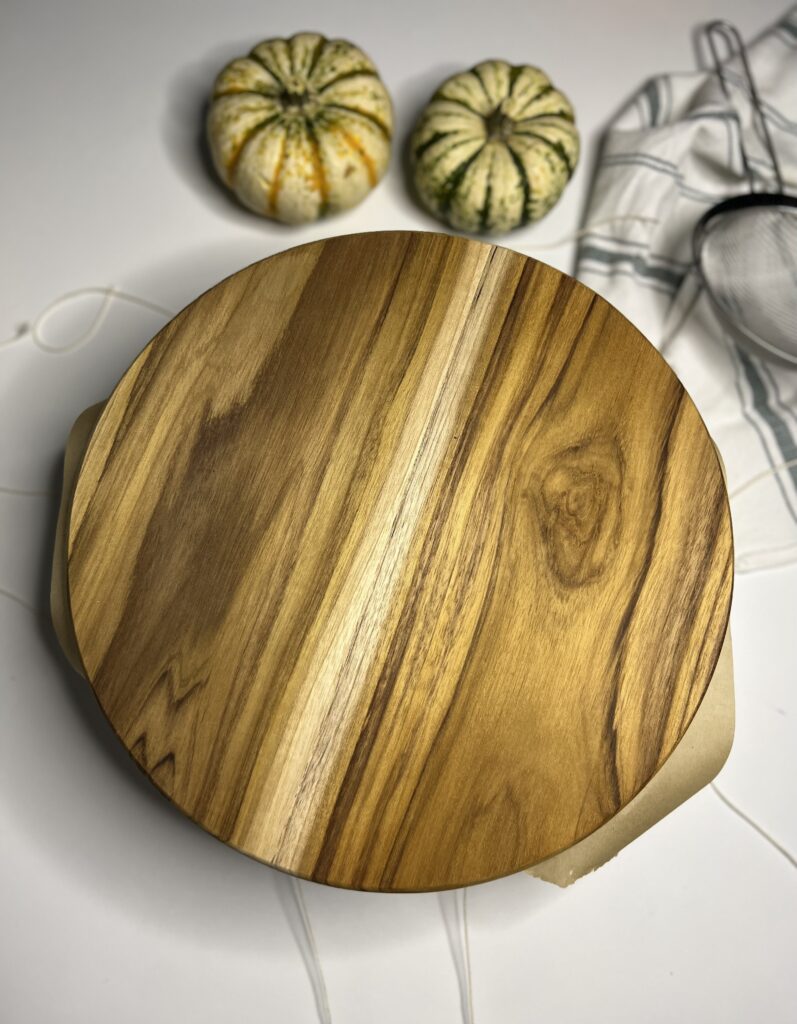
- Dutch oven or cast iron
- Mixing bowl
- Bench scraper
- Scoring tool
- Food scale
- Parchment paper
- Round banneton basket
- Cooking twine
- Optional: a cinnamon stick or even a real pumpkin stem to create the stem.
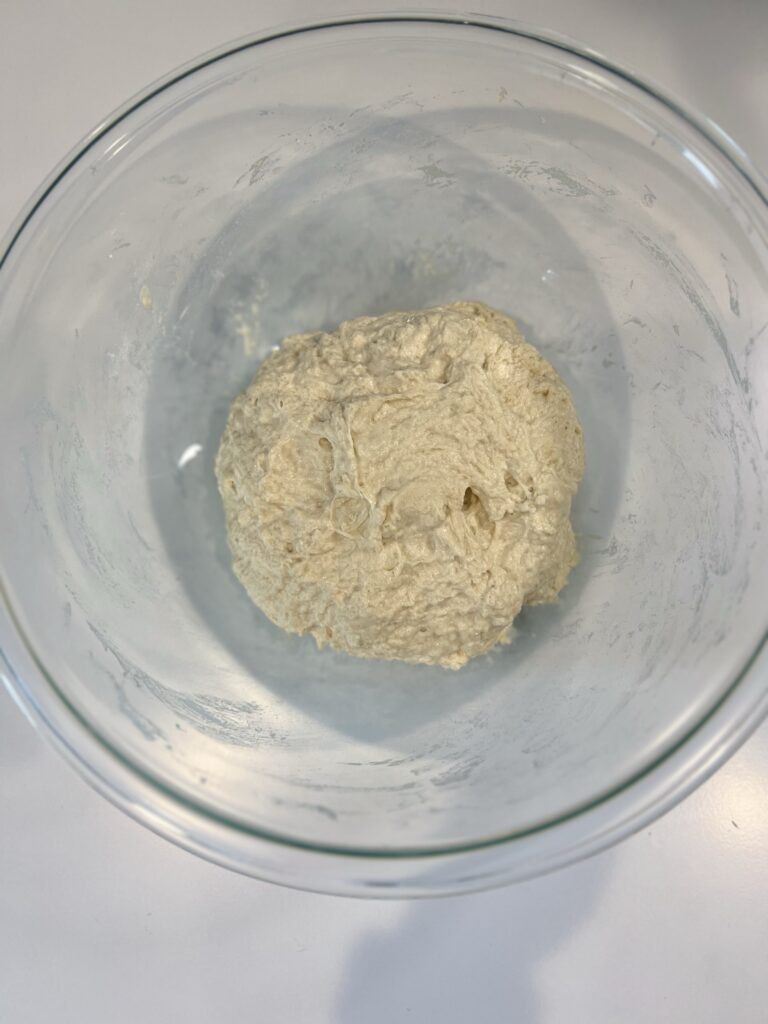
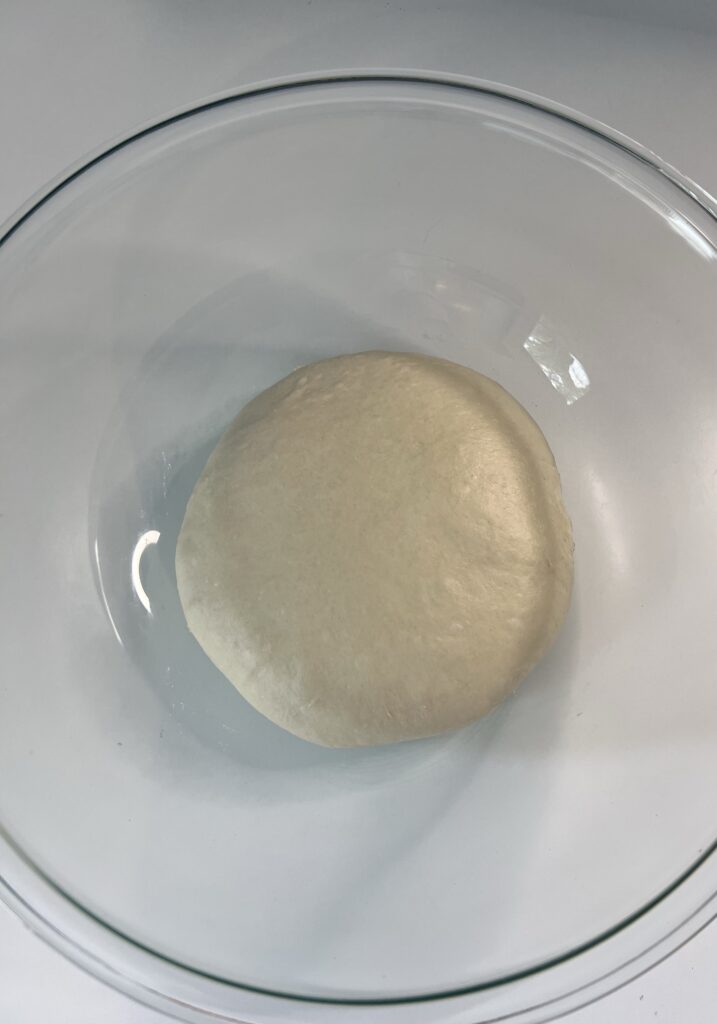
Mix the dough
- In a mixing bowl add 350 grams of water and stir in the sourdough starter and salt until it dissolves and the water becomes milky.
- Next, add 500 grams of bread flour and mix until a shaggy dough is formed. Ensure all of the flour has been absorbed by the water.
- Cover the dough mixture with plastic wrap and allow it to rest for 30-45 minutes.
Strengthen the dough & stretch and folds
- After the dough has rested, work the dough into a smooth ball by folding it into itself repetitively for 3-5 minutes.
- Once the dough becomes smooth, cover the dough and allow it to rest for 30 minutes.
- Next, perform your first stretch and fold. This is where you scoop your hand under a portion of the dough stretch it a few inches and fold it to the opposing side. You will stretch and fold all 4 quadrants of the dough.
- Once complete, cover the dough and let it rest for 30 minutes.
- Perform 3 more stretch and folds within 30-minute increments, totaling 4 stretch and folds.
- Once all stretch and folds are complete, cover the dough and let it rest for the remainder of the bulk rise or until it has doubled in size.
Pre-shape the dough
- Once the dough has doubled in size (mine took a total of 6 hours) remove it from the bowl onto a lightly floured surface.
- Using your hands or bench scraper create a round shape. Then, cover the dough with a towel and let it rest for 15 minutes.
Final shaping
- After the dough has rested, sprinkle some flour over the surface of the dough and flip the dough over so the flour side is now on the work surface.
- Using the envelope-style shaping method, fold the top of the dough to the center, the left side to the center, the right side over the left side, and the bottom of the dough to the center.
- Flip the dough back over and tighten the shape using your hands. Gently push the dough towards yourself and make circular motions to tighten the seams.
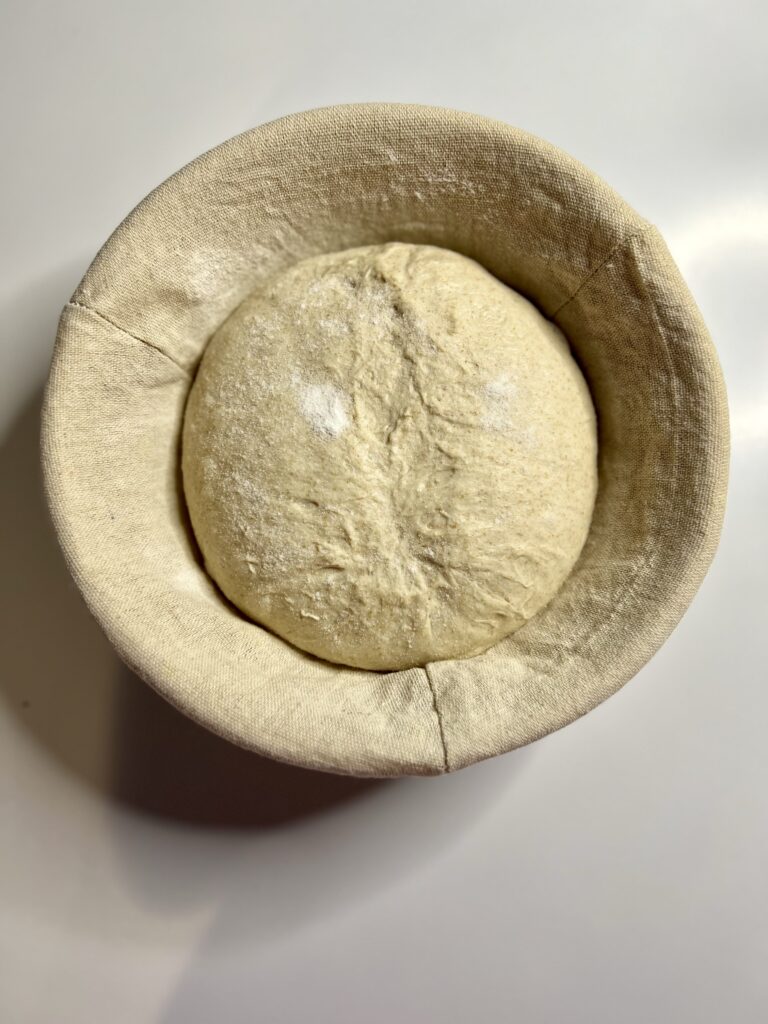
- Once the desired shape has been achieved, place the dough in a linen-lined lightly floured bowl seam side up and cover it with a towel or place it in a plastic bag in the refrigerator overnight (10-12 hours).
If you need additional tips on shaping check out my Shaping your Sourdough Bread article!
Create the pumpkin shape
- Tip: pop the dough in the freezer for 15-20 minutes before getting ready to shape.
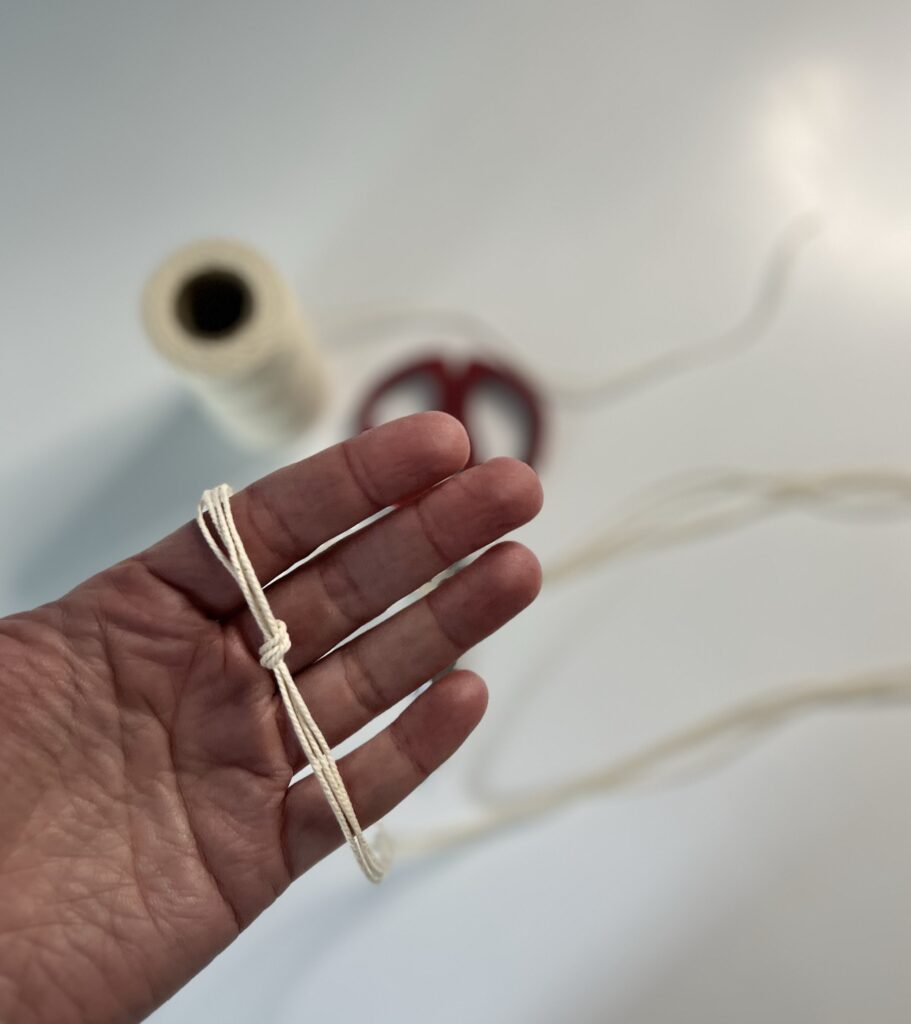
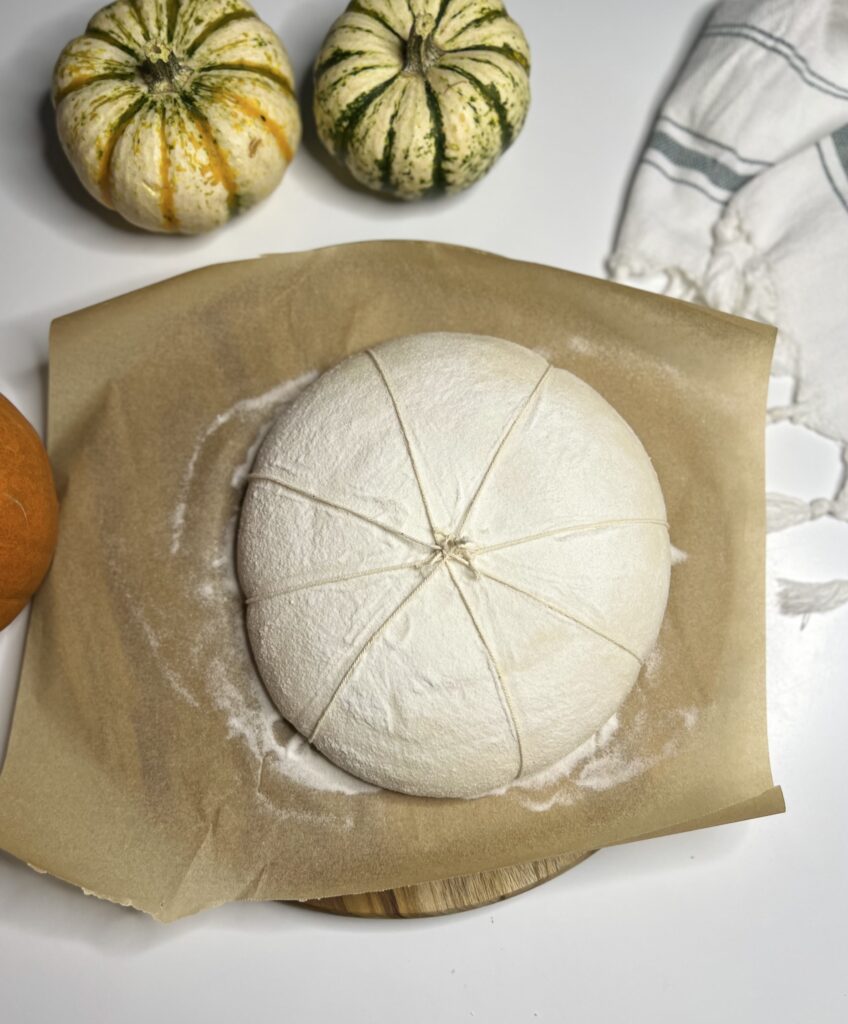
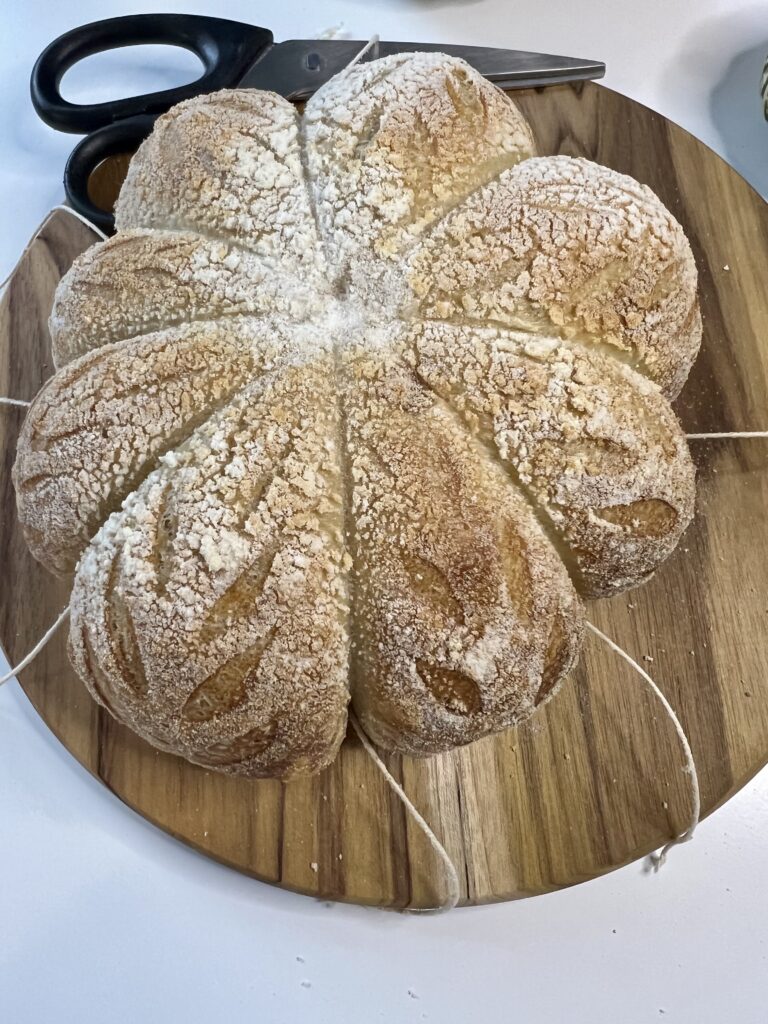
- Cut 4 pieces of twine approximately 36 inches each and tie them all together with a single knot in the middle.
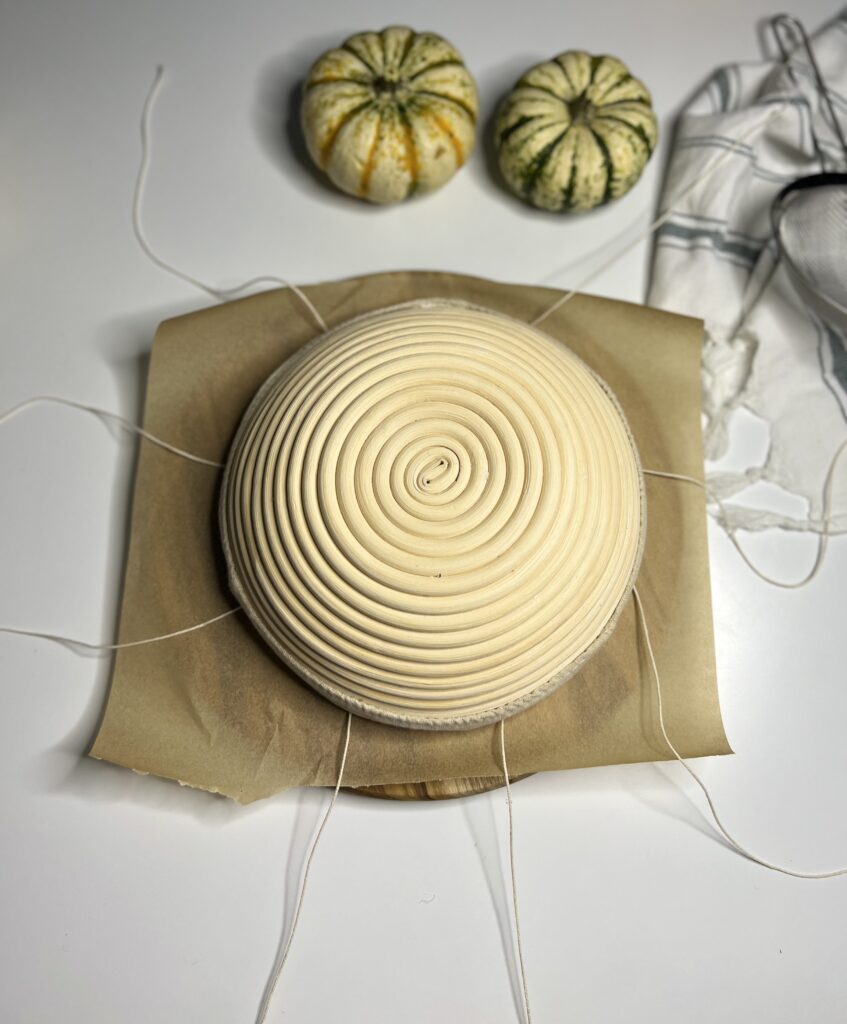
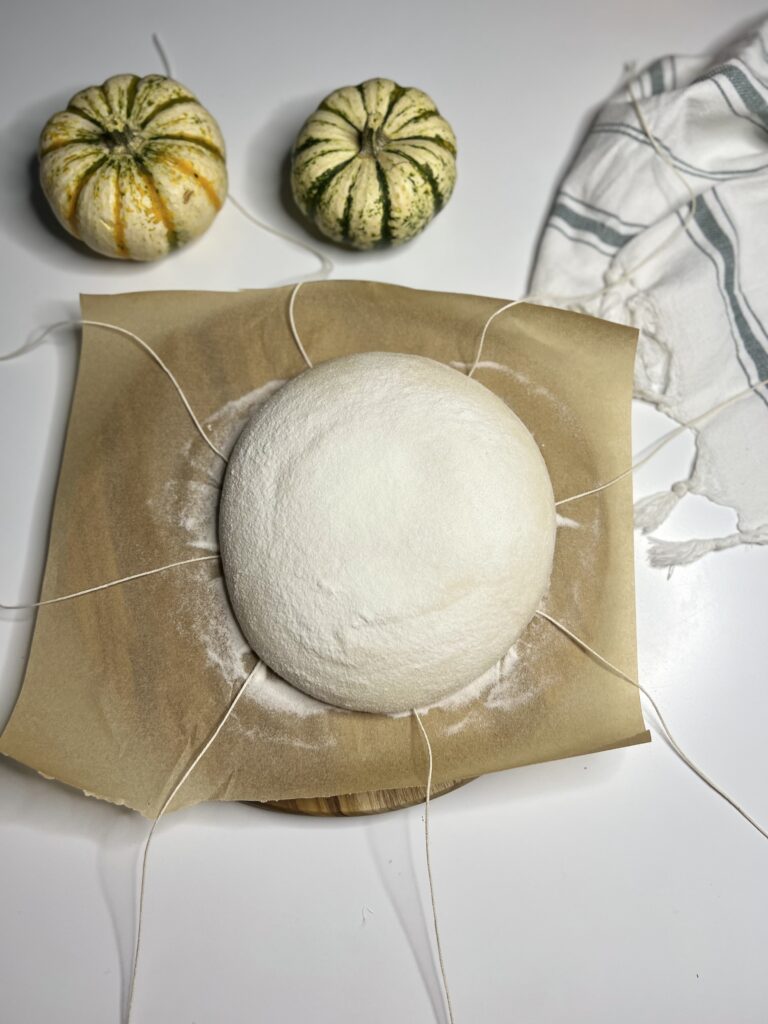
- Remove the dough from the freezer and sprinkle some rice flour onto the surface of the dough.
- Place the twine on the surface of the dough with the knot in the center and spread the twine evenly across the dough.
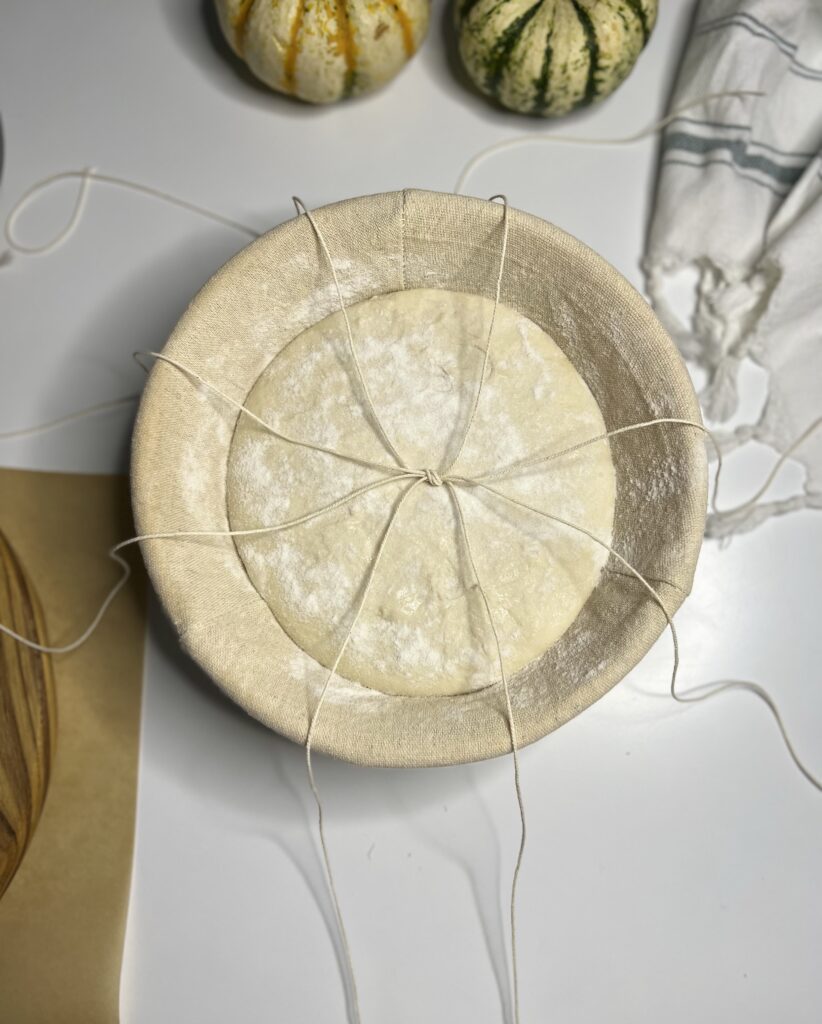
- Place a piece of parchment paper over the dough followed by a cutting board to use as support to flip everything over. Then, gently remove the banneton basket.
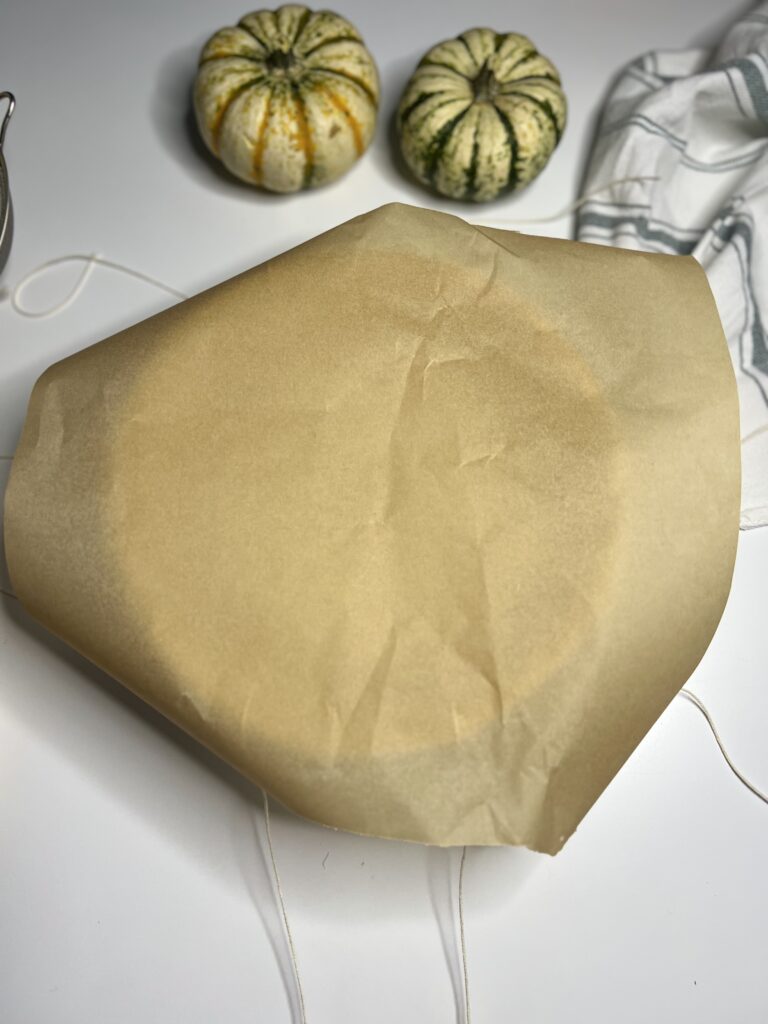
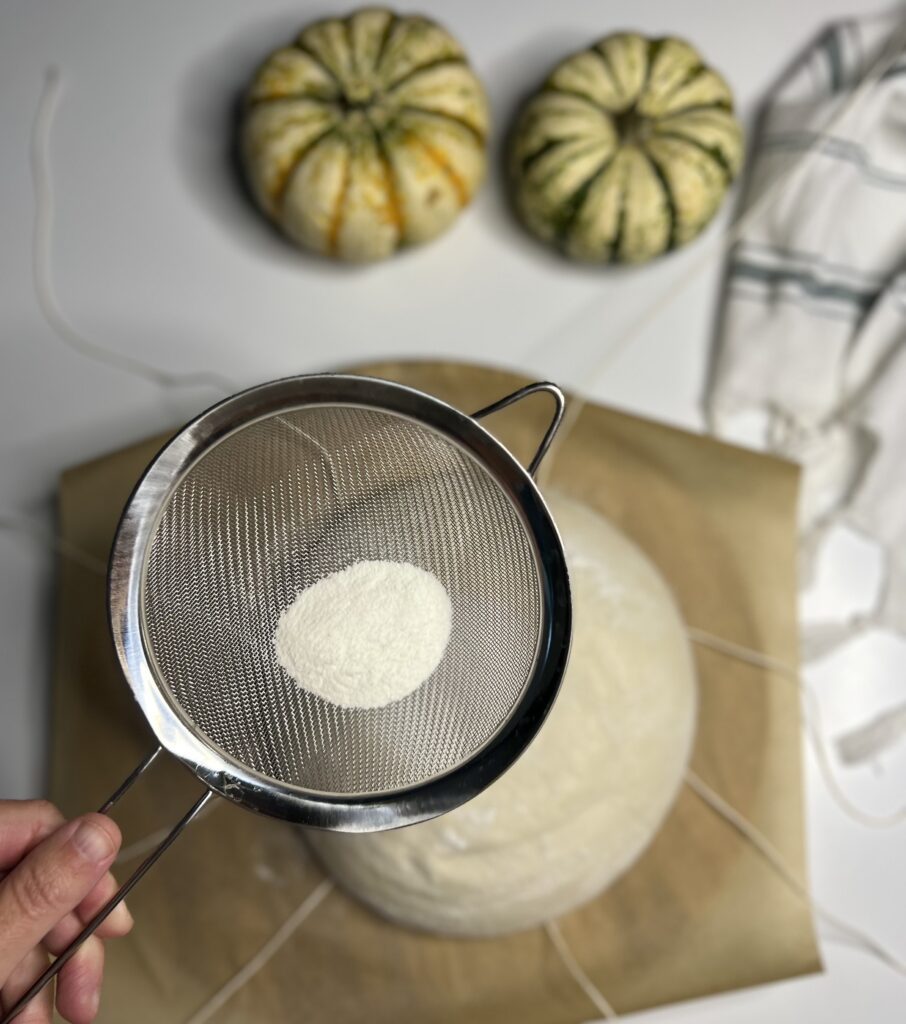
- Next, sift some rice flour over the top of the dough to ensure the twine won’t stick, this will also help your design pop!
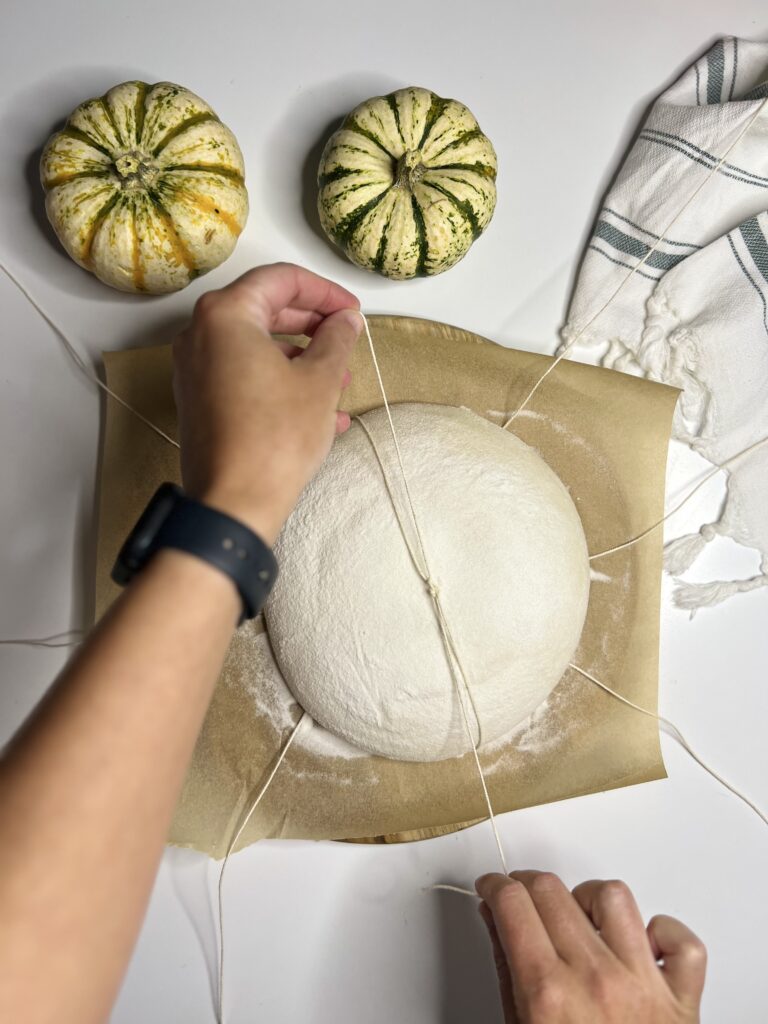
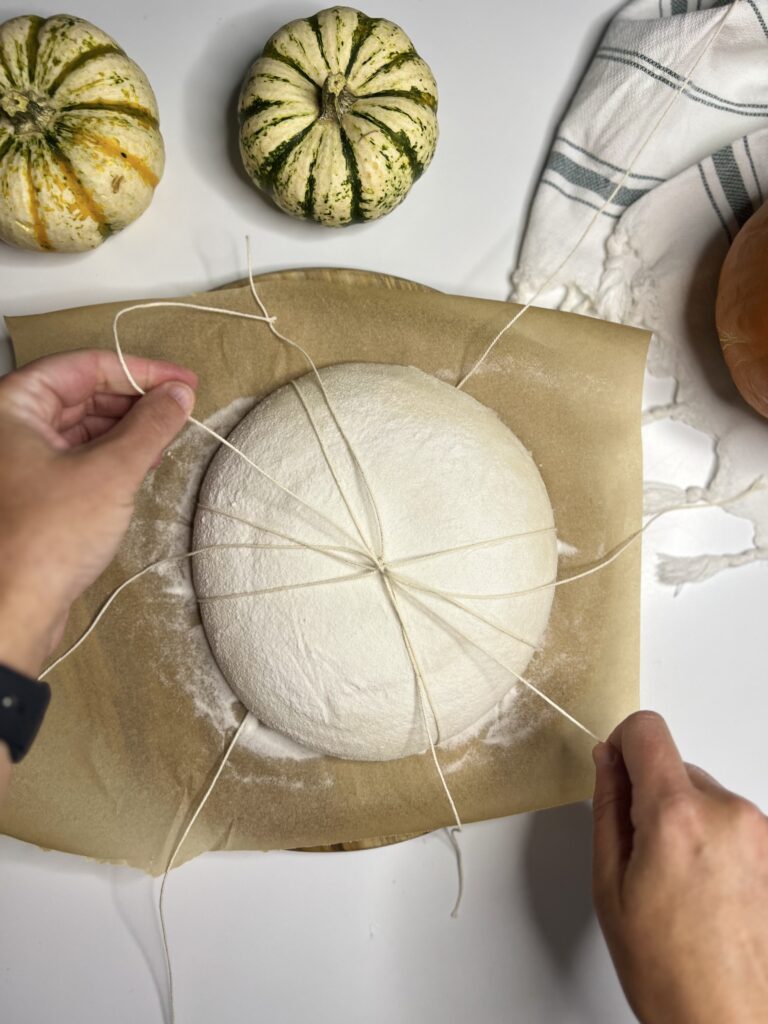
- Readjust the strings as needed to ensure the sections are even and begin to tie two at a time. Grab strings from the opposite side of the sourdough boule and tie them in a knot at the center. Do not tie the string too tight as the dough needs room to expand.
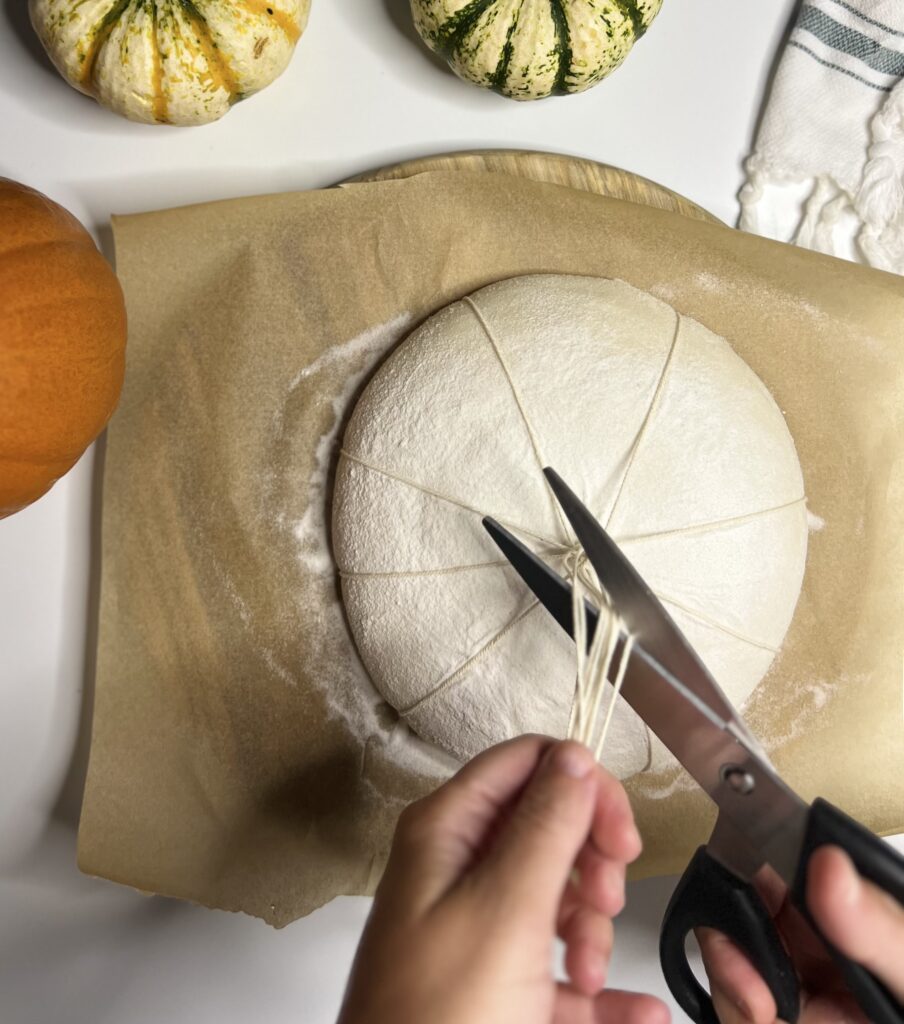
- Once all the strings have been tied, cut the excess string off right above the knot.
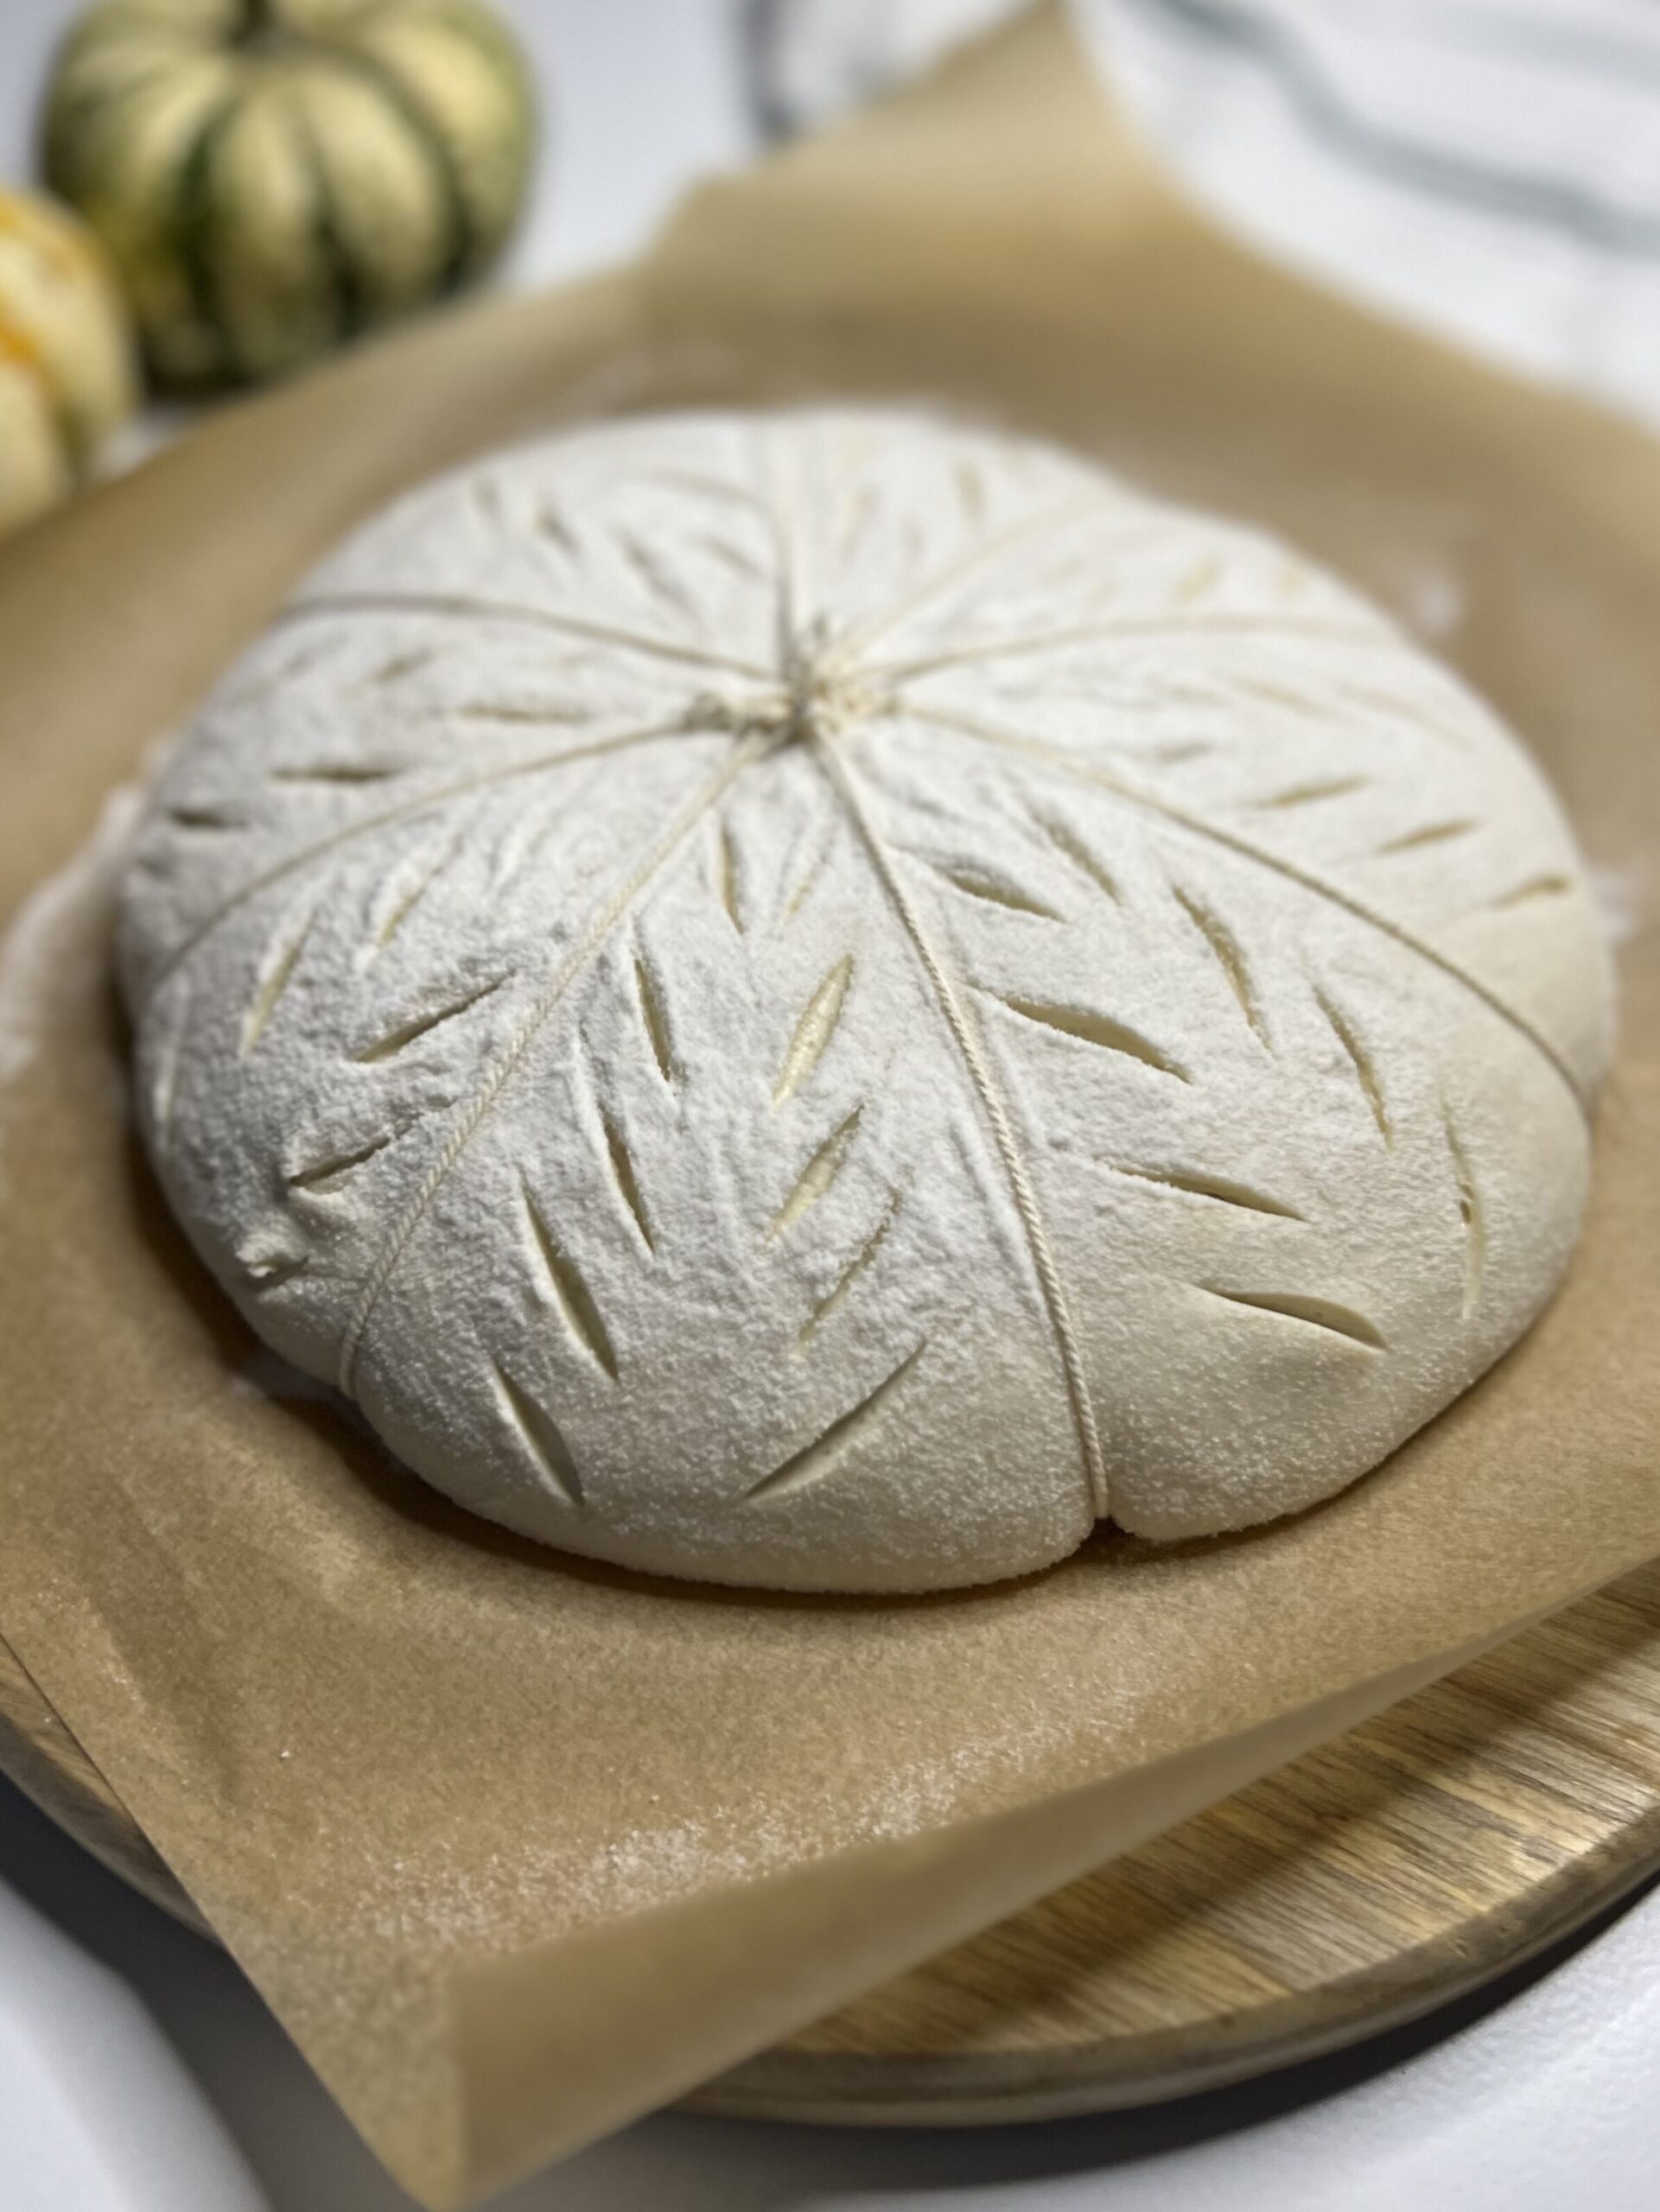
Score the sourdough bread
- If you desire to score the bread, you can make some fun designs in each section using a bread lame.
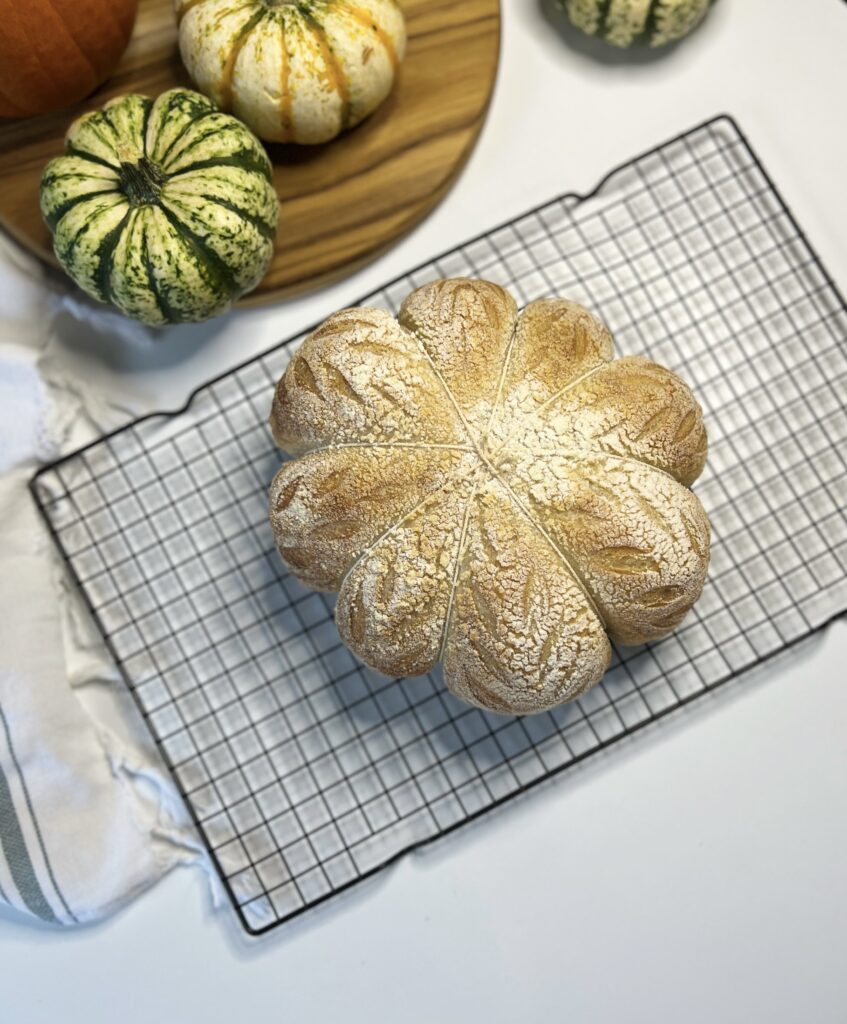
Bake the bread
Tip: preheat the oven to 500 degrees F with your baking pan for 20-30 minutes.
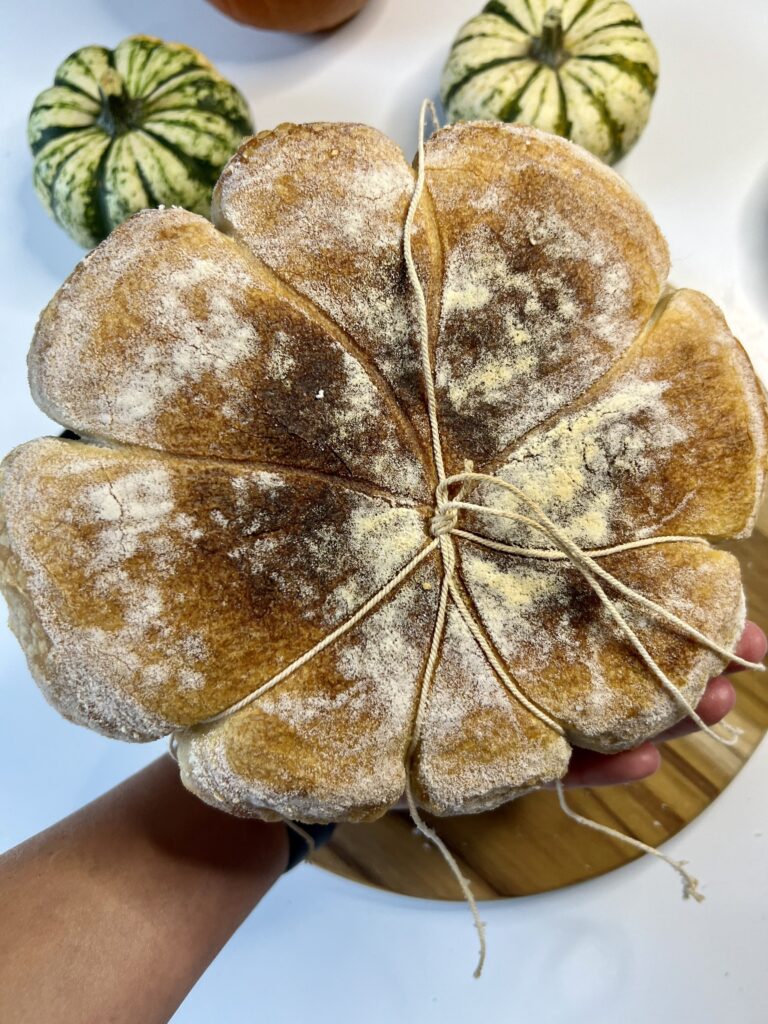
- Once the shaping is complete, transfer the dough using the parchment paper into your cast iron or Dutch oven and bake for 20 minutes covered at 500 degrees F.
- After 20 minutes, remove the lid reduce the temperature to 450 degrees F, and bake for another 15-17 minutes uncovered.
- Allow the bread to cool for 1-2 hours on a cooling rack.
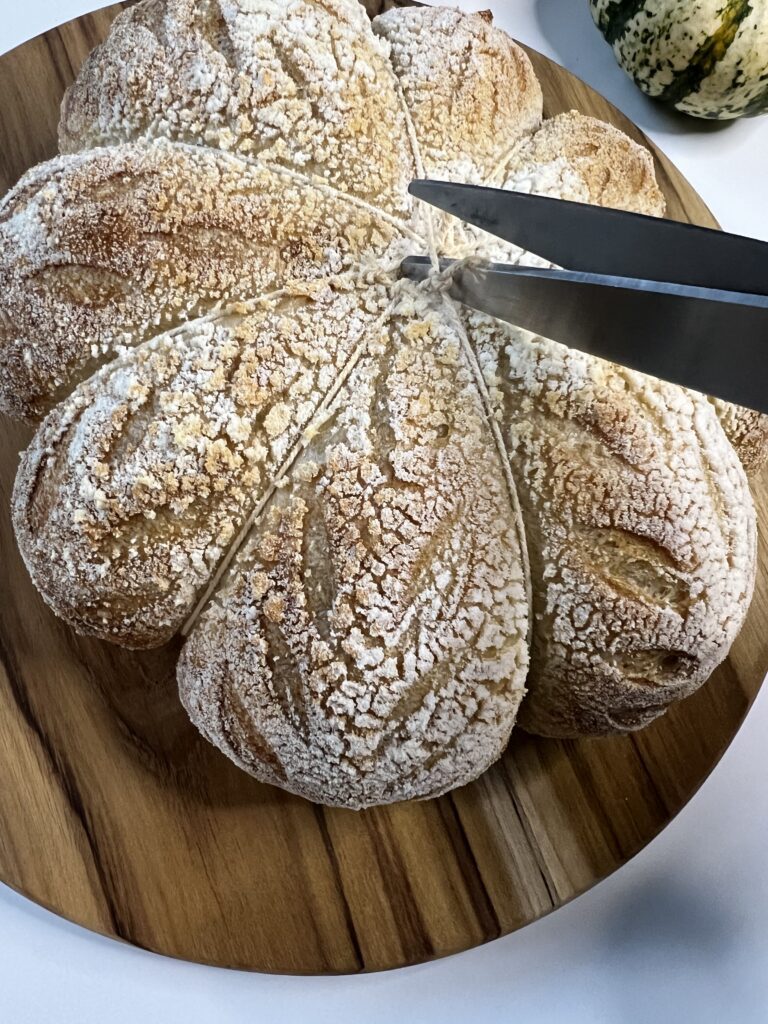
How to remove the twine
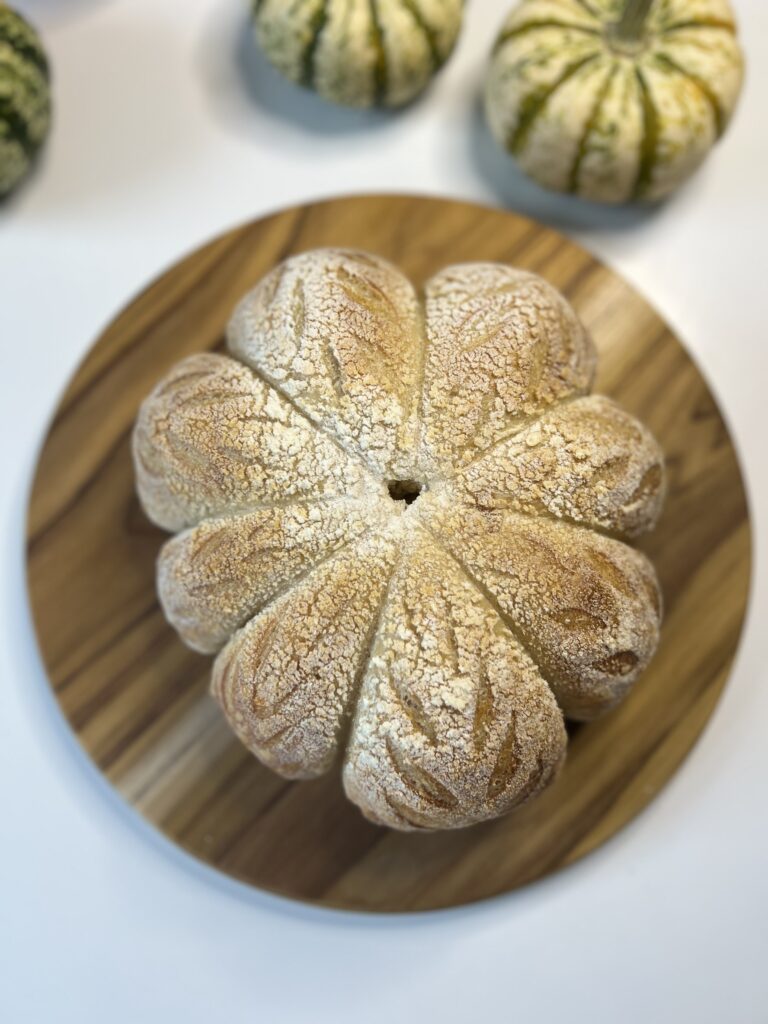
- Allow the bread to cool completely before trying to remove the twine.
- Cut the strings from the top and start to peel them away from the bread.
- Flip the bread over and use the tip of a knife to remove any twine that is stubborn. It should pull right off with a little elbow grease!
Add a stem
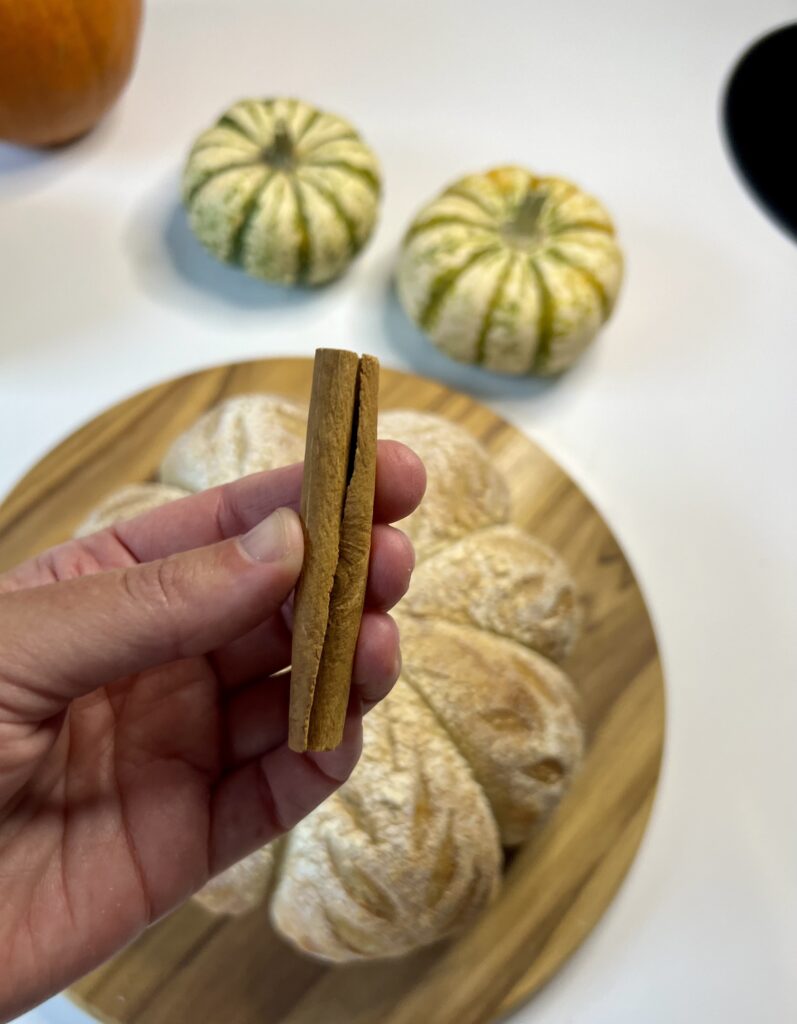
- If you want to add a “pumpkin stem” to complete the look, I recommend a cinnamon stick or a real stem from a squash or pumpkin.
- Using a knife, cut a shallow hole in the middle of the loaf and insert your stem of choice.
- Enjoy your beautiful design! They make wonderful Thanksgiving centerpieces 🙂
More Sourdough Recipes
- Sourdough Pumpkin Cake (with cream cheese frosting!)
- Sourdough Pumpkin Bread
- Sourdough Maple Sugar Cookies
- Sourdough Pumpkin Maple Cake
Pumpkin-Shaped Sourdough Bread
Discover the art of crafting a beautiful pumpkin-shaped sourdough bread with these step-by-step instructions made simple!
Equipment
- Dutch Oven
- Mixing bowl
- Bench scraper
- Scoring tool
- Food scale
- Parchment paper
- Round Banneton Basket
- Cooking Twine
- Optional: a cinnamon stick or even a real pumpkin stem to create the stem.
Ingredients
- 500 grams bread flour
- 80 grams sourdough starter (active & at its peak)
- 10 grams salt
- 350 grams water
Instructions
Mix the dough
-
In a mixing bowl add 350 grams of water and stir in the sourdough starter and salt until it dissolves and the water becomes milky.
-
Next, add 500 grams of bread flour and mix until a shaggy dough is formed. Ensure all of the flour has been absorbed by the water.
-
Cover the dough mixture with plastic wrap and allow it to rest for 30-45 minutes.
Strengthen the dough & stretch and folds
-
After the dough has rested work the dough into a smooth ball by folding it into itself repetitively for 3-5 minutes.
-
Once the dough becomes smooth, cover the dough and allow it to rest for 30 minutes.
-
Next, perform your first stretch and fold. This is where you scoop your hand under a portion of the dough stretch it a few inches and fold it to the opposing side. You will stretch and fold all 4 quadrants of the dough.
-
Once complete, cover the dough and let it rest for 30 minutes.
-
Perform 3 more stretch and folds within 30-minute increments, totaling 4 stretch and folds.
-
Once all stretch and folds are complete, cover the dough and let it rest for the remainder of the bulk rise or until it has doubled in size.
Pre-shape the dough
-
Once the dough has doubled in size (mine took a total of 6 hours) remove it from the bowl onto a lightly floured surface.
-
Using your hands or bench scraper create a round shape. Then, cover the dough with a towel and let it rest for 15 minutes.
Final shaping
-
After the dough has rested, sprinkle some flour over the surface of the dough and flip the dough over so the flour side is now on the work surface.
-
Using the envelope-style shaping method, fold the top of the dough to the center, the left side to the center, the right side over the left side, and the bottom of the dough to the center.
-
Flip the dough back over and tighten the shape using your hands. Gently push the dough towards yourself and make circular motions to tighten the seams.
-
Once the desired shape has been achieved, place the dough in a linen-lined lightly floured bowl seam side up and cover it with a towel or place it in a plastic bag in the refrigerator overnight (10-12 hours).
Create the pumpkin shape
-
Tip: pop the dough in the freezer for 15-20 minutes before getting ready to shape.
-
Cut 4 pieces of twine approximately 36 inches each and tie them all together with a single knot in the middle.
-
Remove the dough from the freezer and sprinkle some rice flour onto the surface of the dough.
-
Place the twine on the surface of the dough with the knot in the center and spread the twine evenly across the dough.
-
Place a piece of parchment paper over the dough followed by a cutting board to use as support to flip everything over. Then, gently remove the banneton basket.
-
Next, sift some rice flour over the top of the dough to ensure the twine won't stick, this will also help your design pop!
-
Readjust the strings as needed to ensure the sections are even and begin to tie two at a time. Grab strings from the opposite side of the sourdough boule and tie them in a knot at the center. Do not tie the string too tight as the dough needs room to expand.
-
Once all the strings have been tied, cut the excess string off right above the knot.
Score the sourdough bread
-
If you desire to score the bread, you can make some fun designs in each section using a bread lame.
Bake the bread
-
Tip: preheat the oven to 500 degrees F with your baking pan for 20-30 minutes.
-
Once the shaping is complete, transfer the dough using the parchment paper into your cast iron or Dutch oven and bake for 20 minutes covered at 500 degrees F.
-
After 20 minutes, remove the lid reduce the temperature to 450 degrees F, and bake for another 15-17 minutes uncovered.
-
Allow the bread to cool for 1-2 hours on a cooling rack.
How to remove the twine
-
Allow the bread to cool completely before trying to remove the twine.
-
Simply cut the strings from the top and start to peel them away from the bread.
-
Flip the bread over and use the tip of a knife to remove any twine that is stubborn. It should pull right off with a little elbow grease!
Add a stem
-
If you want to add a "pumpkin stem" to complete the look, I recommend a cinnamon stick or a real stem from a squash or pumpkin.
-
Using a knife, cut a shallow hole in the middle of the loaf and insert your stem of choice.
-
Enjoy your beautiful design! They make wonderful Thanksgiving centerpieces :)
Notes
Baker's schedule: feed your starter in the AM to mix the dough by the afternoon to bake for the following morning.
Tip: make sure to use an active, bubbly starter that is at its peak.
Nutrition
Nutritional information is automatically calculated and should be used as an approximation only.
Comments