
How to Make Sourdough Starter: Having your own sourdough starter is like unlocking a baker’s best-kept secret. This homemade, wild yeast is always at your fingertips, ready to be used in countless recipes. Packed with lactobacilli, it’s a natural probiotic that’s both gut-friendly and deliciously versatile. While starting a sourdough starter requires a bit of time and patience, the rewards of creating your own are well worth the effort!
Once your sourdough starter is alive, maintaining it is surprisingly simple—easier than keeping a houseplant! Active starters are incredibly resilient, so even if you forget to feed them, they’re often easy to revive. A well-cared-for starter will reward you endlessly, opening up a world of baking possibilities. So, let’s dive in! Below, you’ll find a detailed 7-day guide to help you create your own sourdough starter and tips on how to care for it beyond those first seven days.
If you have an active sourdough starter and want to learn more check out my Troubleshooting Sourdough Starters (FAQ).
What is a sourdough starter?
Behind every good loaf of sourdough bread is a strong sourdough starter. It is the key component to achieving quality bread.
Simply put, a sourdough starter is a live culture of flour and water, used as a natural leavening agent in sourdough baking.
It contains wild yeast and lactic acid bacteria, which ferment the dough, giving it a unique flavor and texture. By regularly maintaining and feeding the starter, bakers can use it to make various bread and baked goods rise without the need for commercial yeast.
Although sourdough starters have simple ingredients, they require an ongoing and consistent relationship.
This begins with understanding. That is why I put together this article, in hopes of helping in your sourdough journey.
Ingredients for your sourdough starter
- Organic dark rye flour OR whole wheat flour
- Organic unbleached all-purpose flour OR organic bread flour
- Filtered water or bottled water
Equipment needed
- Mason jar or Weck jar (note: do not use an airtight lid)
- Food scale
- Food thermometer
Make Sourdough Starter: Mix your starter-Day 1
- Using a food scale measure 100 grams of rye flour (or wheat) in your jar.
- Add 150 grams of lukewarm water (roughly 85 degrees F)
- Vigorously stir using a silicone spatula or fork. Make sure there are no flour clumps.
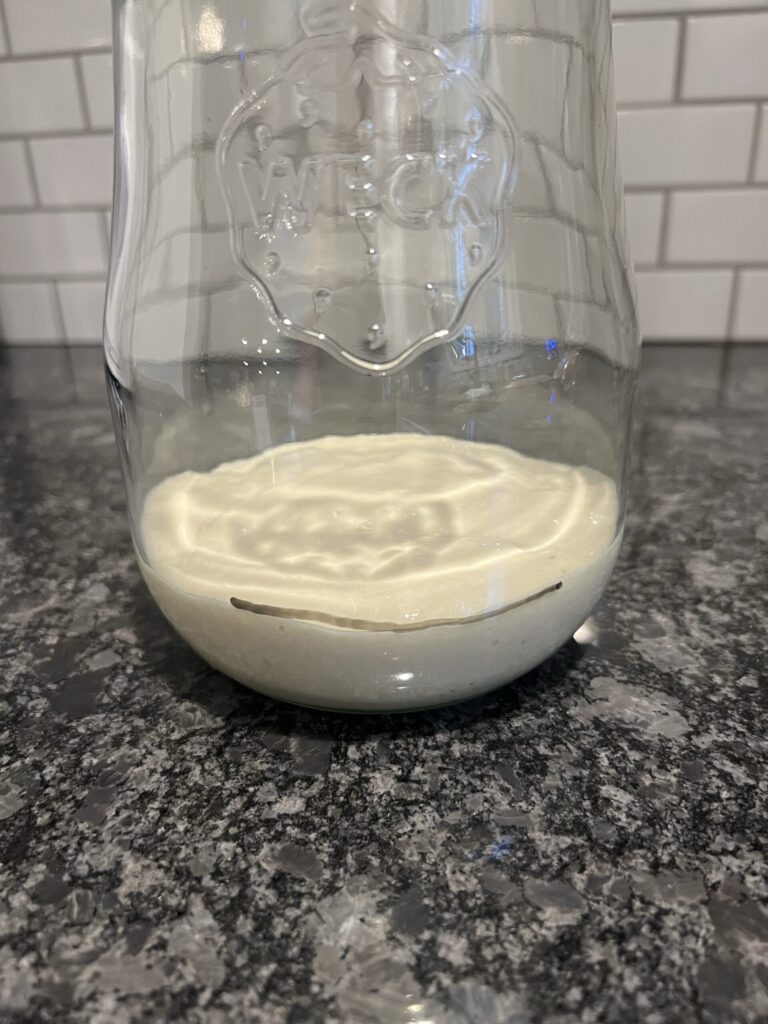
- Cover with a loose-fitting lid and mark the level where the mixture sits at
Make Sourdough Starter: First feed-Day 2
- Remove 70 grams of starter
- Add 50 grams of rye flour
- Add 50 grams of all-purpose flour
- Add 115 grams of warm water (approximately 85 degrees F)
- Stir vigorously
Make Sourdough Starter: Second feed-Day 3
- Same as Day 2
Make Sourdough Starter: Third feed-Day 4
- Same as days 2 and 3 EXCEPT drop water to 100 grams
Make Sourdough Starter: Fourth feed-Day 5
- Same as day 4
NOTE: Day 5 and 6 you will most likely see some bubbling and some rising and falling. This is pretty typical but does not mean your starter is necessarily strong enough to use yet. Continue with the below instructions.
Make Sourdough Starter: Fifth feed-Day 6
- Remove 50 grams of starter
- Add 50 grams of rye flour
- Add 50 grams of all-purpose flour
- Add 100 grams of water
If you see no activity-Day 7
By day 7, if your starter isn’t showing any signs of activity, don’t worry—just continue feeding it daily with 100 grams of your preferred flour (rye, all-purpose, whole wheat, etc.) and 100 grams of water. Be sure to discard at least 50 grams of the starter before each feeding to maintain balance.
At this stage, you can use room-temperature water for feeding. Keep feeding consistently every day until you notice substantial activity, such as bubbles and a noticeable rise in the starter.
Remember, your home’s temperature plays a significant role in the starter’s progress. In warm and humid conditions, your starter will likely become active more quickly. In cooler environments, it may take longer. If your home is on the cooler side, try placing your starter in a cozy spot like your microwave or oven (turned off) with a cup of warm water nearby to create a slightly warmer environment.
Patience is key—activating your starter takes time, but with consistent care, it will spring to life. Keep at it, and trust the process!
If you see activity-Day 7
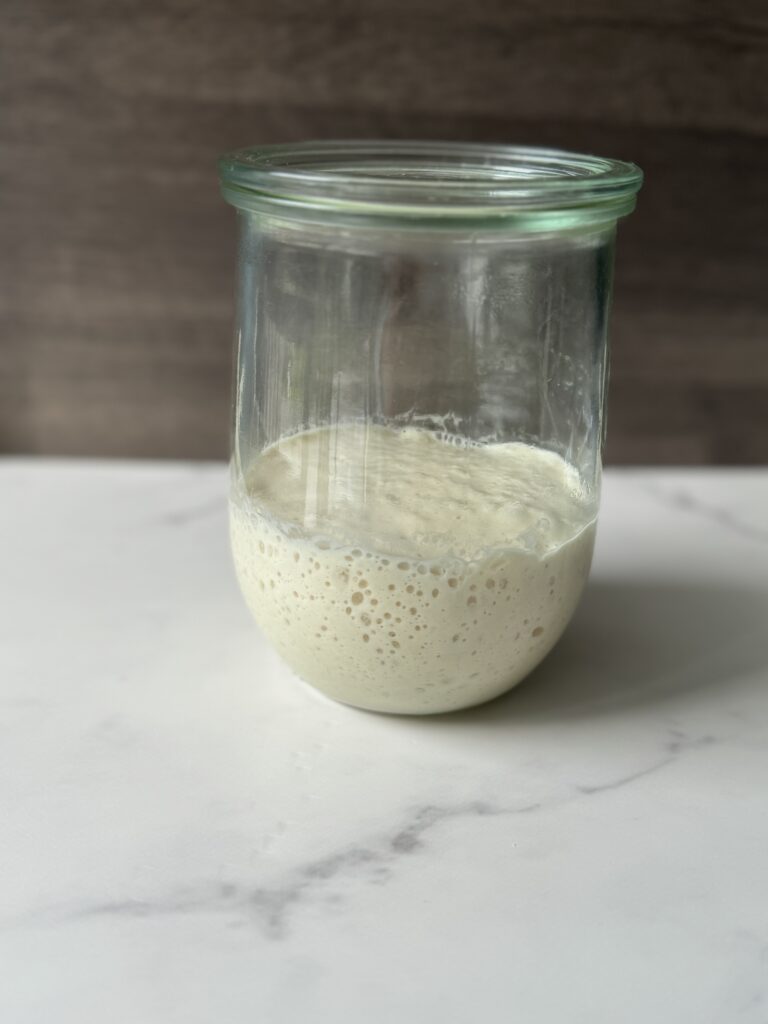
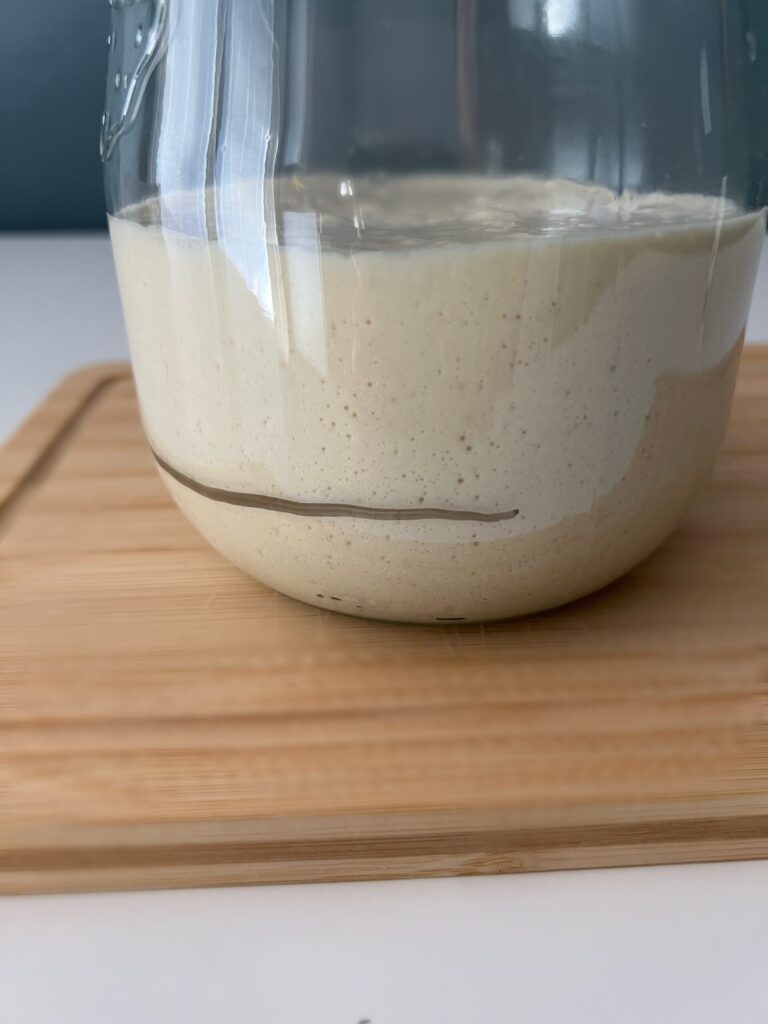
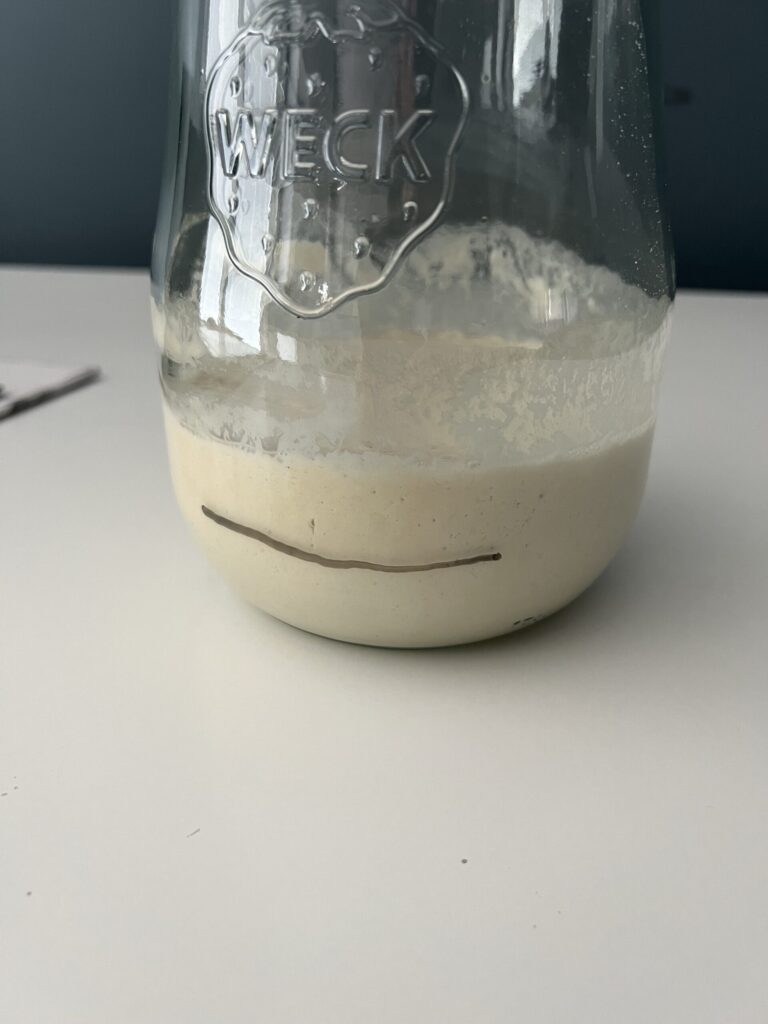
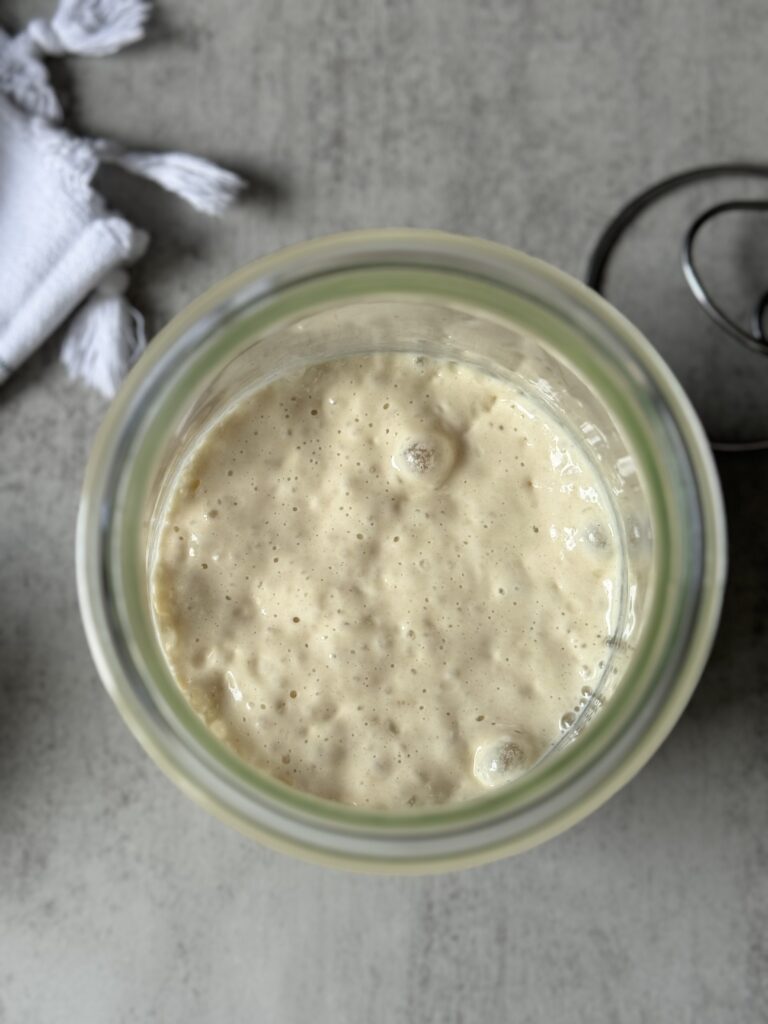
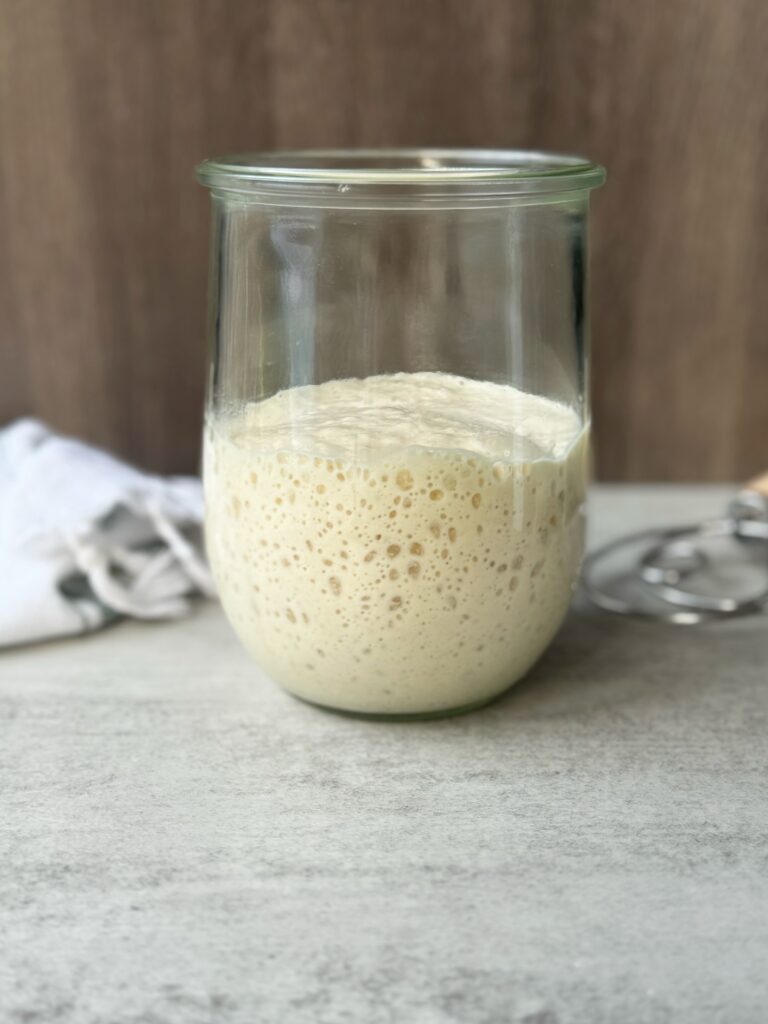
A starter goes through a natural cycle of rising as it feeds and then falling back down once the feeding is complete. You can observe its rise by noting the line it leaves on the sides of the glass jar. Ideally, your starter should double in size during this process.
If you notice your starter rising above your marked line and becoming bubbly (see photos below), it’s a sign that it’s thriving. At this point, follow the Day 7 instructions provided below, as this will become your regular feeding schedule moving forward. Detailed steps are outlined below to guide you.
- Remove 25 grams of starter
- Add 100 grams of all-purpose flour
- Add 100 grams of room-temperature water
The consistency should be thicker than pancake batter, smooth, and easy to pour out of the jar.
Caring for your starter
Now that your starter is alive and active, let’s talk about its feeding schedule moving forward.
Starters are low maintenance and easy to care for. Starting a starter with rye or wheat flour is pretty common to get it going. These flours have more nutrients and fiber, which ferments a starter more actively. But, you do not have to continually feed it with rye or wheat flour.
If you would like to transition it to a white starter, simply follow this feeding schedule below using a 1:5:5 ratio (or your preferred ratio feeding).
- Storing: A sourdough starter can be stored in the refrigerator when not being used and on the counter during feeds.
- Sample feeding schedule: Feed the starter 1-2 times a week using 100 grams (1/2 a cup) of all-purpose flour, and 100 grams (1/2 a cup) of filtered or bottled water (room temperature). Remember to discard your starter at every feed. I keep about 20 grams of starter at a time, but you’ll find what works best for you. You can save your discard in a separate jar and use it in various recipes!
- Adjusting ratios for feeding: You can also adjust your ratios as needed. Starters can be fed at a 1:2:2 ratio or even a 1:10:10 ratio depending on how much strength you may want. Over time you will find the best ratio and schedule for your needs.
- Frequency: If you find your starter needing more attention or you are a frequent baker, you can feed it every day or multiple times a week. The more you feed it, the stronger it will become.
A few additional tips
- Try a different flour if you see your starter not responding well to the flour you are using. I have had a lot of success with organic white bread flour.
- If you neglect your starter for a few weeks, do not throw it out. Remove 1/4 cup or even more and continue the feed schedule.
- Sourdough starters will have different smells. A strong acetone smell means some of the starter needs to be discarded and given a fresh feed.
- At times there may be some liquid forming on top of your starter, this is normal. You can remove it if there is an excess, or mix it in if there is not much liquid. Continue with your normal feed.
- The typical smell of a sourdough starter is a slightly sweet and a touch acidic if it has not been fed.
- If you are having no luck with a starter becoming active, and you really want to bake. You can always obtain a starter from a local bakery or maybe a friend and make it your own. You only need a small amount of an active starter to start. Just continue to feed it with the 1:5:5 ratio with the flour of your choice.
Make sure to check out my Troubleshooting Sourdough Starters (FAQ) for more information on sourdough starters.
Beginner Friendly Sourdough recipes
- Simple Sourdough Recipe
- Sourdough Cheese Crackers
- Easy Sourdough Sandwich Bread
- Easy Sourdough Focaccia Bread
How to make sourdough starter
This is a seven day guide to make your own sourdough starter and get it active!
Equipment
- Mason jar
- Food scale
- Food thermometer
Ingredients
- 100 grams rye flour (or wheat flour)
- 150 grams lukewarm water (roughly 85 degrees F)
For the daily feedings
- 50 grams all-purpose flour
- 50 grams rye flour
- 100-115 grams lukewarm water
Instructions
Day 1-mix your starter
-
Using a food scale measure 100 grams of rye flour (or wheat flour) in your jar.
-
Add 150 grams of lukewarm water (roughly 85 degrees F)
-
Vigorously stir using a silicone spatula or fork. Make sure there are no flour clumps.
-
Cover with a loose-fitting lid and mark the level where the mixture sits at.
Day 2- first feed
-
Remove 70 grams of starter.
-
Add 50 grams of rye flour.
-
Add 50 grams of all-purpose flour.
-
Add 115 grams of warm water (approximately 85 degrees F). Stir vigorously.
Day 3-second feed
-
Follow the same instructions as day 2.
Day 4- third feed
-
Same as days 2 and 3 EXCEPT drop water to 100 grams.
Day 5-fifth feed
-
Same as day 4.
-
Note: Day 5 and 6 you will most likely see some bubbling action and rising and falling. This is pretty typical but does not mean your starter is necessarily strong enough to use quite yet. Continue with the below instructions.
Day 6
-
Remove 50 grams of sourdough starter.
-
Add 50 grams of rye flour.
-
Add 50 grams of all-purpose flour.
-
Add 100 grams of water. Stir.
Day 7
-
Remove 25 grams of sourdough starter.
-
Add 100 grams of all-purpose flour.
-
Add 100 grams of room-temperature water. Stir.
Feeding schedule
-
Moving forward you can feed your sourdough starter 1-2 times a week with a 1:5:5 ratio (or your preferred ratio feeding) with your choice of flour. If you bake often, feed it every other day or every few days.
You can keep your sourdough starter stored in the refrigerator when not being used. It should remain on the counter during feeds.
Sample feeding ratio:
1. Keep 20 grams of starter.
2. Feed 100 grams of flour and 100 grams of water.
It should peak within 8-12 hours and be ready for use.
Keep in mind sourdough starters can be fed at your preferred ratio. Feel free to make adjustments.
Notes
Additional Tips:
- Try a different flour if you see your starter not responding well to the flour you are using. I have had a lot of success with organic white bread flour.
- If you neglect your starter for a few weeks, do not throw it out. Remove 1/4 cup or even more and continue the feed schedule.
- Sourdough starters will have different smells. A strong acetone smell means some of the starter needs to be discarded and given a fresh feed.
- At times there may be some liquid forming on top of your starter, this is normal. You can remove it if there is an excess, or mix it in if there is not much liquid. Continue with your normal feed.
- The typical smell of a sourdough starter is a slightly sweet and a touch acidic if it has not been fed.
- If you are having no luck with a starter becoming active, and you really want to bake. You can always obtain a starter from a local bakery or maybe a friend and make it your own. You only need a small amount of an active starter to start. Just continue to feed it with the 1:5:5 ratio with the flour of your choice.
Comments