
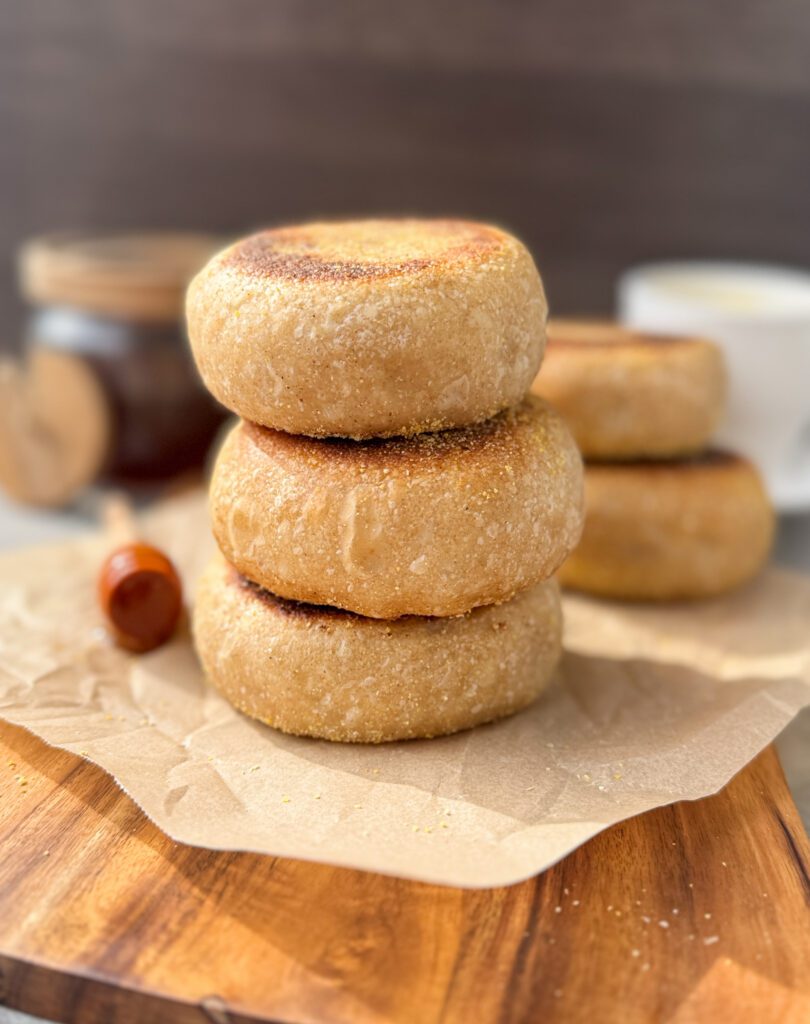
These honey wheat sourdough English muffins have the cozy flavor I grew up loving, gently sweet and honey-forward with just enough whole wheat (about 20%) to add a rich, nutty depth without losing that soft, fluffy texture and signature nooks and crannies.
This recipe took me many rounds of testing and tiny adjustments to finally land on the perfect balance of flavor, structure, and tenderness. I’d consider it an intermediate bake because of the higher hydration dough, but don’t worry… I’ve included plenty of helpful tips throughout to guide you to success, so be sure to check out that section before you start!

- What is an English Muffin?
- My journey to the perfect honey wheat English muffin
- Tips for handling sticky dough
- Why I Love This Recipe
- Troubleshooting: FAQ’s
- How to make honey wheat sourdough English muffins: step-by-step
- Mix the dough
- Knead the dough
- Shape the honey whole wheat sourdough English muffins
- Bake the honey wheat sourdough English muffins
- Storage Instructions
What is an English Muffin?
An English muffin is a small, round, flat bread typically cooked on a griddle or skillet rather than baked. It’s known for its soft, chewy interior and signature golden-browned top and bottom, often dusted with cornmeal. When split open (ideally by a fork) reveals nooks-and-crannies texture that’s perfect for catching melted butter, jam, or eggs. Despite the name, they’re a staple breakfast bread in the U.S. and loved for their versatility.

My journey to the perfect honey wheat English muffin
My first few trials started with the base of my very popular sourdough English muffin recipe …and I quickly realized it just wasn’t going to cut it.
The crumb was dense and the muffins felt heavy instead of light and airy. Back to the drawing board. Whole wheat flour is thirstier and clearly needed more hydration, and the honey flavor I wanted wasn’t coming through either. I had already started with 40 grams of honey (which felt like a lot!), so I remember thinking… really?!


After many less than ideal batches, I finally landed on the perfect balance: just enough whole wheat for that warm nuttiness, enough honey for a cozy sweetness, and most importantly a soft, airy English muffin full of those classic nooks and crannies we all love. Because this is a higher-hydration, stickier dough, I made sure to include plenty of tips and tricks…so definitely read the next section before you begin!
Tips for handling sticky dough
This dough is intentionally higher hydration to create a light, airy crumb and those classic nooks and crannies, which also means it will feel softer and stickier than my regular English muffin dough. Don’t panic… that’s exactly what we want!
You can reduce the hydration by about 15–20 grams of liquid. The muffins will still be good, just expect a slightly tighter, denser crumb and fewer nooks and crannies.
But here are a few tips to help along the way:
- Build strength early: Give the dough a strong start. Mix thoroughly and add a few extra stretch and folds during the first rise to help it develop structure. You’ll notice it tighten up and become smoother as gluten forms.
- Use coatings instead of flour: For shaping, lean on barriers rather than extra flour in the dough: cornmeal or rice flour…these prevent sticking without changing hydration.
- Prep your proofing surface well: Lightly oil your parchment paper and generously sprinkle cornmeal over it before placing the muffins down. This keeps the soft dough from bonding to the paper during proofing.
- Chill if needed: If the dough feels overly sticky or difficult to handle, place it in the refrigerator for 20–30 minutes. A short chill firms the dough up and makes shaping much easier without needing to add extra flour.
- Oil your tools: A lightly oiled spatula or bench scraper makes transferring the dough much easier and keeps the delicate structure intact.

Why I Love This Recipe
- The honey and whole wheat give it a warm, cozy flavor that’s just slightly sweet and nutty.
- Soft, airy texture with those classic nooks and crannies perfect for toasting.
- A sweet levain keeps the tang gentle and balanced instead of overly sour.
- Holds up beautifully for breakfast sandwiches or just butter and jam.

Troubleshooting: FAQ’s
Why is the center of my English muffin dense?
A dense middle usually means the dough was under-proofed. These muffins need to be light, puffy, and airy before they ever hit the skillet—if they still feel heavy or tight, let them rise longer.
Another culprit? Too much heat on the pan. If the outside cooks too quickly, the center won’t have time to fully set. Cook low and slow for even doneness.
Why didn’t my muffins puff up?
Make sure your levain is active and bubbly before mixing the dough. Also double check that you let them proof fully—if they haven’t visibly risen and feel light when handled, they’re not ready. A cold kitchen can slow things down, so be patient.
Why are my muffins flat?
If the muffins spread too much during the final proof, the dough may have been over-proofed or too warm. Try chilling them briefly before cooking to help hold their shape.
Can I use more whole wheat flour than the recipe calls for?
Yes, you can substitute more whole wheat in place of the bread flour. Just keep in mind that whole wheat is a thirstier flour, so you may need to add a bit more water as you increase the amount to keep the dough soft.
How to make honey wheat sourdough English muffins: step-by-step
Baker’s schedule: Make the sweet levain in the morning, mix the dough in the evening and allow it to rest overnight (8-10 hours) at room temp (68-70 degrees F). Shape the English muffins the following morning, allow to rest (3-5 hours) and bake.
Need more time? After the first rise, the sourdough English muffin dough can be refrigerated for up to 24 hours for added flexibility and flavor development.
Ingredients
For the sweet levain (optional)
- 15 grams active sourdough starter
- 15 grams sugar
- 40 grams water
- 40 grams flour (all-purpose or bread flour)
Do I have to use a sweet levain? No. A regular 100% hydration sourdough starter works perfectly. Just make sure it’s active, bubbly, and at its peak when you mix the dough. Keep in mind, it may produce a slightly more tangy flavor.
For the dough:
- 80 grams of sweet levain (from above)
- 110 grams milk
- 160 grams water
- 60 grams honey
- 30 grams avocado oil (melted unsalted butter can be used as well)
- 336 grams bread flour
- 84 grams whole wheat flour
- 9 grams salt
- 1/4 cup of cornmeal for dusting the English muffins
- 1-2 tablespoons of butter for frying the English muffins
Equipment
- Food scale
- Mixing bowl
- Bench/dough scraper
- Large baking sheet
- Parchment paper
Instructions
Make the sweet levain
- In the morning mix together the sourdough starter, sugar, and water in a small jar until mostly dissolved. Then add the flour and mix until combined. Cover the jar loosely, and let it rest until doubled in size (8-10 hours).
Mix the dough
**The dough can be mixed by hand or a stand mixer
- In the evening, (once the levain has doubled in size), combine the levain, milk, water, honey, and avocado oil (or melted butter if using). Stir to combine. Using cold milk is perfectly fine—it helps slow fermentation, making it ideal for a long overnight rise without the risk of overproofing.
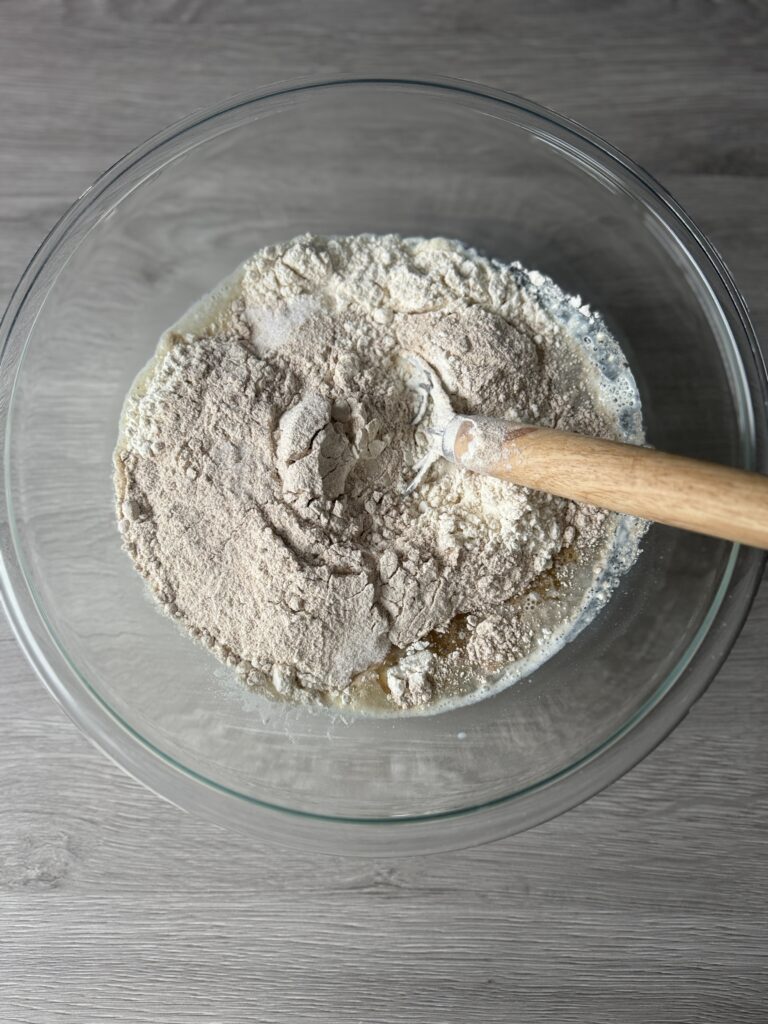
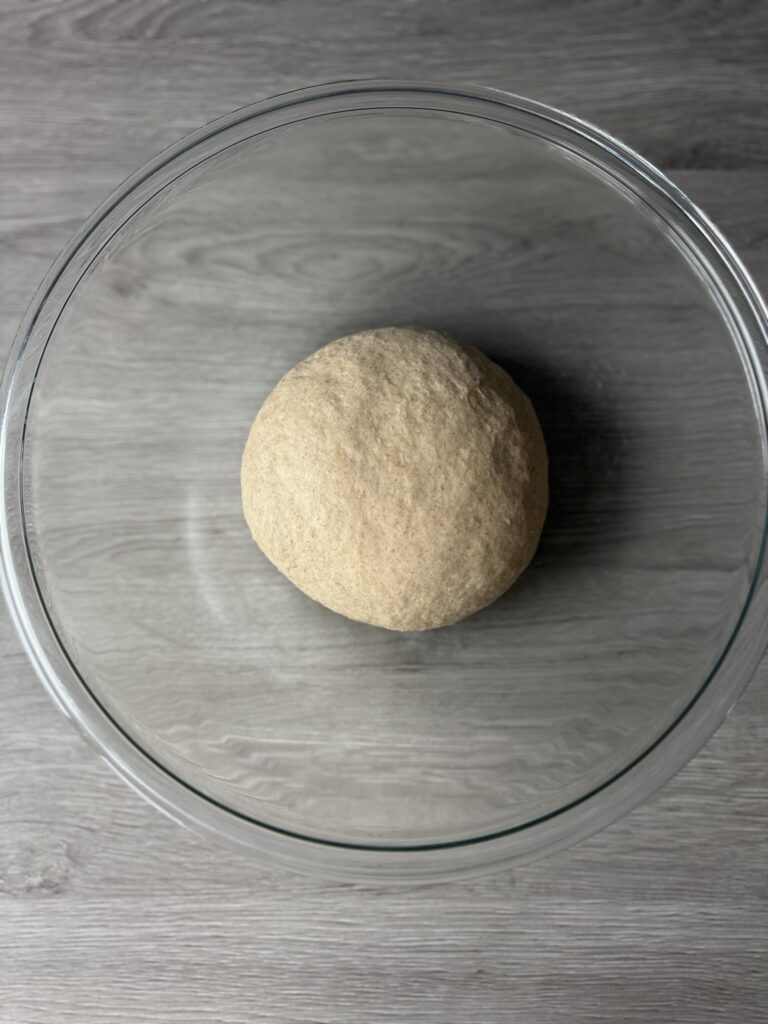
- Next, add the bread flour, whole wheat flour, and salt until a shaggy dough is formed. It will be very sticky- this is normal.
- Cover the dough and let it rest for 20-30 minutes to relax and hydrate.
Knead the dough
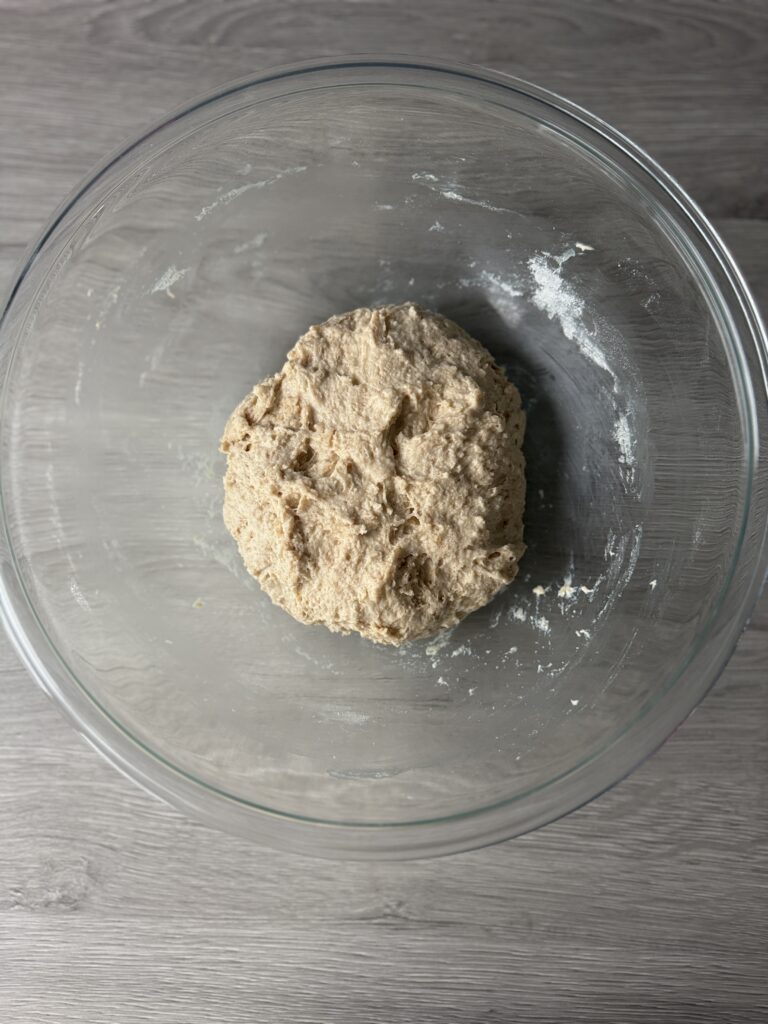
- Return to the dough after it has rested and build some strength in the dough. Knead it in the bowl for 3-5 minutes with a little flour, then let it rest for 10-15 minutes. This allows the gluten to relax, making it much easier to finish kneading
Pro Tip: The key with this dough is not to overwork it too much or it will continue to feel stickier. To avoid overworking it or adding too much flour, letting the dough rest in between kneading will help.
- After the dough has rested, place it on a lightly floured surface and knead it for another 3-5 minutes using small amounts of flour.
- Once finished, place it in an oiled bowl, cover it and let it rest for 30 minutes.

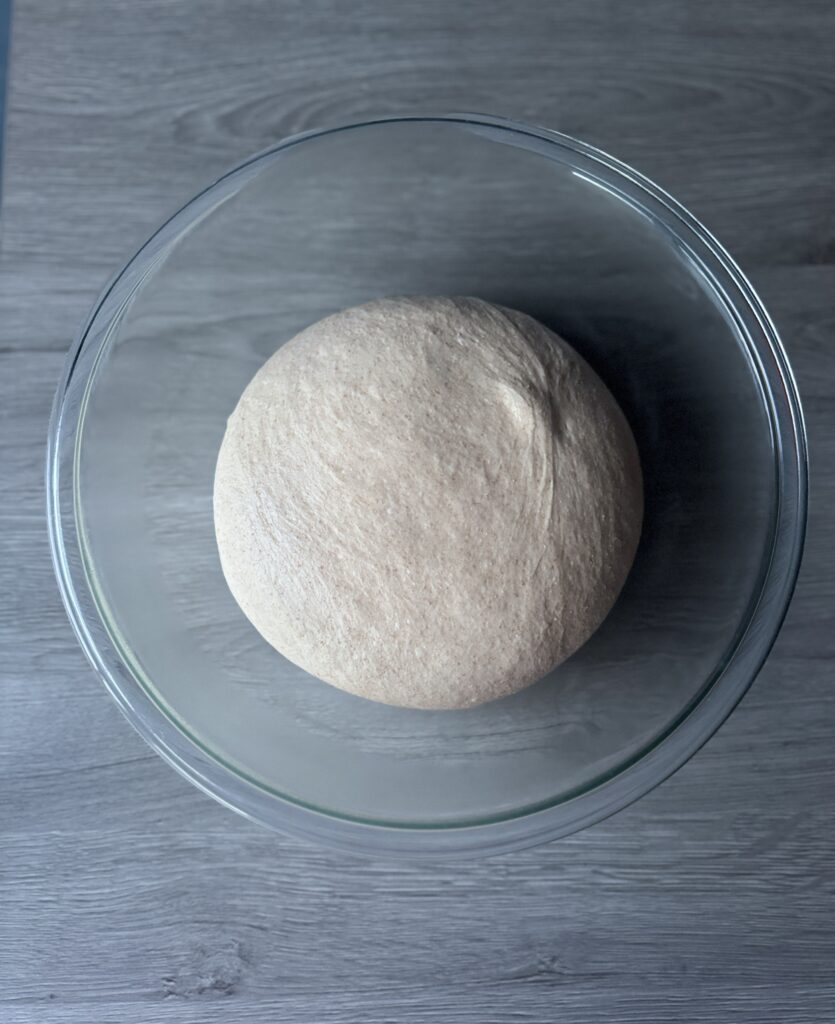
- Perform 1-2 stretch and folds (spaced 30 minutes apart) to the dough after it has rested, cover it, and let it rest overnight (8-10 hours) at room temperature (68-70 degrees F).
*If your kitchen is warmer than this, I recommend moving the dough to the refrigerator and finishing the proof the next day.
Shape the honey whole wheat sourdough English muffins
**Before shaping the English muffins please refer to Tips for handling sticky dough to set you up for success!
- By morning, the dough should look domed, puffy, and well-risen.
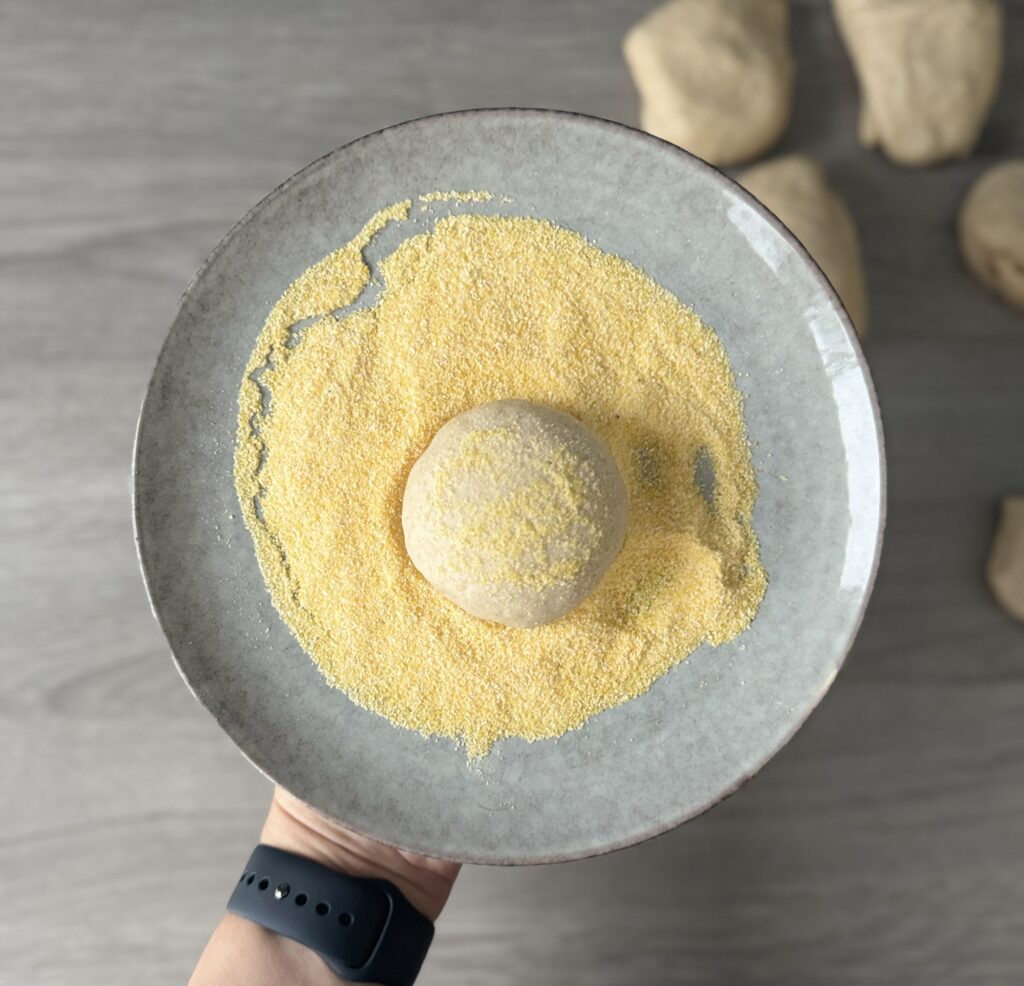
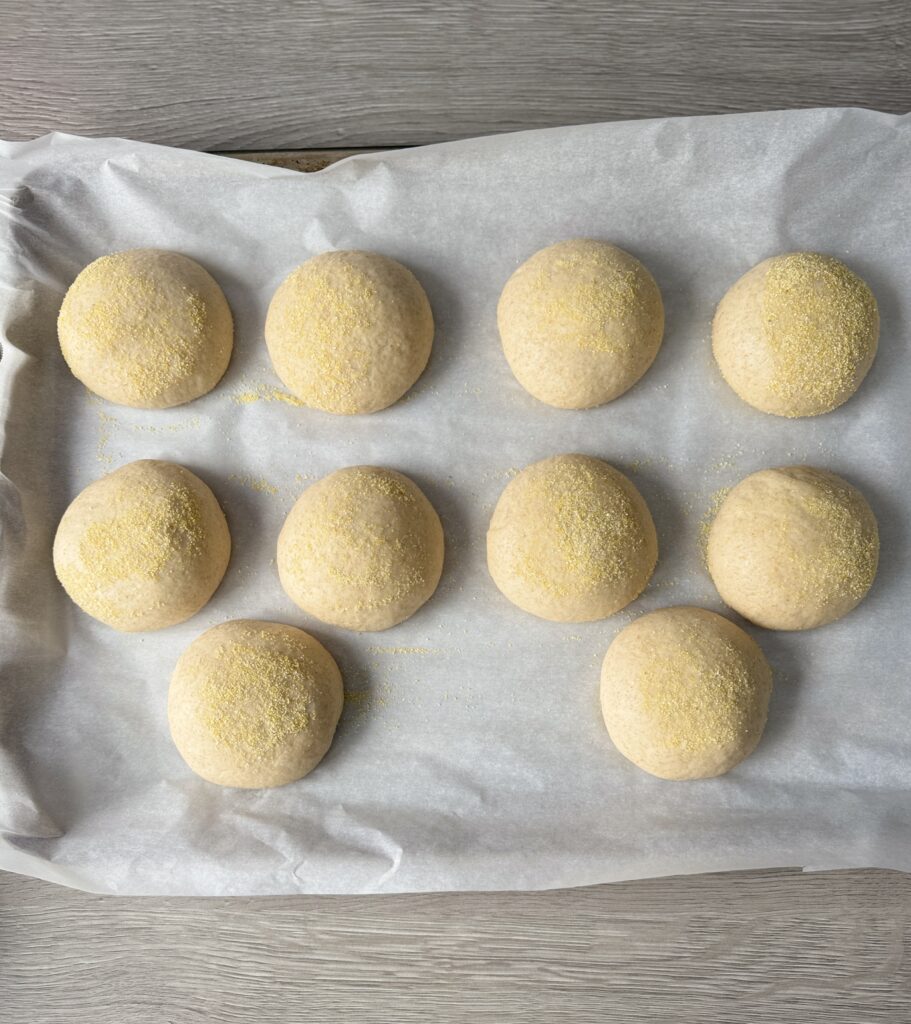
- The next morning, line a large baking sheet with parchment paper and generously sprinkle it with cornmeal (this will help the English muffins not stick to the parchment paper while proofing). Also, prepare a separate plate with cornmeal for coating the dough rounds.
- Turn the dough out onto a lightly floured surface and divide it into 10 equal pieces (about 85–90 grams each).

- Gently shape each piece into a smooth ball by tucking the seams underneath and pulling the dough toward you to create surface tension. It is normal for the dough to be a little sticky use some extra cornmeal to assist with this. Rice flour works great too!


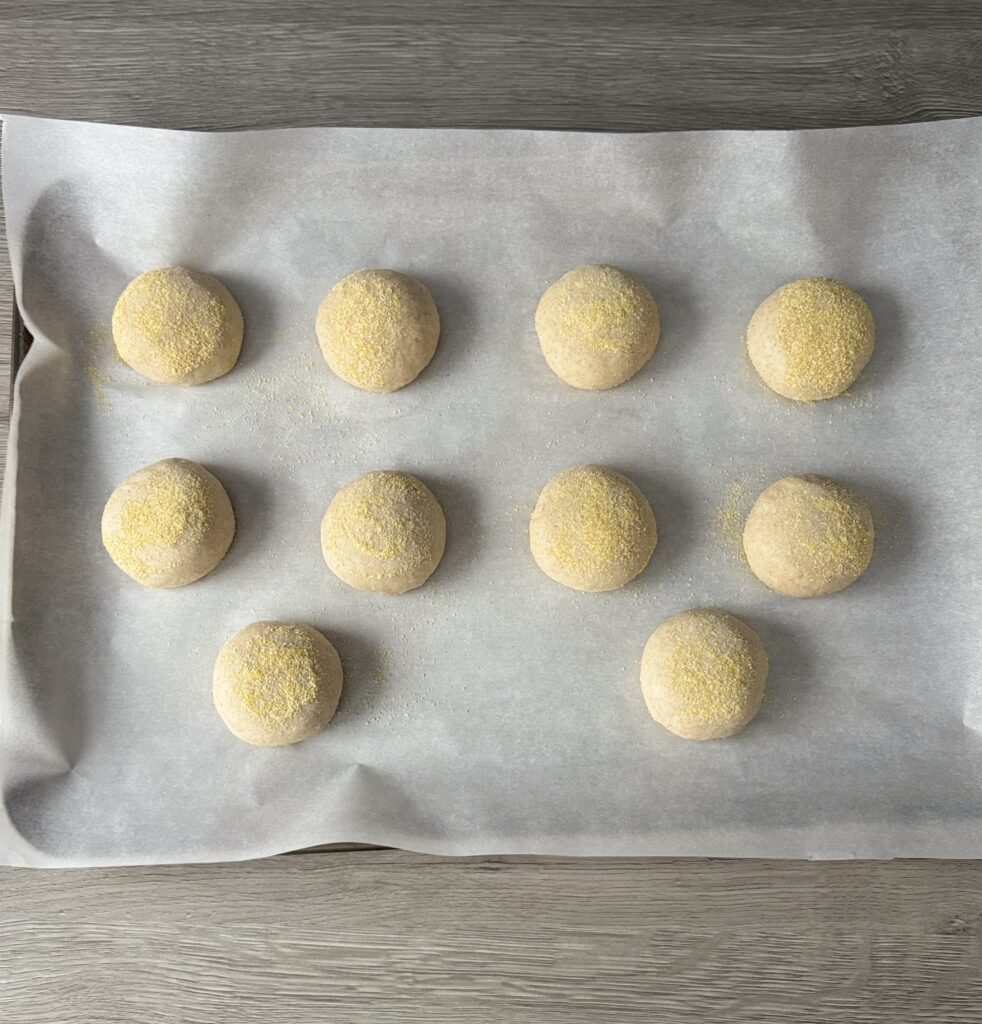
- Dip both sides in cornmeal and set the muffins on the parchment paper lined pan spaced slightly apart.

- Cover the dough with oiled plastic wrap or a dampened towel and let them rest until doubled in size (3-5 hours) depending on the temperature in your home.
I love using these proofing bags for covering my large baking trays!
Pro tip: Place the tray in the oven with the light turned on for gentle warmth.
Bake the honey wheat sourdough English muffins
- The honey wheat sourdough English muffins are ready to be baked once they are doubled in size, airy, and puffy. They should be very light and delicate to the touch. This step is key to developing those classic nooks and crannies, don’t rush it!
- Once the honey wheat sourdough English muffins have finished their second rise, preheat the oven to 350 degrees F and heat a nonstick or cast iron skillet over low heat and add a tablespoon of butter.
- Working in batches of 3 or 4, gently transfer the muffins to the skillet (lightly oil a spatula for easy transferring) and cook for about 3 minutes on each side, or until lightly golden and set on the surface.
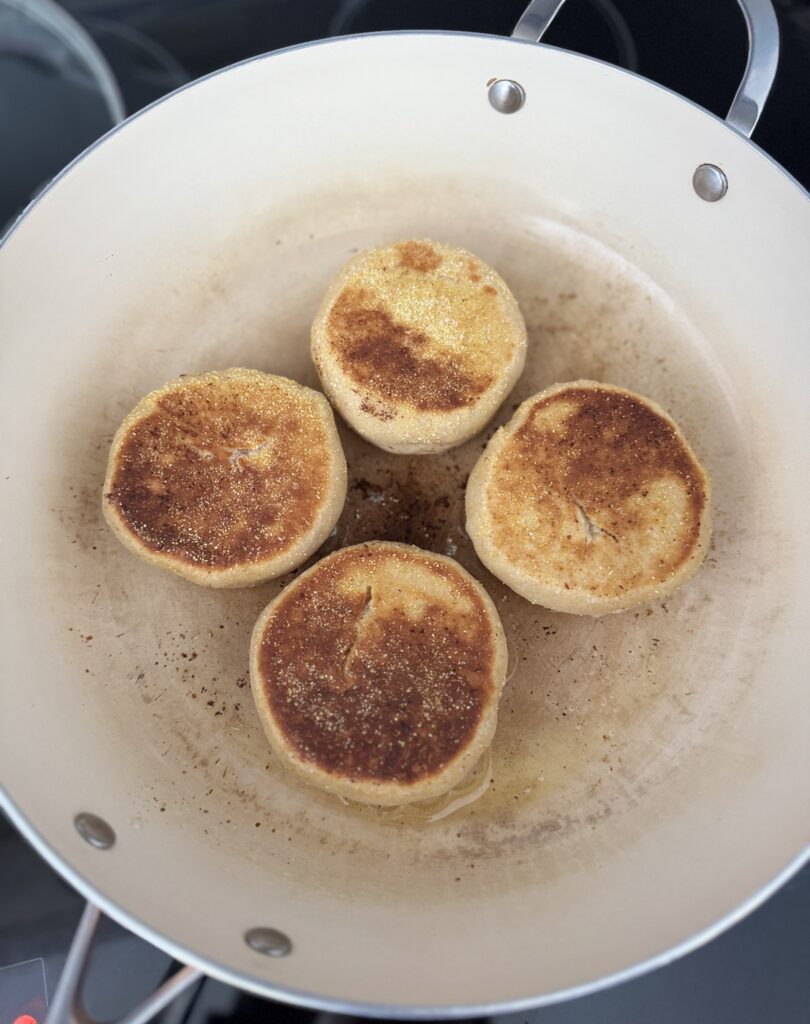

- Once the muffins are griddled, transfer them back to the parchment-lined sheet pan and bake for 12 to 15 minutes, or until fully cooked through. The internal temperature should reach 200–205°F (93–96°C) to ensure doneness.
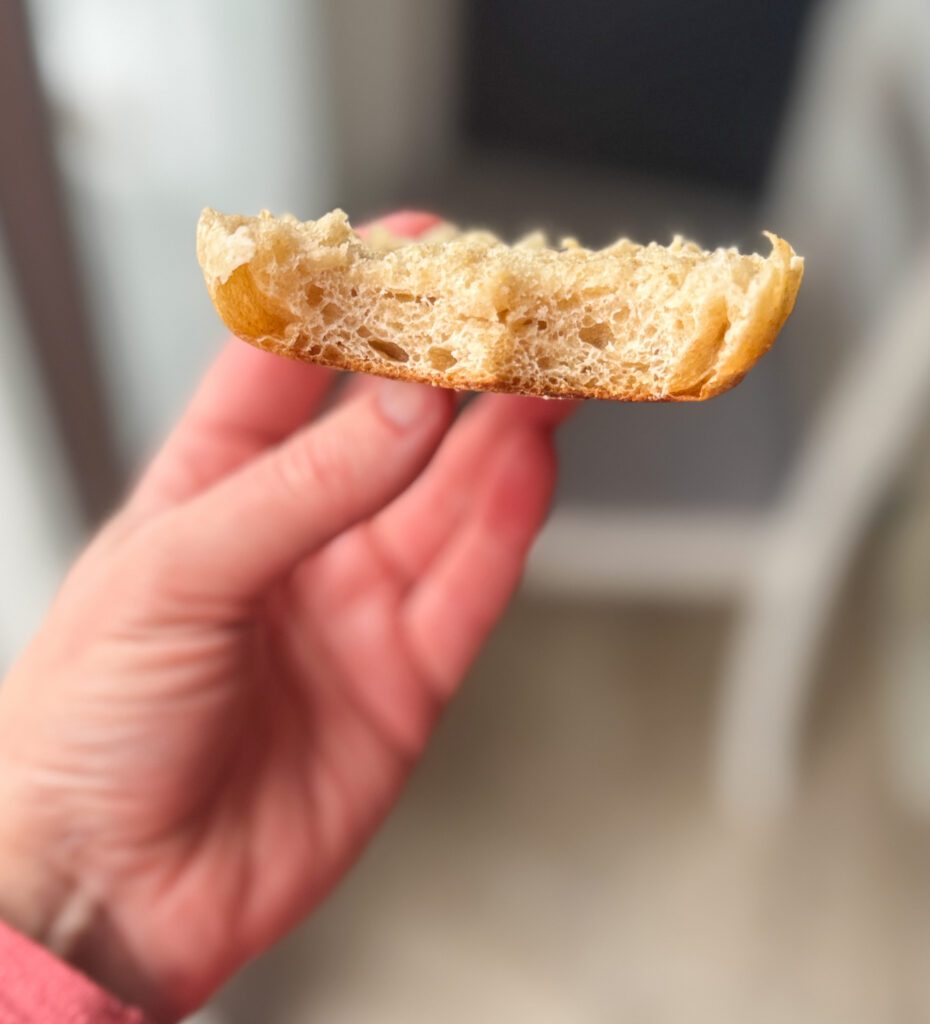
- Allow the honey wheat sourdough English muffins to cool completely before splitting open with a fork to reveal the light, airy crumb. If you slice the English muffins while they’re still warm, the crumb may appear dense and gummy.


- Honey wheat sourdough English muffins toast beautifully and are the perfect match for salted butter & a drizzle of honey!
Storage Instructions
- Allow English muffins to cool completely before storing. For short-term storage, keep them in an airtight container at room temperature for up to 2 days.
- For the best long-term freshness, freeze the muffins in a zip-top bag or airtight container. To reheat, simply toast them straight from frozen, this preserves their texture and flavor beautifully, just like they were freshly made.

More sourdough English muffin recipes
- Cinnamon Raisin Sourdough English Muffins
- Bacon Cheddar Chive Sourdough English Muffins
- Everything Bagel Sourdough English Muffins
- Pumpkin Spice Sourdough English Muffins
- Sourdough English Muffins (overnight recipe!)

Soft Honey Wheat Sourdough English Muffins (overnight recipe)
Soft, fluffy sourdough English muffins sweetened with honey and made with a blend of whole wheat and bread flour for rich flavor and classic nooks and crannies, an easy overnight recipe!
Equipment
- Food scale
- Mixing bowl
- Bench/dough scraper
- Large baking sheet
- Parchment paper
Ingredients
For the sweet levain (optional)
- 15 grams active sourdough starter (fed within the last 48 hours )
- 15 grams sugar
- 40 grams water
- 40 grams flour (all-purpose or bread flour)
For the dough
- 80 grams of sweet levain (from above OR regular active sourdough starter)
- 110 grams milk
- 160 grams water
- 60 grams honey
- 30 grams avocado oil (OR melted unsalted butter )
- 336 grams bread flour
- 84 grams whole wheat flour
- 9 grams salt
- 1/4 cup cornmeal (for dusting the English muffins)
- 1-2 tablespoons unsalted butter (for frying the English muffins)
Instructions
Make the sweet leavin (if using)
-
In the morning mix together the sourdough starter, sugar, and water in a small jar until mostly dissolved. Then add the flour and mix until combined. Cover the jar loosely, and let it rest until doubled in size (8-10 hours).
Mix the dough
-
**The dough can be mixed by hand or a stand mixer
In the evening, (once the levain has doubled in size), combine the levain, milk, water, honey, and avocado oil (or melted butter if using). Stir to combine. Using cold milk is perfectly fine—it helps slow fermentation, making it ideal for a long overnight rise without the risk of overproofing.
-
Next, add the bread flour, whole wheat flour, and salt until a shaggy dough is formed. It will be very sticky- this is normal.
-
Cover the dough and let it rest for 20-30 minutes to relax and hydrate.
Knead the dough
-
Return to the dough after it has rested and build some strength in the dough. Knead it in the bowl for 3-5 minutes with a little flour, then let it rest for 10-15 minutes. This allows the gluten to relax, making it much easier to finish kneading.
Pro Tip: The key with this dough is not to overwork it too much or it will continue to feel stickier. To avoid overworking it or adding too much flour, letting the dough rest in between kneading will help.
-
After the dough has rested, place it on a lightly floured surface and knead it for another 3-5 minutes using small amounts of flour.
-
Once finished, place it in an oiled bowl, cover it and let it rest for 30 minutes.
-
Perform 1-2 stretch and folds (spaced 30 minutes apart) to the dough after it has rested, cover it, and let it rest overnight (8-10 hours) at room temperature (68-70 degrees F).
*If your kitchen is warmer than this, I recommend moving the dough to the refrigerator and finishing the proof the next day.
Shape the honey wheat sourdough English muffins
-
**Before shaping the English muffins please refer to Tips for handling sticky dough to set you up for success!
By morning, the dough should look domed, puffy, and well-risen.
-
Line a large baking sheet with parchment paper and generously sprinkle it with cornmeal (this will help the English muffins not stick to the parchment paper while proofing). Also, prepare a separate plate with cornmeal for coating the dough rounds.
-
Turn the dough out onto a lightly floured surface and divide it into 10 equal pieces (about 85–90 grams each).
-
Gently shape each piece into a smooth ball by tucking the seams underneath and pulling the dough toward you to create surface tension. It is normal for the dough to be a little sticky use some extra cornmeal to assist with this. Rice flour works great too!
-
Dip both sides in cornmeal and set the muffins on the parchment paper lined pan spaced slightly apart.
-
Cover the dough with oiled plastic wrap or a dampened towel and let them rest until doubled in size (3-5 hours) depending on the temperature in your home.
I love using these proofing bags for covering my large baking trays!
Pro tip: Place the tray in the oven with the light turned on for gentle warmth.
Bake the honey wheat sourdough English muffins
-
The honey wheat sourdough English muffins are ready to be baked once they are doubled in size, airy, and puffy. They should be very light and delicate to the touch. This step is key to developing those classic nooks and crannies, don’t rush it!
-
Once the honey wheat sourdough English muffins have finished their second rise, preheat the oven to 350 degrees F and heat a nonstick or cast iron skillet over low heat and add a tablespoon of butter.
-
Working in batches of 3 or 4, gently transfer the muffins to the skillet (lightly oil a spatula for easy transferring) and cook for about 3 minutes on each side, or until lightly golden and set on the surface.
-
Once the muffins are griddled, transfer them back to the parchment-lined sheet pan and bake for 12 to 15 minutes, or until fully cooked through. The internal temperature should reach 200–205°F (93–96°C) to ensure doneness.
-
Allow the honey wheat sourdough English muffins to cool completely before splitting open with a fork to reveal the light, airy crumb. If you slice the English muffins while they’re still warm, the crumb may appear dense and gummy.
-
Honey wheat sourdough English muffins toast beautifully and are the perfect match for salted butter & a drizzle of honey!
Storage Instructions
-
Allow English muffins to cool completely before storing. For short-term storage, keep them in an airtight container at room temperature for up to 2 days.
-
For the best long-term freshness, freeze the muffins in a zip-top bag or airtight container. To reheat, simply toast them straight from frozen, this preserves their texture and flavor beautifully, just like they were freshly made.
Notes
Baker's schedule: Make the sweet levain in the morning, mix the dough in the evening and allow it to rest overnight (8-10 hours) at room temperature (68-70 degrees F). Shape the English muffins the following morning, allow to rest until doubled in size (3-5 hours) and bake.
Need more time? After the first rise, the sourdough English muffin dough can be refrigerated for up to 24 hours for added flexibility and flavor development.
Do I have to use a sweet levain? No. A regular 100% hydration sourdough starter works perfectly. Just make sure it’s active, bubbly, and at its peak when you mix the dough. Keep in mind, it may produce a slightly more tangy flavor.
Can I use more whole wheat flour than the recipe calls for? Yes, you can substitute more whole wheat in place of the bread flour. Just keep in mind that whole wheat is a thirstier flour, so you may need to add a bit more water as you increase the amount to keep the dough soft.
Have a question? Be sure to check out the troubleshooting section in this article for helpful tips and answers.

Comments